

De un vistazo – Quick look
MATERIAL Y PIEZAS
MEDIA & PARTS:
- Plástico inyectado (222 piezas).
- Injected molded styrene (222 parts).
CALCAS – DECALS:
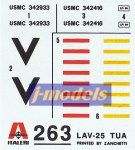
- Hoja pequeña que contiene dos pares de códigos del USMC, bandas para los misiles TOW y chevrones de identificación. Finas, resistentes y con escasa película transparente.
- Small sheet containing two pairs of USMC vehicle codes, color stripes for the TOW missiles and single chevrons used in the Gulf War. Thin, resistant to setting solutions and without too much carrier film.
OPCIONES – OPTIONS:
- LAV-AT pintado sólo en color arena (FS33531). Sin datos de unidad o localización. Parece corresponder a un vehículo del USMC de la Guerra del Golfo.
- LAV-AT camuflado en arena (FS33531) y verde hierba (FS34097). Sin datos de unidad o localización.
- Overall sand LAV-AT (FS33531). No other identification or setting is given, but it seems to correspond to a USMC LAV-AT in the Gulf War.
- Camouflaged LAV-AT in sand (FS33531) and field green (FS34097). No unit or setting identification.
INSTRUCCIONES – INSTRUCTIONS:
- Folleto vertical grande. Contiene diagrama de piezas, 13 pasos de montaje, pequeño resumen histórico-técnico en varios idiomas, referencias de color (Model Master y Federal Standard) y esquemas de pintura.
- Long leaflet containing parts diagram, 13 assembly steps, a brief historical and technical summary about the vehicle in several languages, color references (Model Master and Federal Standard) and painting guide.
LO MEJOR – THE BEST:
- Maqueta sencilla de montar y al alcance de cualquier modelista.
- Straightforward assembly even for the novice modeler.
LO PEOR – THE WORST:
- Interior escaso e inexacto. Carece de hueco en el casco bajo la cúpula del comandante (!). Necesita detallado.
- Incomplete and unrealistic interior. There is no hole in the hull under the commander’s cupola (!).
VALORACIÓN – CONCLUSION:
- Maqueta básica de este vehículo. Más barata y desfasada que las de otros fabricantes (Trumpeter, por ejemplo).
- Basic kit of this vehicle, inexpensive but a bit outdated compared to more recent releases from other manufacturers (Trumpeter, for instance).

La referencia 263 de Italeri tiene en realidad dos ediciones distinguibles por el dibujo de la caja. Ignoro cuál es el orden cronológico de ambas, apostaría a que esta que comento sería la más antigua, mientras que la que aún se puede encontrar en comercios, y que muestra este vehículo avanzando de frente, es la más reciente. En cualquier caso, el molde debe ser idéntico, aunque no sé si también las versiones de pintura y calcas. En la misma línea y por el mismo tiempo Italeri también sacó el LAV-25 Piranha y la versión portamortero que, obviamente, comparten el mismo molde.
La maqueta comprende tres bastidores, una pequeña hoja de calcas y las instrucciones. Aunque esta maqueta puede situarse en un punto intermedio entre las más antiguas de Italeri y las actuales, el plástico tiende a ser más duro que blando pero presenta menos marcas de eyector en lugares visibles que haya necesariamente que rellenar. Tampoco hay rebabas dignas de mencionar. Las piezas son razonablemente finas si bien las más delgadas, como las asas, pueden mejorarse con hilo de cobre. En conjunto la maqueta está aceptablemente detallada en su parte superior y bastante menos en los elementos inferiores, tales como suspensión y dirección. La ventaja es que las ruedas tapan en parte muchas carencias de detalle en esas zonas. En cualquier caso, esta maqueta se beneficia especialmente si se dedica un tiempo extra a mejorar ciertos detalles. El fotograbado de Eduard (35415) sin ser demasiado exhaustivo, cubre bastante bien tanto detalles genéricos como correas, rejillas, etc., como otros más específicos del interior o del sistema lanzamisiles. El montaje es sencillo en general y el encaje es de regular a bueno con algún desajuste mayor en la pieza 34A (parte trasera del casco) de mi maqueta por estar ligeramente deformada y en el lanzador de misiles que comentaré luego. Salvo rellenar algunas líneas de unión en el casco, la maqueta no tiene más problemas serios de construcción.
A diferencia de otras maquetas más actuales de esta familia de vehículos (las de Trumpeter y AFV Club, para entendernos), Italeri ha incluido parte del interior. Aunque no he encontrado imágenes reales del mismo, lo que tenemos en la maqueta parece cuando menos bastante imaginario: un soporte con 8 misiles TOW y un asiento que mira hacia la parte trasera del vehículo. Desde luego, mejor eso que nada, ya que permite dejar las escotillas traseras abiertas y mostrar algo del interior. El asiento desde luego convence bastante menos que los proyectiles. Los misiles vienen en dos piezas longitudinales y están huecos en su parte inferior de modo que asienten en sus soportes. Detalle bastante pobre si se quiere, pero una gran ventaja a la hora de pintarlos. Si se desea usar las bandas rojas y amarillas que traen las calcas (no lo recomiendo, es mejor pintarlas directamente), ha de tenerse en cuenta que transparentan el color de debajo.
En la parte inferior, Italeri ha simplificado mucho la dirección y suspensión del vehículo. Para ahorrar piezas y trabajo al modelista, gran parte de la dirección de las cuatro ruedas delanteras viene en una sola pieza y cuesta encajarla en la parte inferior del casco. Un poco de lija bastará para que pueda asentar horizontalmente. La suspensión también es deficiente en detalle pero ajusta bien sin esfuerzo. La parte inferior incluye las hélices y los timones dobles a ambos lados del vehículo. Las ruedas son de plástico y vienen en dos mitades que ajustan muy bien. No se incluye la rueda de repuesto que llevan las versiones más modernas de este vehículo, pero el detalle es aceptable si no se desea reemplazarlas por otras de resina y desde luego me parecen mejor solución que las de vinilo, material por el que tengo especial desapego.
En la parte trasera, ambas puertas pueden mostrarse abiertas e incluyen detalle suficiente (cierres y visores) por ambos lados. Las dos mitades del casco ajustan aceptablemente bien sin tener que emplear cantidad de masilla y lija gracias a que la parte superior es un poquito más ancha que la inferior. Un suave lijado del casco de abajo a arriba (en lugar de en sentido inverso, como señalan las instrucciones) permite que la unión en ángulo sea perfecta. En la parte superior Italeri no ha pasado por alto la mayor parte de detalles, pero hay al menos tres cosas importantes que mejorar: las escotillas superiores pueden pegarse abiertas o cerradas, el único problema es que la del comandante carece de hueco en el casco como si fuese una puerta tapiada. No sé si es que a Italeri se les pasó este detalle o es que decidieron por su cuenta que no se abriese. En cualquier caso, es un error solucionable con sólo cortar el hueco correspondiente. También falta ahí la ametralladora M240 que puede verse en fotos de estos vehículos tomadas durante la Guerra del Golfo y que acertadamente se cita entre el armamento de los LAV-AT en la reseña técnica de las instrucciones. Otra posible mejora son los lanzadores de fumígeros, que vienen de una pieza y cuyo soporte está moldeado junto con el casco. La impedimenta se compone de tres contenedores de agua/combustible (parece que de la II Guerra Mundial) y una lona enrollada de escaso detalle.
Los últimos pasos del montaje están dedicados al lanzador M901 Hammerhead. Básicamente consta de tres ensamblajes principales: el lanzador en sí, el soporte plegable y la cúpula del artillero. El mayor inconveniente aquí es que la parte superior e inferior dejan un hueco considerable que se debe rellenar con plástico. También hay que refinar algunas piezas que permiten que el conjunto se pueda mostrar en posición de disparo o de transporte (para lo cual el sistema y la cúpula giran, quedando la salida de misiles orientada hacia detrás).
Las calcas vienen en una hoja pequeña, que parece suficiente dado que uno no puede esperar de esta maqueta que además incluya los numerosos estenciles que llevan los LAV por todas partes y que no se identifican tampoco las dos versiones de pintura que proponen las instrucciones. Se incluyen, además de las bandas de los misiles ya comentadas, dos chevrones usados en la Guerra del Golfo y dos pares de códigos de vehículos del USMC. El vehículo en color arena corresponde a dicha contienda, aunque también podría pintarse en el usual esquema tricolor OTAN con el que también combatieron en ella. La otra opción de pintura en verde y arena corresponde más bien a los colores usados por los LAV australianos, aunque su uso en maniobras de los Marines en EE.UU. está documentado si se busca con cierta paciencia en internet.
En resumen, esta es una maqueta de tres noes: no muy detallada, no difícil de montar y (comparada con las más recientes) no muy cara. Aunque hay ya versiones más recientes de este vehículo, como el LAV III AT de Trumpeter, esta parece ser la única actualmente en el mercado (en sus dos cajas diferentes) que corresponde a un LAV-AT inicial del USMC.◊


Italeri’s reference #263 has had two different artboxes. I suppose this one was released first and the second, which can still be found in the market and shows a front view of the advancing vehicle, is more recent. Most probably the tooling must be the same, but I don’t know whether the decals and painting options are identical as well. Italeri also released two other LAVs, the Piranha and the mortar carrier versions, which obviously share the same tooling.
The kit consists of three dark olive green sprues, a small decal sheet and the instructions. The kit can be considered a midpoint between Italeri’s older releases and the most recent ones, the plastic is rather on the hard side but there are fewer ejector pin marks in visible locations to contend with than usual. Parts are flash free and reasonably thin although handles and some other thinner parts will be enhanced if they are replaced by copper wire. Overall the kit is acceptably detailed on the hull but far less in the direction and suspension. Most of the missing detail under the hull won’t be seen as the wheels will cover them once the model is finished. As any other kit, this LAV-AT will benefit if one spends some time improving some details. Eduard PE set #35415 without being very thorough, caters well for both the generic details such as grills, straps and the like and also the interior or the missile launcher. Assembly is easy and straightforward in general and the fitting ranges from middling to good with some minor problems in part 34A (rear wall of the hull) which comes slightly distorted n my kit and the launcher. Apart from filling some joins in the hull, the kit has no other serious assembly concerns.
Unlike more recent kits of the LAV family by other manufacturers (namely Trumpeter and AFV Club), Italeri included part of the interior. I haven’t found pics of this AT version but judging from what we have in the box it seems most, if not all, is quite unreal to say the less: a rack containing 8 TOW missiles and a seat facing the rear of the vehicle. Well, better this than nothing, as you can show part of the interior with rear hatches open. The seat is of course less convincing than the ammunition. TOWs come in two parts and are hollow below so that they can lay flat on the rack. Poor detail if you want, but a good advantage to paint them. If you want to use the red and yellow decals for the missiles (I don’t recommend this, it’s better to paint them), you should know they reveal the base color.
In the bottom hull Italeri has reduced the number of the suspension and steering parts and the modeler’s work, the front steering gear comes in one part and it needs some trimming to make it lay flat. Suspension also lacks some detail but fits quite well onto the hull. There are also two propellers and four rudders for both rear bottom sides of the vehicle. Wheels are made of plastic and come in halves which fit well. There isn’t the spare wheel which more modern LAVs in the family include, but real pics of these early vehicles don’t show them either, so I think it’s OK as it is. Detail is acceptable if you don’t wish to replace the wheels by a resin set and of course I think they are better in plastic than vinyl, a material I’m not really very fond of.
Rear doors can be showed open or closed as said and are detailed with handles, locks and periscopes on both sides. The halves of the hull fit well, and you won’t need to use much putty and sanding as the upper half is slightly wider than the bottom one. Some light sanding of the joins bottom-up (instead of from top to bottom as the instructions suggest) will allow you to keep the angled profile straight. Italeri has included most of the important detail on the hull (grills, rearview mirrors etc.), but there are at least three items of major concern: hatches can be glued open or close, but the commander’s cupola does not have the opening on the roof which gives access to the interior. A big mistake, but avoidable with only opening the hole before gluing the cupola if you wish to show it open. Also the M240 machine-gun that can be seen in pics of the real vehicle is missing. This gun is correctly quoted as a part of the LAV-AT armament in the historical/technical summary in the instructions. A third improvement you can do are the smoke launchers, which come in one part with their holders molded on the roof. There are also three jerrycans (not usable as they look WWII containers) and a folded tarp that you can perfectly discard and replace.
The last assembly steps are focused on the M901 Hammerhead launcher. There are basically three major subassemblies here: the launcher itself, the folding system and the gunner’s cupola. The most important concern here is that the upper and lower halves of the turret do not fit together and there is a gap to be filled with strip plastic. Other than that, some parts should also be refined so that the armament can be showed in firing position or folded (for this the whole launcher and cupola turn round, with the twin muzzles facing backwards).
Decals come in a small sheet which is enough since one cannot hope this kit also includes the manifold stencils that LAVs sport all over and the instructions show no unit or setting identification for the painting options. The sheet includes a couple of chevrons used in the Gulf War, two pairs of USMC vehicle codes and the stripes for the TOWs already commented above. The painting guide shows a LAV-AT painted in overall sand as used in Gulf conflict and a camouflaged vehicle painted in field green over sand that looks like an Australian LAV but in fact the use of this scheme can also be seen in pics of training exercises in the U.S. that you can find on the Internet.
In short, this is a kit with three nots: not especially detailed, not difficult to build and (compared to more modern releases) not pricey. There are kits for more modern versions of this vehicle in the market, Trumpeter’s LAV III AT for instance, but this seems to be the only one which corresponds to an early USMC LAV-AT.◊
Actualizado – Updated: 4 / 2022
Actualizado Updated: 5 / 2017
Publicado – Published: 2 / 2011
©www.jmodels.net


Debe estar conectado para enviar un comentario.