
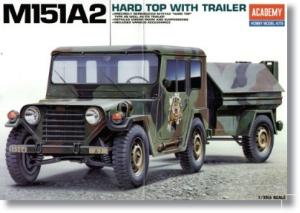
De un vistazo – Quick look
MATERIAL Y PIEZAS
MEDIA & PARTS:
- Plástico inyectado (M151A2: 146 piezas; tráiler: 49 piezas), plástico transparente (25 piezas), vinilo (7 piezas).
- Injected plastic (M151A2: 146 parts; trailer: 49 parts), clear plastic (25 parts), vinyl (7 parts).
CALCAS – DECALS:
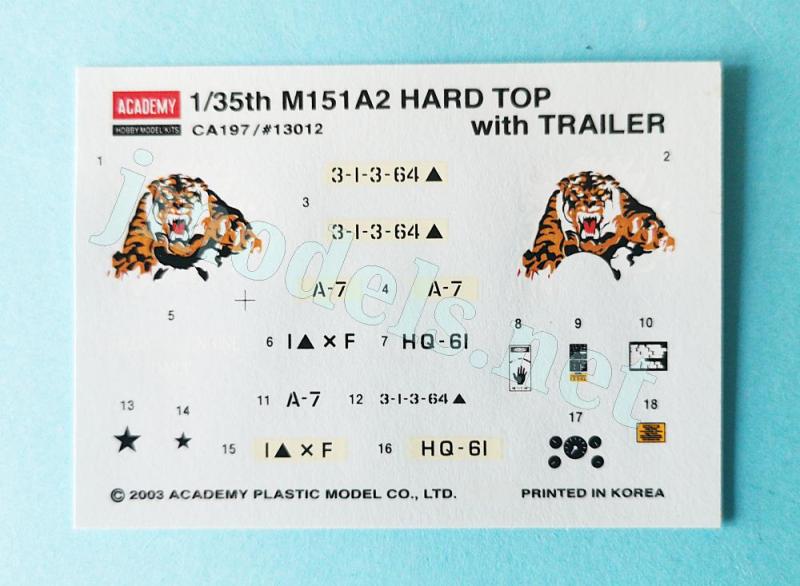
- Matrículas, marcas tácticas, instrumentos del salpicadero y estarcidos. Acabado fino y brillante, buen registro, nitidez y saturación. Poco exceso de soporte en la mayoría.
- Number plates, bumper numbers, dashboard instruments, unit markings and some stencils. Thin and glossy finish, good register, sharpness and saturation. Not too much carrier on most of them.
OPCIONES – OPTIONS:
- M151A2. US Army. 3rd Infantry Division. Grafenwöhr (Germany), 1987.
- M151A2. US Army. 1st Armored Division. Zendorf (Germany), 1988.
INSTRUCCIONES – INSTRUCTIONS:
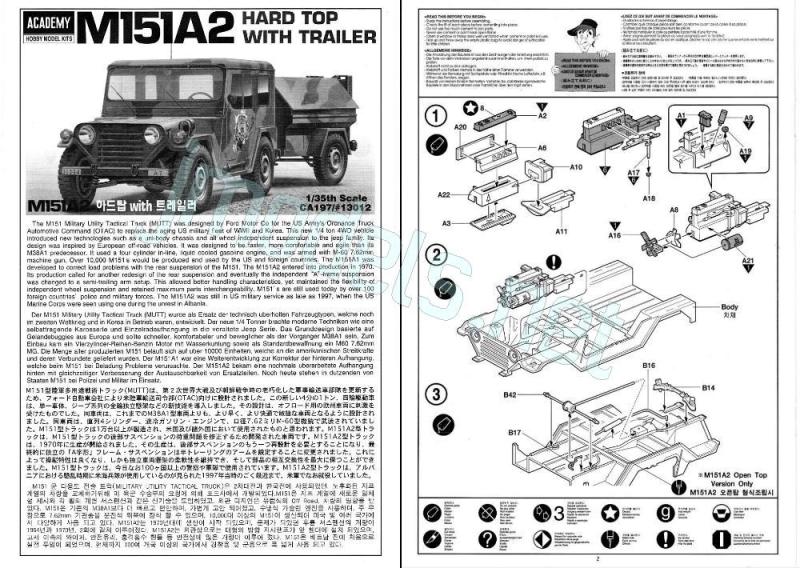
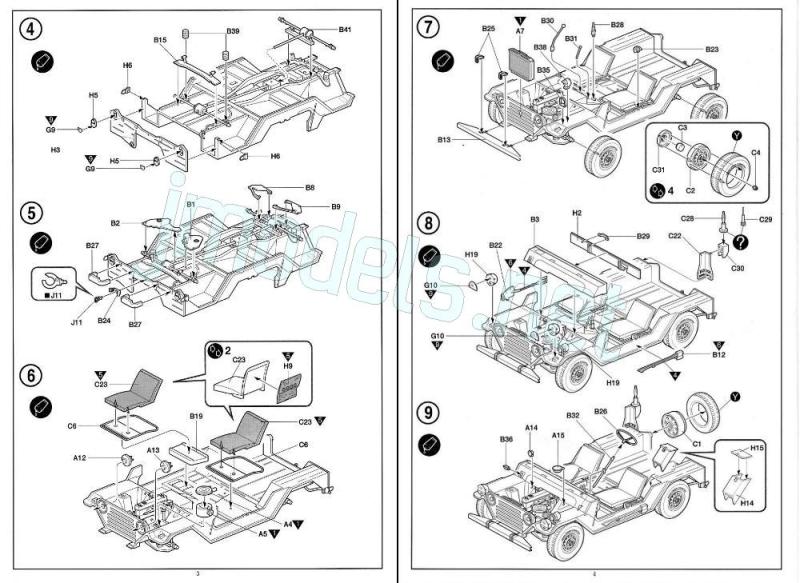
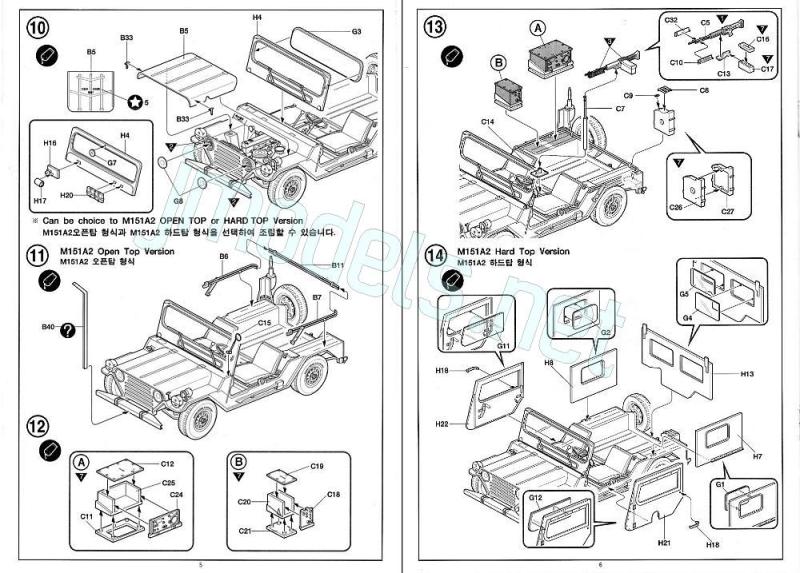
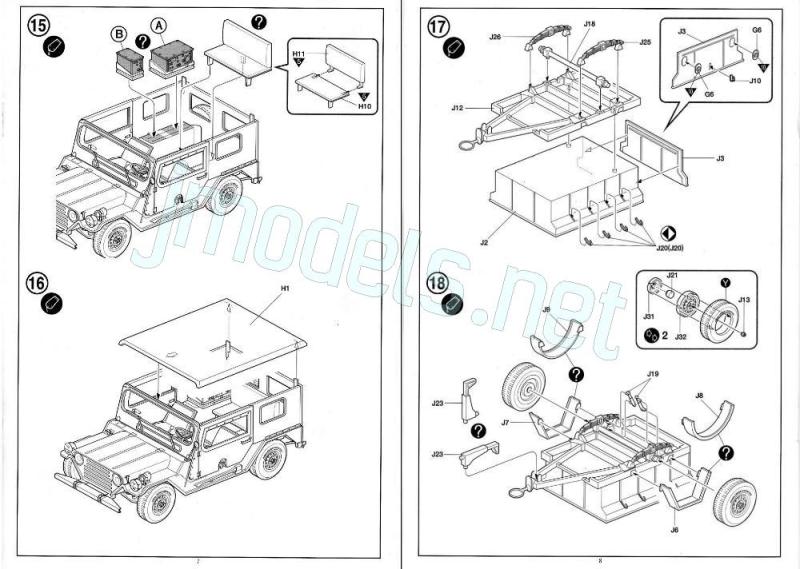
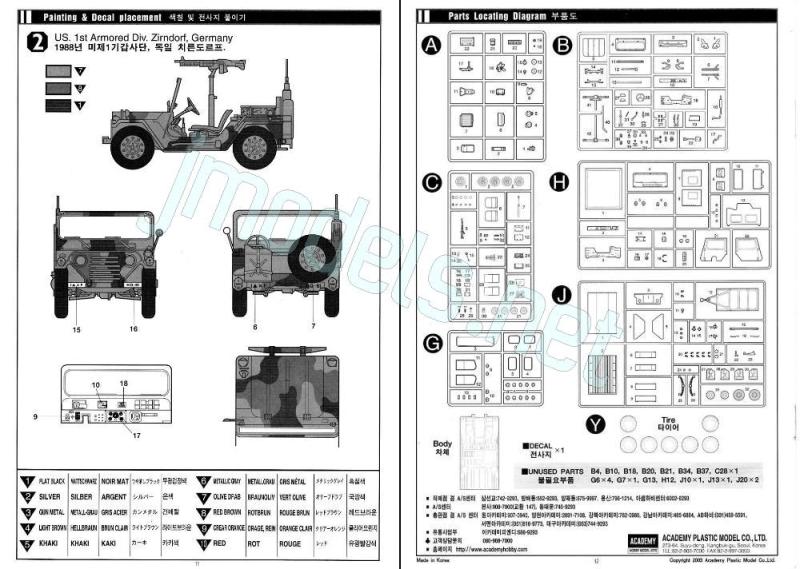
- Folleto A5 de 12 páginas impreso en blanco y negro. Contiene un plano numerado de piezas, una introducción histórica sobre el vehículo, una lista de colores genéricos, 20 secuencias de montaje y 2 páginas de perfiles.
- 12-page A5 booklet printed in black and white. It contains a numbered parts plan, a historical introduction to the vehicle, a list of generic colors, 20 assembly chapters and 2 pages of profiles.
LO MEJOR – THE BEST:
- Aparente sencillez de montaje. Incluye motor bien detallado y remolque. Errores corregidos con acierto respecto a maquetas anteriores. Permite escoger doble versión (con y sin techo).
- Apparent ease of assembly. Nice engine and trailer included. Corrected mistakes from previous kits. Choice for an open or hardtop version.
LO PEOR – THE WORST:
- Abundantes marcas de eyector en la versión con techo. Errores menores en ciertos detalles, pero rectificables.
- Lots of marks on the hardtop version. Some minor mistakes, but can be addressed.
VALORACIÓN – CONCLUSION:
- Única maqueta hasta ahora con la configuración de techo rígido, pero permite escoger una versión de reconocimiento. Bien detallada en general, es apta para modelistas con diferente experiencia. Con ciertas mejoras, puede convertirse en un modelo excelente de este vehículo.
- Only kit so far with a hardtop configuration, but it does allow you to choose a reconnaissance version. Generally well-detailed, it’s suitable for modelers with different experience. With some upgrades and changes, it can become an excellent model of this truck.

La maqueta
A partir de 2002 Academy introdujo su nuevo molde del Ford Mutt y dejó atrás las copias de la maqueta de Tamiya que venía lanzando en los años 80 y 90. Como ya escribí en otro lugar, las primeras maquetas de Academy son las mismas de Tamiya con ciertos cambios en forma de figuras que la marca coreana incluía para poner algo de su cosecha en ellas, además de sus propias calcas e instrucciones. Estas cajas también aparecieron con el sello Academy/Minicraft. Para comparar esta maqueta de molde renovado con la de Tamiya, el lector puede consultar la revisión que hice en su momento de una versión similar: U.S. M151A2 Ford Mutt with M416 Cargo Trailer (Tamiya 35130).
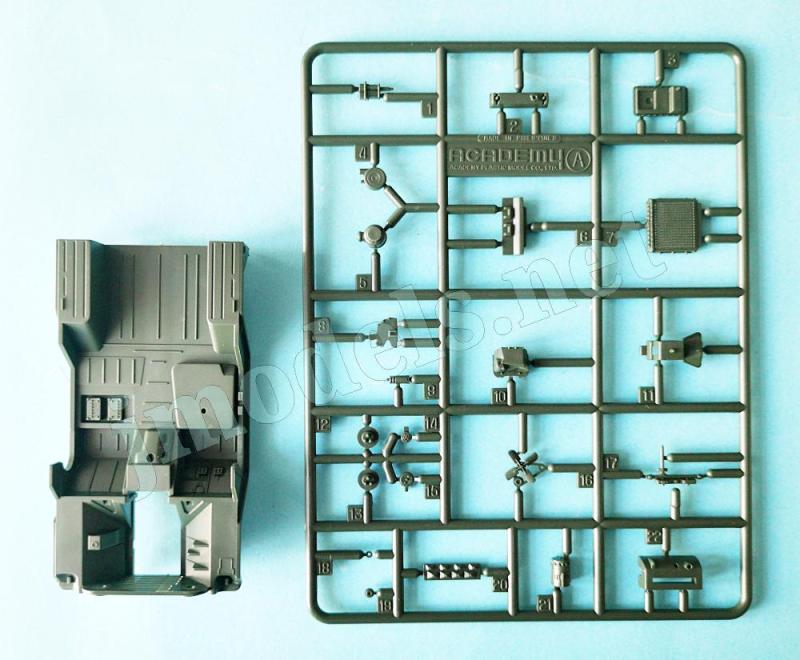
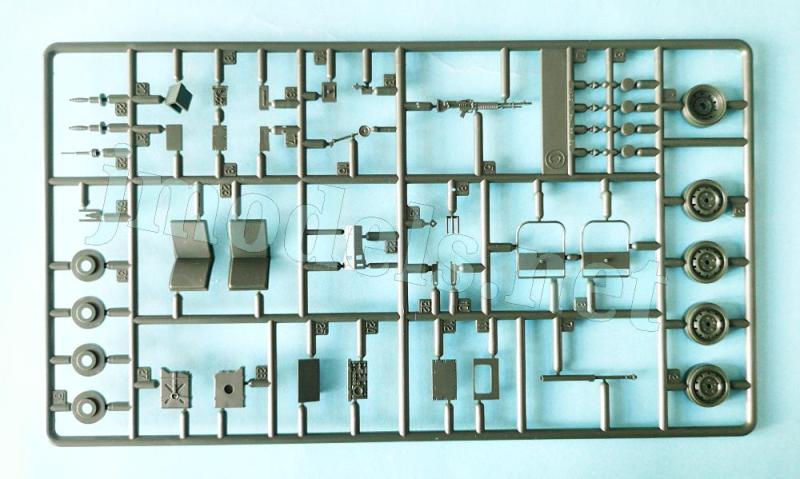
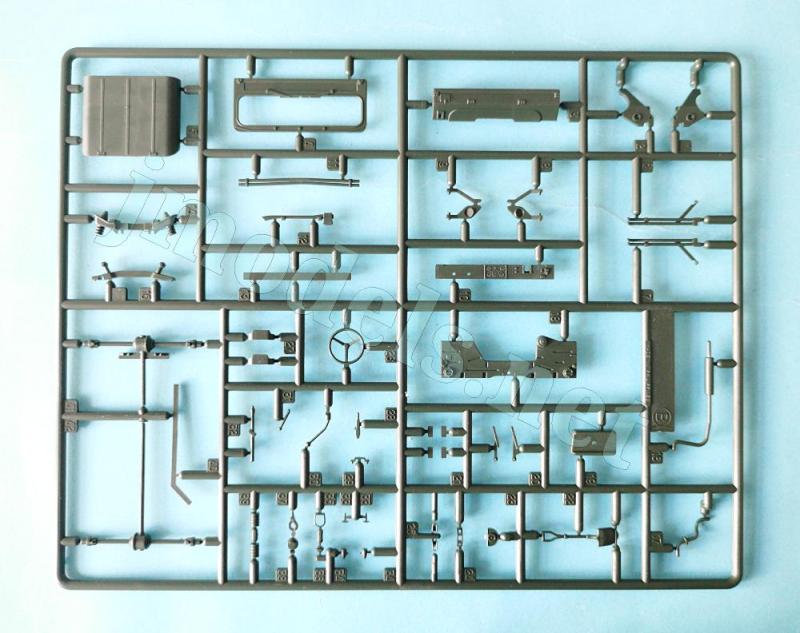
La caja trae siete bastidores de piezas, uno de ellos transparente, la carrocería separada, siete neumáticos de vinilo, la hoja de calcas y las instrucciones. Uno de los bastidores contiene las piezas del motor y otro las del remolque M416 (o M100, como veremos). El moldeado es bastante bueno y limpio. Las marcas de eyector importantes y visibles se ciñen a las caras internas de las puertas y paneles de la versión con techo así como a un lado interno del tráiler. Estas últimas sólo son relevantes si pretendemos dejarlo descubierto. Las más delicadas son las de las puertas porque están próximas a elementos moldeados en las piezas que podemos dañar si no andamos con cuidado. También hay un pequeño rechupe justo en el centro del retrovisor que debe rellenarse ineludiblemente.
La construcción del modelo no aparenta dificultades a primera vista. La maqueta permite terminar el vehículo con paneles laterales y techo, o bien descubierto dotado de radio y una ametralladora M60 emplazada sobre un pedestal entre los asientos delanteros. También el tráiler tiene algunas opciones que describiré más abajo.
Revisión
El motor consta de 15 piezas, entre ellas el bloque separado en mitades, el cárter, la tapa de balancines, el filtro de aceite, el motor de arranque, el ventilador y las correas. Poco más necesita que algunos cables y conductos para hacerlo más realista. La caja de cambios tiene dos piezas y es precisamente una de ellas, plana en su parte superior, la que nos ayuda a pegar el motor a la carrocería por debajo de la cubierta de la caja de cambios. El compartimento del motor de la carrocería posee más elementos alrededor, como el filtro de aire, el radiador o el claxon que se van añadiendo en capítulos posteriores del montaje.
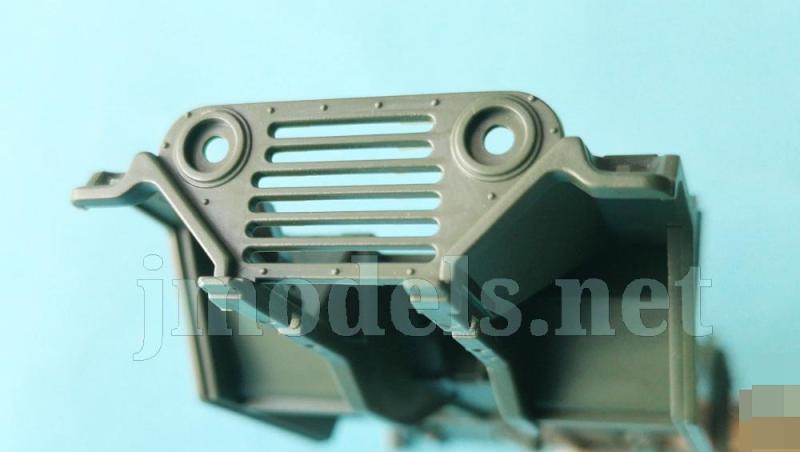
La carrocería de una pieza integra la parrilla delantera y el compartimento del motor ya mencionado. En la cabina tenemos las baterías en su compartimento debajo del asiento del acompañante, el depósito de combustible debajo del conductor y los pedales moldeados in situ. El acelerador está mal definido (parece en realidad un cable), pero se puede rehacer fácilmente. La parte trasera incluye la caja de transporte con molduras en relieve sobre el suelo y los guardabarros. La forma externa de los guardabarros traseros es correcta para el modelo A2, con el perfil posterior acabado en un saliente hacia abajo de forma rectangular. Sólo falta el panel trasero, que es una pieza aparte.
En la parte inferior de la carrocería tenemos una transmisión un tanto simplificada. Los ejes vienen moldeados con los diferenciales y una sección del eje de la transmisión en cada pieza. Los diferenciales son bastante simples y además no hay juntas en el eje. La suspensión delantera tiene los brazos separados, pero los amortiguadores son bastante flojos, ya que los muelles no son helicoidales sino meros anillos paralelos en relieve. Tampoco hay piezas para la barra estabilizadora. La suspensión trasera, acertada para el M151A2, tiene los mismos amortiguadores, pero separados de los brazos de suspensión. El tubo de escape es bastante fino e incluye el silenciador, pero no tiene la enrevesada forma del original. Además, carece de la extensión opcional que lo llevaba a aparecer por debajo del lado trasero izquierdo del vehículo.
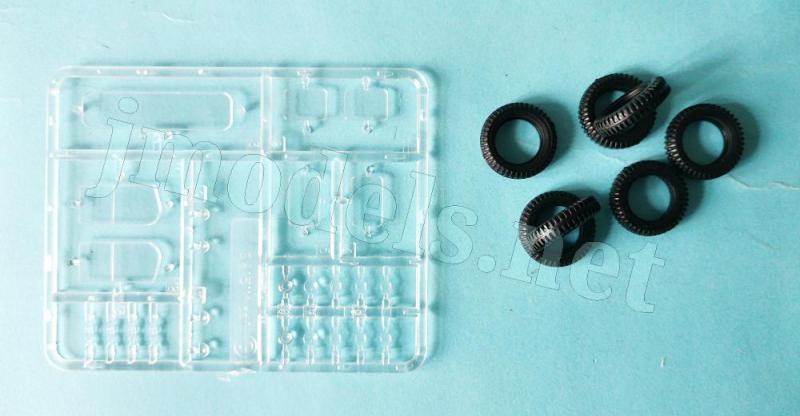
Las ruedas tienen las llantas separadas y los neumáticos de vinilo. Las llantas son mejores que las de Tamiya, ya que al menos tienen los agujeros abiertos y no simplemente marcados. La parte interna lleva un pequeño rodamiento y el tambor de freno. Los neumáticos de vinilo están limpios de líneas de molde y rebabas al estar fabricados por separado. Además, tienen el nombre del fabricante en relieve sobre los flancos. El dibujo de la banda de rodadura está bien definido, tal vez incluso demasiado. En cualquier caso, para el modelista es bueno saber que si no tiene otra alternativa, puede usarlos en la maqueta. Si se tiene aversión al vinilo, no parece aconsejable emplear los de Tamiya, ya que tienen algo maś de diámetro y la llanta es peor. Lo mejor es usar otros de resina, que los fabrican varias marcas.
La parte delantera está detallada con el paragolpes y los grilletes de remolque. Opcionalmente, también se puede añadir una barra cortacables demasiado gruesa. La parrilla carece, acertadamente, de las luces auxiliares del modelo A1. Los faros tienen las carcasas internas añadidas por detrás del panel frontal y las lentes transparentes. Sobre los guardabarros hay dos faros, también con las lentes en piezas transparentes y la luz de conducción nocturna con su guarda. El capó viene separado con sus pestillos aparte. Dado que la maqueta tiene un motor muy bien reproducido, Academy incluye una calca con el rótulo pintado en el lado interno del capó por si queremos mostrarlo abierto. Fenomenal.
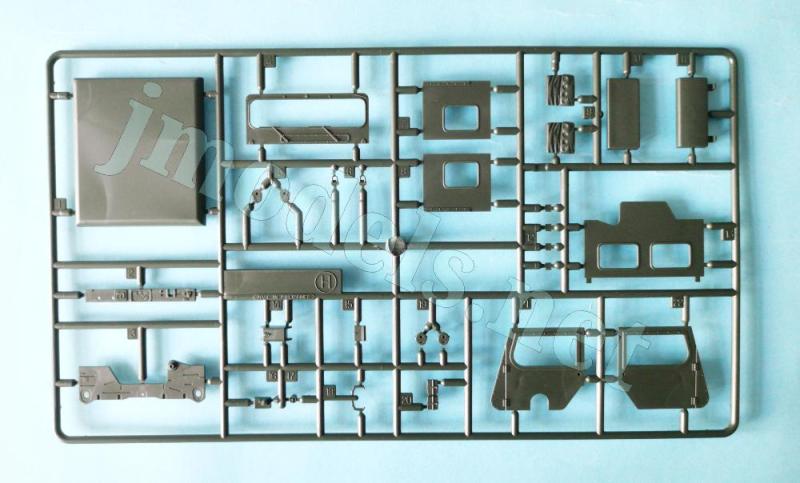
La maqueta proporciona los parabrisas del A1 y A2. El que nos interesa aquí es la pieza H4, con un solo motor a la izquierda y las escobillas paralelas indicando que se movían en el mismo sentido ambas, contrariamente a las del modelo A1. Además del motor, el lado interno lleva el retrovisor y otra pieza que no logro identificar. También hay un par de marcas de eyector que no deben dar mucha lata. El cristal es muy transparente, con una finura más que adecuada, juzgando por lo que suele ser habitual en esta escala.
En el lado externo los limpiaparabrisas están moldeadas en la pieza, pero son erróneos, porque las escobillas no eran perpendiculares a los brazos, sino rectas. Corregir este fallo no es tan sencillo, ya que hay que tener bastante tino y delicadeza para quitarlas del borde del marco y sustituirlas por plástico o fotograbado, pero sin duda se puede hacer. El retrovisor es fino, si bien hay que rellenar el pequeño rechiupe que mencionaba en la introducción. Es factible colocar el parabrisas plegado sobre el capó en la versión descubierta, aunque en principio la maqueta no está diseñada para ello.
Sobre el panel cortafuegos del motor hay que pegar el refuerzo del salpicadero. Este viene separado con el panel de instrumentos diminuto, pero bien definido, más una calca para detallarlo y un asidero para el acompañante. El volante es correcto para el Mutt A2, con radios más anchos y el centro hundido respecto al aro exterior, sin embargo la columna no tiene la palanca del indicador de giro. Las palancas de marcha y freno vienen aparte, al igual que la toma de combustible y una caja de respeto, ambas situadas junto al conductor. Los lados de la carrocería alojan un par de herramientas por debajo de las puertas, que en ocasiones no se instalaban.
Los asientos son de una pieza y no muestran textura. Las bases vienen separadas y son bastante finas, pero no tienen las patas de anclaje al suelo. Tras los repaldos tenemos bolsillos texturizados con el mismo patrón, por lo cual no parecen muy reales.
El panel trasero de la carrocería incluye los reflectantes. Las luces están separadas y provistas de lentes transparentes. El detalle integra los paragolpes, el enganche de remolque, un soporte de antena con la base separada, dos tipos de antenas opcionales y la rueda de repuesto, similar a las demás excepto en la llanta.
La versión sin techo contiene en la caja trasera el bastidor del toldo plegado y moldeado en tres piezas, un equipo de radio RT-524 con el emisor y receptor de muy buena factura, más una ametralladora M60 bastante aceptable con su caja de munición y pedestal separados, más un contenedor de combustible sobre el lado trasero.
La versión cubierta tiene todos los paneles laterales, el trasero y el techo independientes. Las ventanillas son bastante finas y muy transparentes en todos los casos. Los lados internos están plagados de marcas de eyector negativas, aunque superficiales en general. Salvo en las puertas, como he dicho, las demás no son difíciles de tapar. Lo malo del asunto es que no queda otra que hacerlas desaparecer, porque serán visibles a través de las ventanillas. Las puertas están moldeadas con una sección de la carrocería por delante y muestran las bisagras definidas. Las manetas externas son piezas separadas y el detalle del lado interior me parece al menos aceptable. Para mostrar las puertas abiertas habría que separarlas del panel delantero y reconstruir las bisagras.
El interior de esta versión tiene un asiento un tanto grueso y sin textura en la parte posterior además del mencionado equipo de radio como opción. Pese a que no se indica en el montaje, los perfiles de las instrucciones muestran que también se puede añadir en la parte trasera el mismo contenedor de combustible.
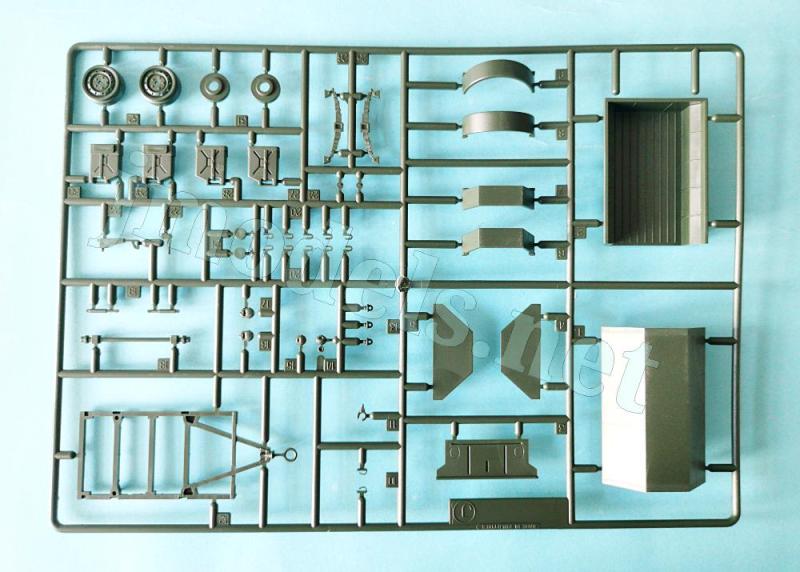
Un aliciente interesante es que la maqueta nos permite emplear un remolque con la versión con techo rígido. Sin que lo mencionen las instrucciones, en realidad se pueden construir dos modelos: el M100, más parecido al remolque del Jeep de la Segunda Guerra Mundial y empleado con el todoterreno M38 en Corea también, y el M416 / M416A1 posterior usado con los M151 en Vietnam y posteriormente.
El M100 posee guardabarros redondos y las luces traseras más grandes y alargadas en el frontal. El M416 / M416A1 lleva los guardabarros cuadrados y las luces traseras más redondas y pequeñas. Tanto los guardabarros como las luces están incluidas como alternativa en la maqueta. Sin embargo, faltan las asas de transporte en las esquinas de la caja. No deben ser muy difíciles de replicar.
El bastidor viene en una pieza unido al enganche delantero. Este enganche lleva el freno de mano y el pie de apoyo, que podemos colocar extendido o plegado. Por debajo de esta pieza hay un eje con sus ballestas bien definidas y pequeños amortiguadores. Las ruedas son idénticas a las del M151.
La caja de transporte es también de una pieza, pero el panel trasero está separado y lleva los reflectantes también aparte. Hay cuatro enganches a cada lado para el toldo. La caja no tiene marcas y muestra molduras nítidas sobre el suelo, sin embargo el panel trasero muestra dos marcas no muy profunas en la cara interna. No deben preocuparnos si no dejamos el tráiler sin tapar. Para la caja tenemos una cubierta de panel angulada en forma de caseta que consta de tres piezas, más dos contenedores de carburante opcionales enganchados en la cara trasera, que no parecen muy realistas en esa posición. Como alternativa, también podríamos cubrir el espacio con un toldo plano fabricado al efecto.
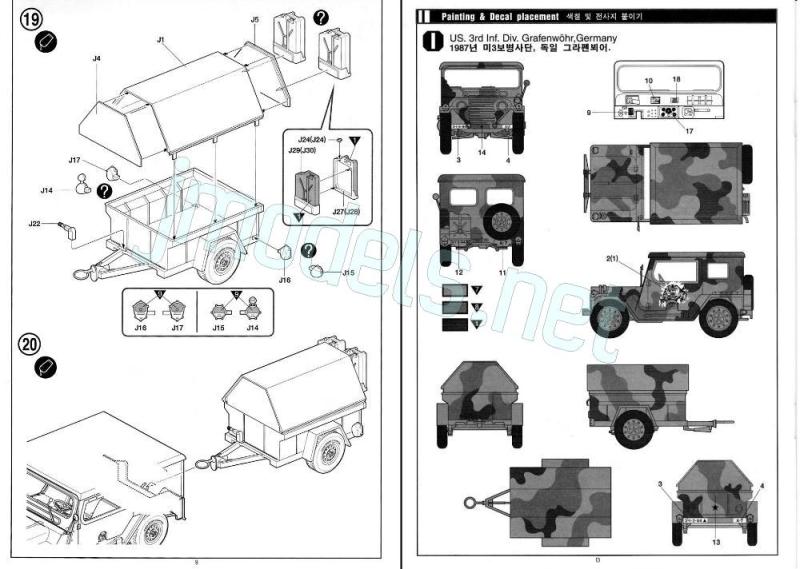
La hoja de calcas proporciona matrículas, marcas tácticas, instrumentos del salpicadero y estarcidos. Los motivos tienen un acabado fino y brillante, buen registro, nitidez y saturación. La película de soporte no excede mucho la parte impresa, salvo en un caso. Esta hoja está impresa por el fabricante y por eso hay que recomendar cautela ante sus posibles malos resultados.
El manual de instrucciones tiene un formato A5 y consta de doce páginas impresas en blanco y negro. Contiene una introducción histórica sobre el vehículo, un plano numerado de piezas, una lista de colores genéricos, 20 secuencias de montaje y dos páginas de perfiles.
Los dos vehículos, con y sin techo, que nos propone esta edición estuvieron basados en Alemania a finales de los años 80 y poseen los mismos patrones de camuflaje tricolor OTAN adoptado a apartir de 1984.
Valoración
Academy corrigió con gran acierto errores precedentes, singularmente los de sus antiguas maquetas copiadas de Tamiya, aunque todavía quedan detalles concretos del M151A2 que se pueden modificar sin gran esfuerzo. Sin duda redondearían el notable potencial que la maqueta trae de caja.
Por el momento, este modelo de techo rígido es la única maqueta del M151 con esta configuración en la escala 1/35 y el remolque adicional le da aún mayor atractivo. No obstante, es un acierto que también permita hacer un vehículo de reconocimiento con radio y ametralladora como alternativa.
Recomendable a los aficionados a los vehículos livianos, especialmente si son adictos al Jeep y toda su parentela de cuatro ruedas.◊

The kit
Starting in 2002, Academy introduced a new mold of the Ford Mutt, abandoning the copies of Tamiya’s tool they had been releasing in the 80s and 90s. As I’ve written elsewhere, Academy’s first Ford Mutt kits were the same as Tamiya’s, with some changes in the form of figures the Korean company included to add its own touch, along with its own decals and instructions. These kits also appeared under the Academy/Minicraft label. To compare this kit with Tamiya’s, the reader can check my review of a similar version: U.S. M151A2 Ford Mutt with M416 Cargo Trailer (Tamiya 35130).
The box contains seven sprues of parts, one of them clear, the separate body, seven vinyl tires, the decal sheet, and the instructions. One sprue contains the engine parts, and another provides the M416 (or M100, as we’ll see) trailer parts. The molding is quite good and clean. The most prominent and visible ejector marks are located on the inner sides of the doors and panels of the hardtop version, as well as inside the trailer body rear panel, these being relevant only if you wish to build the body open. The most delicate are those on the doors, as they are close to molded-in detail that can be damaged if you’re not careful. There’s also a small sink right in the center of the rearview mirror that needs filling.
Building the model doesn’t look difficult at first sight. The kit allows you to finish the vehicle with side panels and a roof, or as an open vehicle equipped with a radio and an M60 machine gun mounted between the front seats. The trailer also has some options, which I’ll describe later.
Review
The engine consists of 15 parts, including the block, which is split into halves, the crankcase, the rocker cover, the oil filter, the starter motor, the fan, and the belts, among others. It needs little more than a few wires and pipework to make it more realistic. The gearbox has two pieces, and it’s one of them, flat on top, that helps attach the engine to the body beneath the gearbox cover. The body engine compartment has more components around it, such as the air filter, the radiator, and the horn, all of them attached in later stages of assembly.
The one-piece body integrates the front grille and the engine compartment. Inside the cab, we find the batteries in their compartment under the passenger seat, the fuel tank under the driver seat, and the pedals molded in place. The accelerator is poorly defined (it actually looks like a cable), but I think it can be easily replaced. The rear section includes the cargo tray with raised moldings on the floor and the fenders. The external shape of the rear fenders is correct for the M151A2, with the rear side ending in a rectangular profile ant just straight. The body rear panel is molded separately.
Under the body, we find a simplified transmission. The axles are molded with the differentials and a section of the driveshaft in each piece. The differentials are quite basic, and there are no joints on the axle. The front suspension has separate control arms and the shock absorbers are rather poor, as the springs are not coiled but simply raised parallel rings. No sway bar is provided either. The rear suspension, correct for the M151A2, has the same shock absorbers, but they are separate from the control arms. The exhaust pipe is quite thin and includes the muffler. The piece does not have the intricate shape of the original. Also, it lacks the optional extension that allowed it to reach the left rear side of the vehicle.
The wheels have separate rims and vinyl tires. The rims are better than Tamiya’s, as they at least have open holes and aren’t simply engraved. The inner rim side has a small bearing and a brake drum. The tires are clean from seam lines and flash because they are molded separately. They also have the manufacturer’s name embossed on the sidewalls. The tread pattern is well-defined, perhaps even too much so. In any case, it’s good for the modeler to know that if he has no other alternative, he can use them on the kit. If vinyl tires aren’t your cup of tea, it doesn’t seem advisable to use Tamiya tires, as they are slightly larger in diameter and the rim is incorrect. It’s better to use resin tires, which are available from various brands.
The front end is detailed with the bumper and separate tow shackles. Optionally, a rather thick wire cutter bar can also be added. The grille, quite accurately, lacks the auxiliary lights of the Mutt A1. The headlights have their housings added behind the front panel and clear lenses. Above the fenders are two more headlights, also with clear lenses, and the blackout light with its guard. The hood and its latches are separate parts. Since the kit has a very detailed engine, Academy include the stencil on the inside in case we want to display it open. Well done.
The kit includes the windshields for the A1 and A2. The one we need here is part H4, with a single motor on the left and parallel wipers indicating that they both moved in the same direction, unlike those of the A1 model. In addition to the motor, the inner side has the rearview mirror and another part that I can’t identify. There are also a couple of ejector marks that shouldn’t cause much trouble. The glass is very clear, with a more than adequate thickness, judging by what is usually the case in this scale.
On the outside, the windshield wipers are molded in place, but they’re incorrect because the blades weren’t perpendicular to the arms, but straight. Correcting this isn’t that simple, as it requires considerable skill to remove them from the edge of the frame and replace them with plastic or PE, but it can certainly be done. The rearview mirror is thin, although the small sink I mentioned in the introduction needs to be filled. It’s possible to place the windshield folded on the hood in the open top version, although it’s not offered as an option.
The dashboard comes separately with the tiny but well-defined instrument panel, plus a decal for detailing it, and a grab handle for the passenger. The steering wheel is correct for the Mutt A2, with wider spokes and a dished wheel; however, the column lacks the turn signal lever. The gear and brake levers are separate, as are the fuel filler cap and a spare box next to the driver’s seat. The body sides house a couple of tools below the rocker panels. These tools were sometimes omitted.
The seats are one-piece molded without texture. The bases are separate and quite thin, but they lack the feet attached to the floor. Behind the seat backs are textured pockets with the same pattern, which makes them look somewhat unrealistic.
The rear body panel includes the reflectors and separate taillights with clear lenses. You also have the bumpers, a tow hitch, an antenna mount with a separate base, two types of optional antennas, and a spare wheel, similar to the others except for the rim.
The open top version is provided with a thin canvas frame molded in three pieces, a very nice RT-524 radio set with a transmitter and receiver, a fairly decent M60 machine gun with a separate ammo box and pedestal, and a fuel container on the rear side.
All the side and rear panels as well as the roof come separately for the hardtop version The windows are quite thin and very transparent. The inner panel and roof sides have plenty of negative pin marks, most of them shallow. As mentioned, except for the doors, the others are not difficult to fill. Unfortunately, most of them will be evident through the windows, so it seems you have no choice but cleaning them up. The doors are molded with a front panel and show sharp hinges. The external handles are separate pieces, and detail on the inside seems at least acceptable to me. To show the doors open, they would have to be cut off from the front panel and the hinges rebuilt.
The interior of this version has a somewhat thick seat with no texture, as well as the same radio equipment described above, but as an option. Although it’s not indicated in the assembly, the profiles in the instructions show that the same fuel container can also be attached to the rear panel.
An interesting feature is the inclusion of a trailer for the hardtop version. Although the instructions don’t mention it, you can actually build two models: the M100, which is more similar to the trailer used with the WWII Jeep and the M38 in Korea, and the later M416/M416A1 used with the M151 in and after Vietnam.
The M100 has rounded fenders and larger taillights. The M416/M416A1 has square fenders and smaller, rounder taillights. Both the fenders and the taillights are included as an alternative in the kit. However, the lifting handles on the corners of the body are missing, but they shouldn’t be too difficult to replicate.
The frame comes as one piece attached to the front tongue and hitch. This hitch includes the handbrake and the landing leg, which can be extended or folded. Beneath this part is an axle with its defined leaf springs and small shock absorbers. The wheels are identical to those of the M151.
The body is also a single piece, but the rear panel and the reflectors are separate. There are four hooks for the canvas on each side. The body shows no marks and crisp moldings on the floor; however, the rear panel has two shallow marks on the inside. These shouldn’t be a concern if the trailer isn’t left open. There’s a cover in the shape of a cabin, consisting of three pieces, plus two optional jerrycans attached to the rear, which don’t look very accurate there. Alternatively, you can also cover the body with a scratchbuilt flat canvas.
The decal sheet provides license plates, tactical markings, dashboard instruments, and stencils. Decals have a fine, glossy finish, good registration, sharpness, and saturation. The carrier film doesn’t extend much beyond the printed area, except in one instance. This sheet is printed by the manufacturer, so caution is advisable due to the potential for poor results.
The instruction manual is A5 format and consists of twelve pages printed in black and white. It contains a historical introduction to the vehicle, a numbered parts diagram, a generic color list, 20 assembly sequences, and two pages of profiles.
The choice for colors and painting are two vehicles, one with a roof and one without, stationed in Germany in the late 1980s with the same NATO three tone camouflage adopted from 1984 onwards.
Conclusion
Academy successfully corrected previous mistakes present in their copies of Tamiya’s, but there are still specific details of the M151A2 that can be improved without much effort, further enhancing the already nice potential of this kit.
Currently, the hardtop version is the only 1/35 M151 kit with this configuration, and unquestionably the inclusion of the trailer adds to its appeal. The alternative without a roof is also a welcome addition that allows for a reconnaissance vehicle with a radio and machine gun.
Highly recommended for softskins builders and specially those who are fans of Jeeps and their four-wheeled family.◊
Publicado – Published: 8 / 2026
©www.jmodels.net


Debe estar conectado para enviar un comentario.