
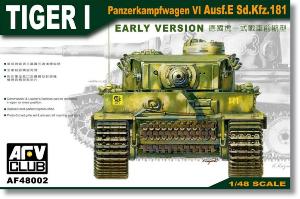
De un vistazo – Quick look
MATERIAL Y PIEZAS
MEDIA & PARTS:
- Plástico inyectado (152 piezas), fotograbado (4 piezas), tornillos metálicos (20 piezas), vinilo (2 tramos).
- Injected plastic (152 parts), photo-etch (4 parts), metal screws (20 parts), vinyl (2 lengths).
CALCAS – DECALS:
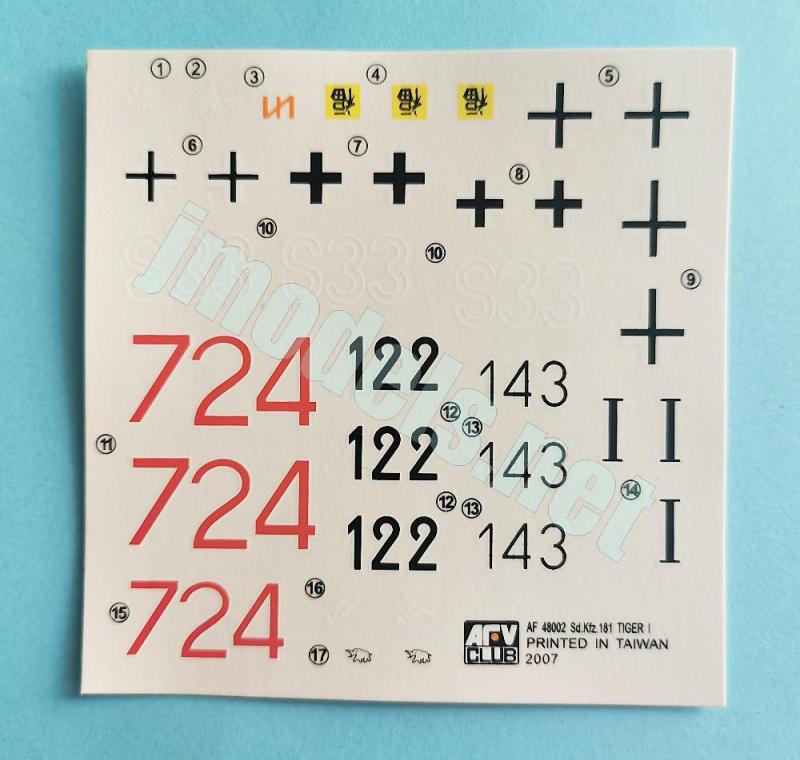
- Cruces alemanas, numerales e insignias de unidad. Finas, nítidas y con buena saturación de color.
- Cruces alemanas, numerales e insignias de unidad. Finas, nítidas y con buena saturación de color.
OPCIONES – OPTIONS:
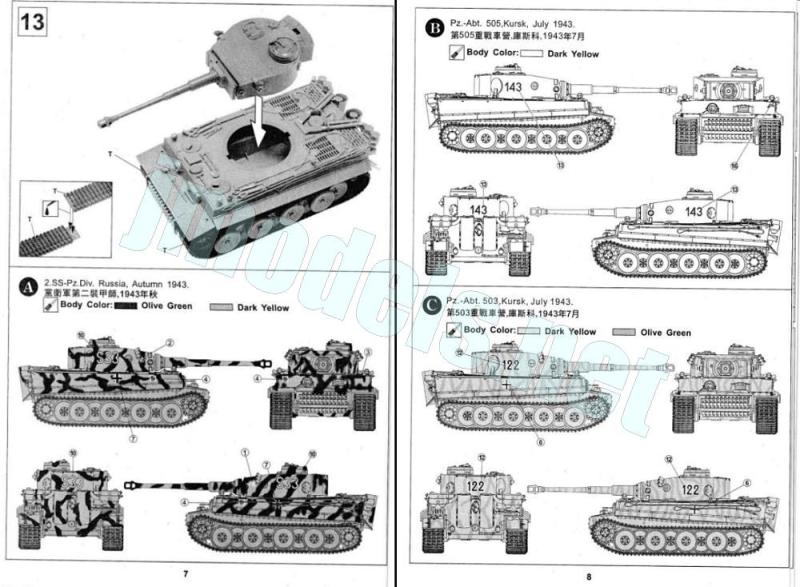
- Panzerkampwagen VI Auf. E. 2. SS-Pz. Div. Russia. Autumn 1943.
- Panzerkampwagen VI Auf. E. Pz.-Abt. 505. Kursk (Russia). July 1943.
- Panzerkampwagen VI Auf. E. Pz.-Abt. 503. Kursk (Russia). July 1943.
- Panzerkampwagen VI Auf. E. 10 Pz. Div. Tunisia 1943.
- Panzerkampwagen VI Auf. E. Pz.-Abt. 503. Kursk (Russia). July 1943.
INSTRUCCIONES – INSTRUCTIONS:
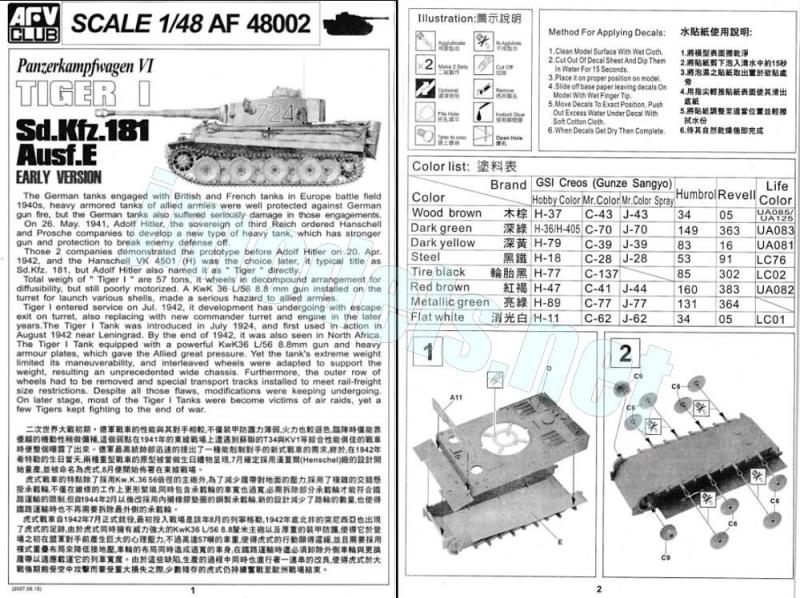
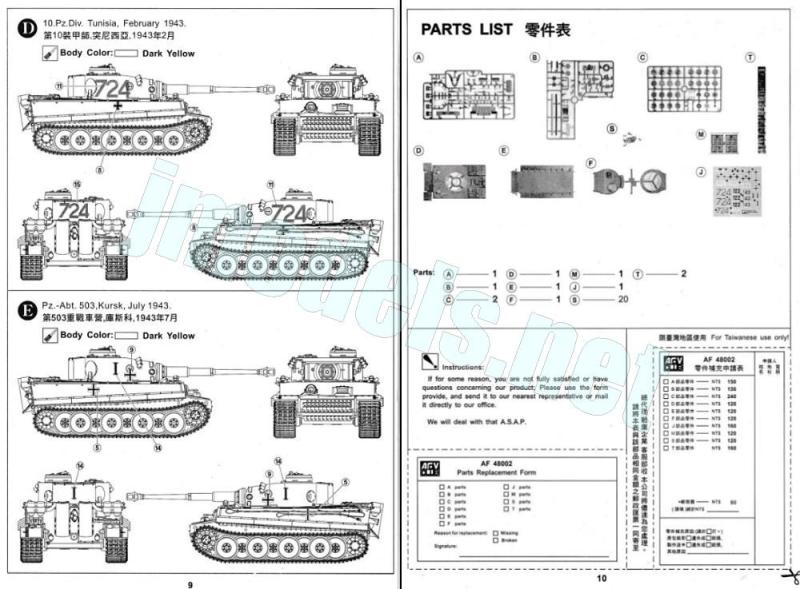
- Folleto doblado de 10 páginas impreso en blanco y negro. Contiene un sumario histórico sobre el vehículo, una tabla de colores con equivalencias de varias marcas de pintura, un lista de piezas sin numerar, 13 capítulos de montaje y tres páginas de perfiles.
- 10-page folded leaflet printed in black and white. It contains a historical summary about the vehicle, a color chart with equivalent paints in several brands, a part list without numbers, 13 assembly chapters and 3 pages of profiles.
LO MEJOR – THE BEST:
- Moldeado y detalle excelente. Aparente sencillez de montaje.
- Excellent molding and overall detail. Presumable ease of assembly.
LO PEOR – THE WORST:
- Carece de interior. Cadenas de vinilo, aún con su buena factura. Algunos errores en las instrucciones.
- No interior detail. Vinyl tracks, though they look fine for the media. Some mistakes in the instructions.
VALORACIÓN – CONCLUSION:
- Tras muchos años, esta maqueta sigue siendo un referente en esta escala gracias a todo el detalle que Skybow le puso y que AFV Club mejoró aún más. Adecuada para modelistas de grado medio.
- After many years, this kit remains a benchmark in this scale, thanks to the extensive detail Skybow incorporated, which AFV Club further enhanced. Suitable for intermediate-level modelers.

La maqueta
Procede de un molde poco anterior de Skybow del que AFV Club copió casi todo excepto los fotograbados. Como en el caso del Tiger I de Tamiya en la misma escala, esta edición se complementa con otra maqueta que representa el modelo tardío (Tiger I Panzerkampfwagen VI Ausf.E Sd.Kfz.181 “Final Version”, referencia AF48001). Las maquetas de Tamiya y AFV Club han sido las referencias en esta escala para el Tiger I durante años, Cada una de ellas continúa teniendo sus partidarios y detractores según preferencias. Actualmente, hay maquetas más completas, si no más sencillas de armar, que cuentan con el interior y algunos complementos añadidos, como son las de las marcas chinas Suyata y UStar, que comparten el molde.
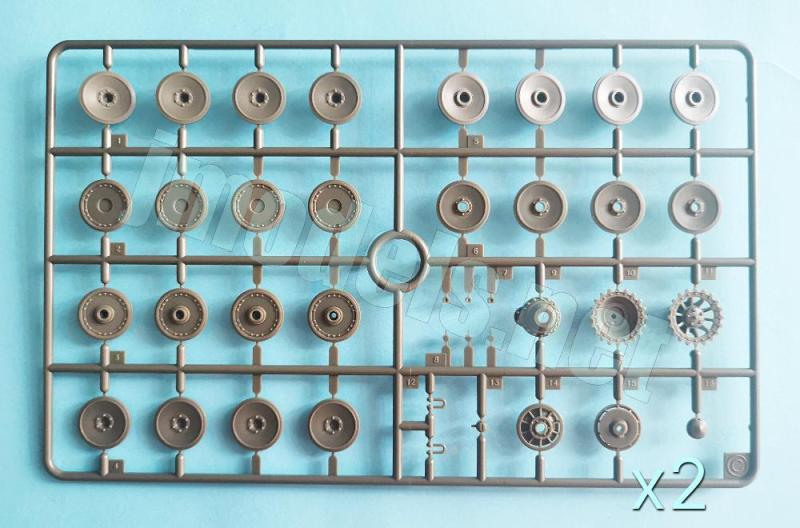
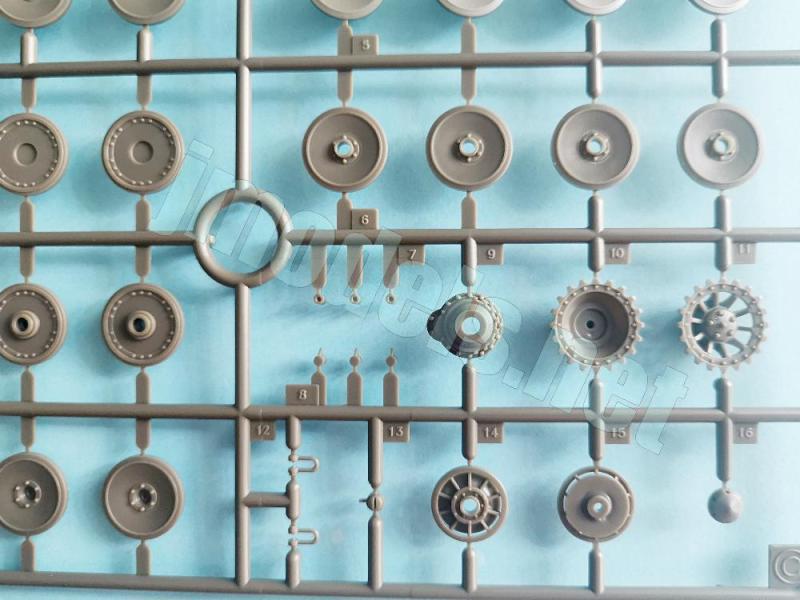
La caja trae cinco bastidores de piezas, dos de ellos repetidos, el casco y la torre separados, una plancha pequeña de fotograbados, un juego de cadenas de vinilo, una bolsa con veinte tornillos diminutos, la hoja de calcas y las instrucciones.
Aunque el interior está vacío, lo que se aprecia por fuera presenta un moldeado fino y limpio, libre de marcas, excepto unas pocas muy pequeñas en el interior de algunas tapas de la torre y el casco, y con un detalle excelente en general, en especial en la textura del casco y la torre que no debe ser fácil de conseguir en esta escala. Como es razonable suponer, hay piezas muy finas y fácilmente quebradizas, especialmente los cables de arrastre, algunas herramientas y otros elementos.
El montaje de la maqueta no parece tener complicaciones para el modelista de nivel medio porque sigue una secuencia lógica, ya tradicional en las maquetas de carros de combate: casco, tren de rodaje, detallado del casco y montaje de la torre. En este caso, se pueden montar las cadenas de vinilo al final si es conveniente.
Las alternativas de pintura ofrecen vehículos con camuflaje multicolor o sin él, presentes en frentes donde se estrenaron los primeros Tiger I, como el Norte de África, y Rusia.
Reseña
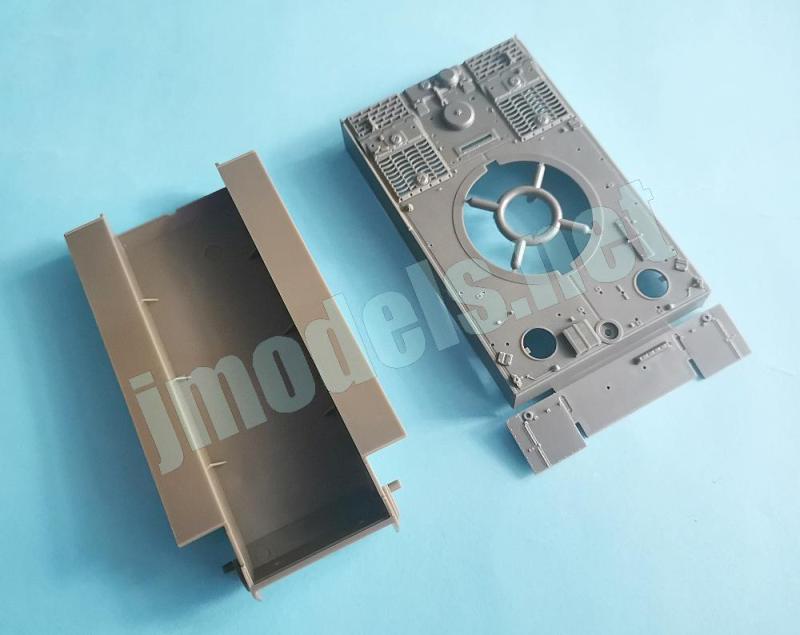
El montaje se inicia uniendo las dos mitades del casco y añadiendo la plancha frontal que contiene el visor del conductor, el mantelete de la ametralladora y el cañón de esta por separado. La parte inferior del casco cuenta con ejes fijos para introducir las ruedas del tren de rodaje. En la parte inferior del casco vemos las cubiertas de acceso y drenaje representadas fielmente. Los grilletes de remolque de la plancha inferior frontal son correctos para la versión inicial y también hay que añadir aquí un tramo de cadena de repuesto unido a su soporte.
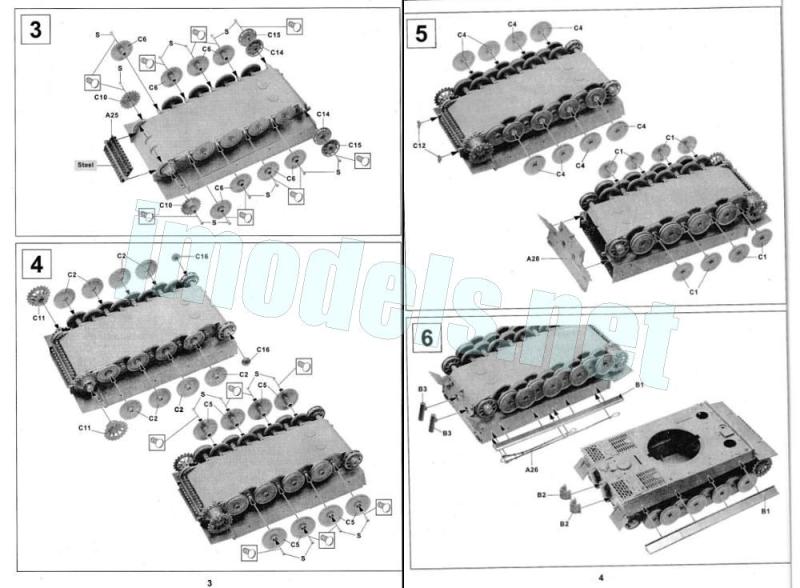
Las ruedas internas del tren de rodaje se fijan con pequeños tornillos a los ejes. Las externas van pegadas y cubren las cabezas evitando que se vean. Aquí, la única precaución es no apretar demasiado el tornillo para que no se pase de rosca fácilmente dentro del plástico. Todas estas ruedas presentan un detalle excelente, con las bandas de caucho bien definidas y las llantas moldeadas con nitidez. Las caras internas tienen algunas marcas de eyector leves, pero son completamente invisibles al montar las ruedas.
Hay un error en el capítulo 3 de las instrucciones. Las ruedas identificadas como C6, son en realidad las piezas C3. Este gazapo es obvio porque las piezas C6 ya las habremos empleado en el capítulo anterior, y no queda otra alternativa para las ruedas intermedias que usar las C3.
Igualmente bien caracterizadas están las ruedas tractoras, que son las correctas para esta versión en los radios y la llanta, donde los pernos están muy bien reproducidos. La rueda está separada en dos mitades, cuya pieza interna también va unida a la cubierta de la transmisión mediante un tornillo. Las tensoras son también acertadas para esta versión. Poseen radios finos y la llanta separada, que es la que cubre aquí el tornillo de sujeción.
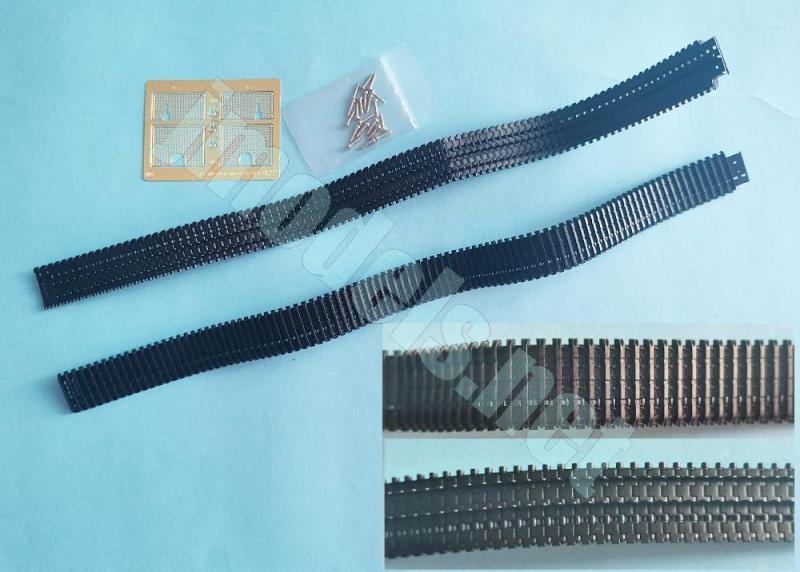
Las cadenas están reproducidas en dos tiras de vinilo flexible. El detalle de los eslabones y dientes es muy beno y limpio por ambos lados, sólo hay una mínima marca en relieve de la salida del eyector, que puede disimularse. Para quienes no sean adeptos al vinilo, hay bastantes juegos de mejora para sustituir las cadenas, tanto de metal como de plástico. El propio fabricante fabrica un juego articulable específico para esta maqueta (referencia AF48004).
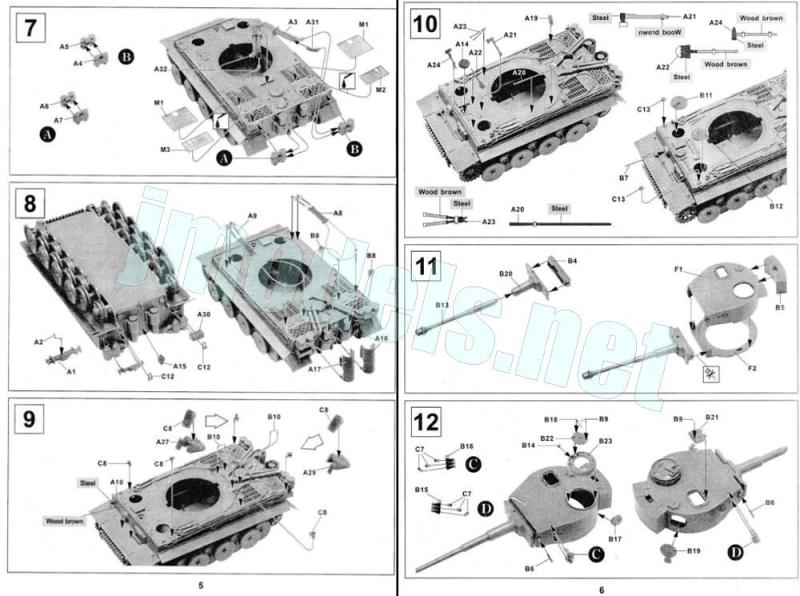
La plancha trasera del casco viene separada y moldeada con finos guardabarros traseros. Sobre ella se colocan las dos piezas del gato, los escapes con sus protectores blindados, las cubiertas externas y los filtros de aire.
La mitad superior del casco está unida a los guardabarros delanteros y la plancha del glacis. Los lados llevan unos finos guardabarros y delicados cables de remolque unidos a sus ojales. Otro par de cables aparece estibado sobre la plancha horizontal de la superestructura.
La parte delantera posee piezas aparte para los faros, diversas herramientas con muy buena factura, la cubierta del ventilador y las tapas de acceso del conductor y ametrallador, correctamente detalladas por dentro más una leve marca fácil de disimular. Las cubiertas ahuecadas de los periscopios están incluidas, pero la pieza transparente hay que fabricarla.
En la cubierta del motor, también correcta para este modelo, tenemos las rejillas reproducidas en piezas de fotograbado muy fino y los conductos de refrigeración y filtro de aire del motor de moldeado excelente, que reproduce con precisión incluso las estrías de los tubos.
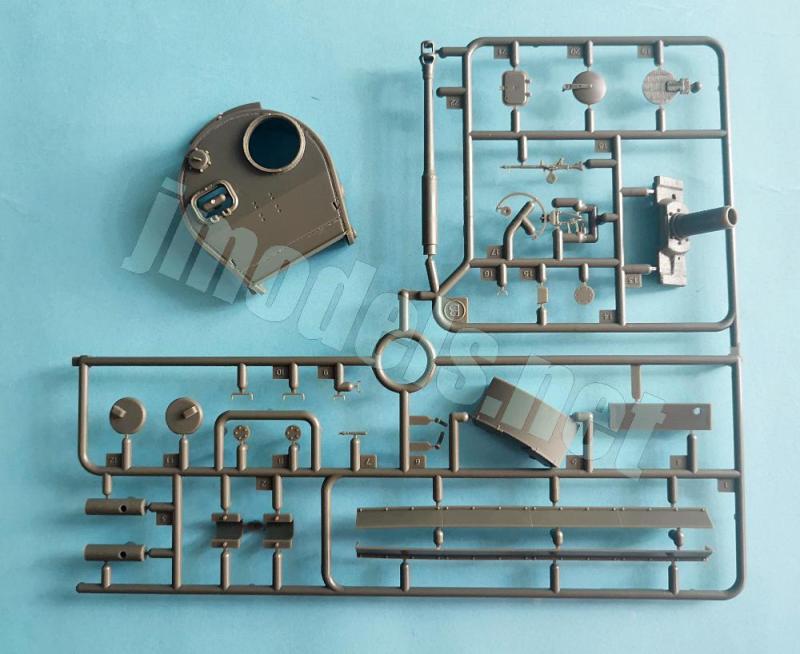
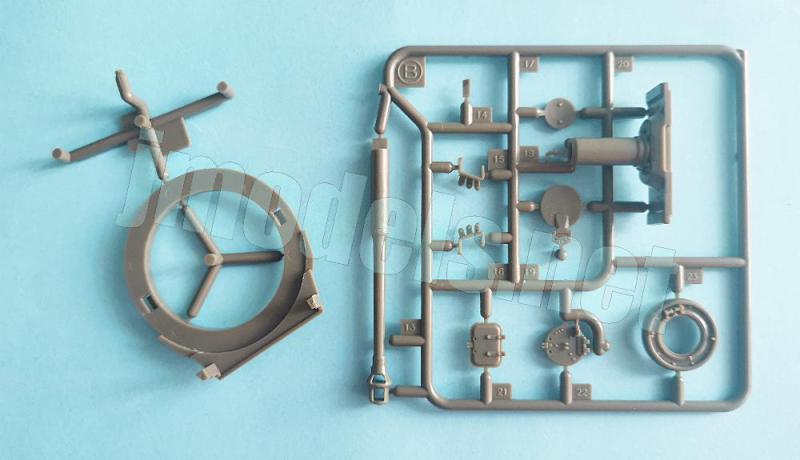
La torre está compuesta de cuatro piezas, con un anillo hueco en la base más la cubierta sin el mantelete y la caja de respeto trasera, pero esta tiene su base moldeada en la torre. La superficie del techo y los lados de la torre muestra una nitidez excelente en la reproducción de la textura de fundición y posee varias líneas de soldadura perfectamente plasmadas. Aunque la cubierta de la toma de aire viene moldeada en la pieza, las tapas de la escotilla del artillero y la cúpula son piezas exentas. La cúpula está cortada de forma que su parte inferior deje evidentes las ranuras de visión perimetral. La tapa tiene el asa y el soporte de las bisagras aparte y buen detalle interno. Estas características se repiten en la tapa de la escotilla del artillero, aunque se aprecian cuatro mínimas marcas de eyector por dentro que abrá que cubrir si se coloca abierta.
A los lados de la torre tenemos los lanzadores de granadas de humo, con tapones aparte, la escotilla de escape separada y con buen detalle en la bisagra, así como el portillo de defensa (pieza B17) que aparece mal colocado en las instrucciones. Su hueco lateral debe orientarse hacia la parte delantera de la torre y no al revés.
El mantelete es el adecuado para un Tigre inicial, con el periscopio de doble mira y la tronera de la ametralladora coaxial bien reproducida. Una pieza interna con muescas laterales permite alzar o deprimir el cañón mediante dos pernos de plástico situados a los lados de la torre. El sistema no me parece muy convincente, por eso es aconsejable que peguemos el mantelete en la posición exacta en la que deseemos mostrar el cañón. El cañón está moldeado de una pieza, sujeto en los bastidores de manera que no haya que limpiar ni líneas de molde ni restos del corte de la pieza. El freno de boca está bien representado y horadado en toda su longitud.
En los bastidores también encontramos piezas para la versión final de esta maqueta, como un mantelete con Zimmerit y detalles diferentes así como una ametralladora con su afuste y raíl para la cúpula.
Como lleva tanto tiempo en el mercado y el fabricante la sigue reeditando, existe una larga lista de mejoras para esta maqueta, tales como fotograbados, cañones, cadenas y algunos elementos más para quien desee detallarla al extremo, con no ser poco lo que esta edición ofrece de caja.
La hoja de calcas contiene cruces alemanas, numerales e insignias de unidad con apariencia fina, nítida y buena saturación de color.
Las instrucciones vienen en un folleto doblado formando diez páginas impreso en blanco y negro. Muestra un sumario histórico sobre el vehículo, una tabla de colores con equivalencias de Gunze Sangyo, Humbrol, Revell y Life Color, un lista de piezas sin numerar, trece capítulos de montaje y tres páginas de perfiles. Como ya he indicado, hay algunos pequeños deslices en las instrucciones que conviene tener en cuenta durante el montaje para evitar errores.
Valoración
No por muy conocida, debemos dejar de apreciar esta sobresaliente maqueta original de Skybow y algo mejor perfilada por AFV Club, que le añadió una necesarias rejillas de fotogrado. De los Tiger I que circulan hoy día sin interior, es una opción que considerar seriamente por sus acertados detalles, muy fieles a la versión inicial, y por su montaje asequible para modelistas de nivel medio, aunque tenga algunas piezas un tanto delicadas de manipular.
De haberle proporcionado un interior al mismo nivel de lo que se aprecia fuera, esta maqueta se hubiese adelantado décadas a sus contrapartes chinas más actuales. Bueno, AFV Club y sus maquetas también son chinos, pero no son lo mismo aunque sean iguales. El lector ya me entiende.◊

The kit
This is a rebox of an earlier Skybow kit with the addition of a small PE fret AFV Club included on their own. As with Tamiya 1/48 Tiger I, this boxing is complemented by another kit representing the late-production model (Tiger I Panzerkampfwagen VI Ausf.E Sd.Kfz.181 “Final Version”, reference AF48001). For years, Tamiya and AFV Club kits have been the benchmarks for the Tiger I in this scale; each continues to have its fans and detractors depending on personal preference. Currently, there are more comprehensive kits, though not necessarily easier to assemble, with the interior and added accessories from the Chinese brands Suyata and UStar, which share the same mold.
The box contains five sprues (two of which are doubled), separate hull and turret parts, a small photo-etched fret, a set of vinyl tracks, a bag containing twenty tiny screws, the decal sheet, and the instructions.
Although the interior is empty, the exterior features crisp, clean molding free from blemishes, except for a few tiny marks on the inside of some turret and hull hatches, and excellent overall detail, particularly the hull and turret texture, which must be difficult to depict at this scale. As one would expect, there are very delicate and brittle parts, especially the tow cables, some tools, and other small bits.
Assembly does not seem to pose difficulties for the average modeler, as it follows a logical sequence that has become standard for tank kits: hull, running gear, upper hull detailing, and turret assembly. In this case, the vinyl tracks can be attached at the end of construction if desired.
Paint choices offer vehicles with or without multi-color camouflage, representing the fronts where the first Tiger I tanks saw action, such as North Africa and Russia.
Review
Assembly begins by joining the two hull halves and attaching the front superstructure plate, which includes the driver’s visor along with the machine gun ball mantlet and separate barrel. The lower hull piece has fixed axles to attach the running gear wheels. Accurately rendered access and drainage covers are visible under the hull tub. The towing shackles on the lower front plate are correct for the early version, and a length of spare track is also attached at this stage.
The inner running gear wheels are secured to the axles with small screws. The outer wheels are glued in place, covering the screw heads so they remain hidden. The only caveat here is to avoid tightening the screws too much, which could easily strip the treads in the plastic. All these wheels have excellent detail, with well-defined rubber tires and sharply molded rims. The inner faces show some small ejector marks, but these are completely invisible once the wheels are assembled.
There is a mistake in step 3 of the instructions: the wheels identified as C6 are actually parts C3. This mistake is obvious because parts C6 will have already been used in the previous step, leaving parts C3 as the only option for the middle wheels.
The drive sprockets are equally well-executed; their spoke and rim designs are correct for this version, with the bolts reproduced in great detail. The sprocket consists of two halves, with the inner piece attached to the transmission housing with a screw. The idler wheels are also accurate for this version, showing fine spokes and a separate rim that hides the screw.
The tracks are rendered in two strips of flexible vinyl. Detail on the links and teeth is quite good and clean on both sides; there is only a tiny raised ejector mark, which can be easily hidden. If vinyl isn’t your cup of tea, there are numerous aftermarket sets available to replace the tracks, in both metal and plastic. The manufacturer also produces a workable track set specifically for this kit (reference AF48004).
The rear hull plate is a separate part, molded with fine rear fenders. Separate detail includes the two-part jack, the exhausts with the armored shields, the external covers, and the air filters.
The upper hull section is molded integrally with the front fenders and the glacis plate. The sides have fine fenders and brittle tow cables molded with their clips. Another pair of cables is stowed on the superstructure plate.
The front section includes separate parts for the headlights, several nice tools, the ventilator cover, and the driver’s and machine-gunner’s hatches; the latter are correctly detailed on the inside, except for a small mark that is easy to hide. Hollowed-out periscope covers are molded on the piece, though you will need to provide the clear parts yourself.
On the engine deck, also accurate for this early variant, the grilles are very thin photo-etched parts, while the cooling ducts and engine air filter have excellent molding that accurately reproduces even the ribbing on the ducts.
The turret consists of four parts: a hollow ring base, the main turret shell (except the gun mantlet), and the rear stowage bin with the base molded with the turret. The roof and side surfaces show excellent crisp detail in the cast texture and weld seams. While the air intake cover is molded on the main part, the covers and the commander’s cupola are separate pieces. The cupola is designed so that the perimeter vision slits are clearly visible at its base. The hatch cover features separate handle and hinge mountings, along with good interior detail. These same features appear on the gunner’s hatch cover, although there are four tiny ejector marks on the inside that will need to be filled if displayed open.
On the turret sides, we find the smoke grenade launchers (with separate caps) and the separate escape hatch, with sharp hinges as well as the pistol port (part B17), which is incorrectly positioned in the instructions; its side opening should face the front of the turret, not the rear.
The mantlet is the correct type for an early production Tiger, featuring a well-reproduced dual-sight periscope and coaxial machine gun port. An internal part with side notches allows the gun to be elevated or depressed using two plastic pins located on the turret sides. This layout isn’t particularly convincing, so it is advisable to glue the mantlet in the exact position you wish to display the gun. The gun barrel is molded as a single piece and attached to the sprue in a way that eliminates the need to clean up seam lines or sprue gates. The muzzle brake is well-rendered and hollowed out along its length.
On the sprues, we also find parts for the late Tiger kit, such as a mantlet with Zimmerit and a machine gun with its mount and cupola rail.
Given the time this kit has been around and the fact that the manufacturer continues to reissue it, there is a wide range of aftermarket upgrades available, including photo-etched parts, replacement barrels, and tracks, for modelers wishing to add extreme detail, even though the kit already offers a great deal right out of the box.
The decal sheet includes German crosses, numbers, and unit badges that look thin and sharp, with excellent color saturation.
The instructions come in a ten-page, black-and-white folded brochure. It includes a brief history of the vehicle, a color chart with equivalents in Gunze Sangyo, Humbrol, Revell, and Life Color paints, an unnumbered parts diagram, thirteen assembly steps, and three pages of profiles. As mentioned, there are a few bugs in the instructions that should be noted during assembly to avoid mistakes.
Conclusion
Just because it is well-known, we shouldn’t overlook this outstanding kit, originally released by Skybow but refined by AFV Club, which added the necessary photo-etched grilles. Among the Tiger I kits currently available without a full interior, this is a serious contender thanks to its accurate detail for an early Tiger I and an assembly suitable for average modelers, despite a few parts being somewhat delicate to handle.
Had it included an interior matching the quality of its exterior, this kit would have been decades ahead of its more modern Chinese counterparts. Well, AFV Club and their kits are Chinese too, yet they aren’t the same thing, even if they are alike. The reader knows what I mean.◊
Publicado – Published: 9 / 2026
©www.jmodels.net

 jmodels.net
Debe estar conectado para enviar un comentario.