
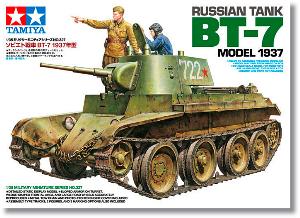
De un vistazo – Quick look
MATERIAL Y PIEZAS
MEDIA & PARTS:
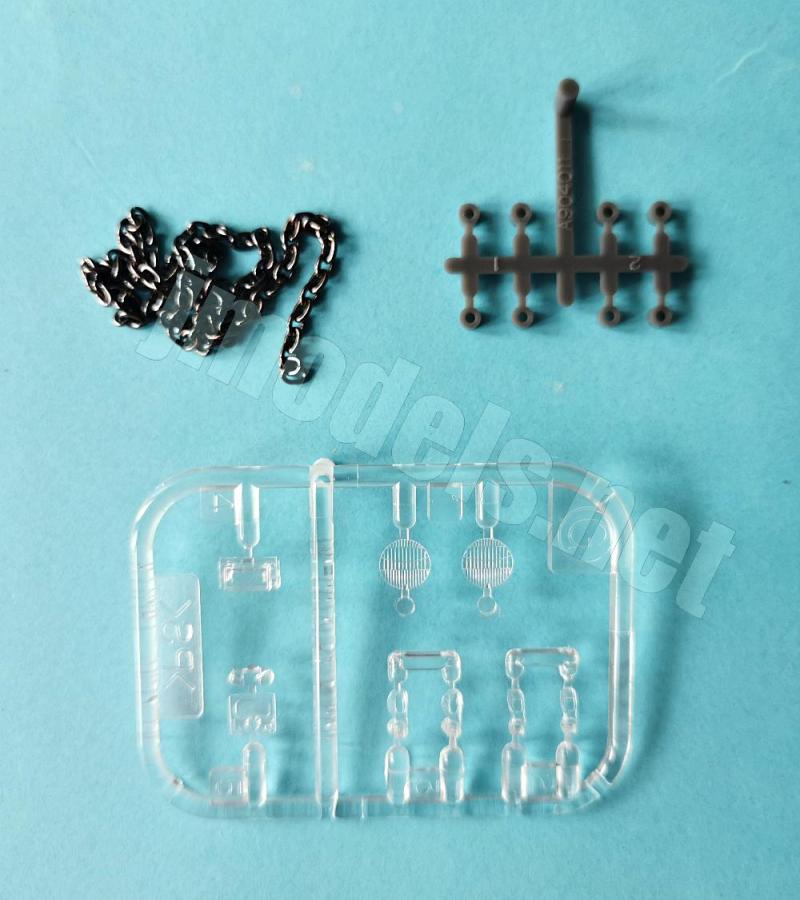
- Plástico inyectado (230 piezas), plástico transparente (8 piezas), fotograbado (10 piezas), rodamientos plásticos (20 piezas), cadena metálica (1 tramo). Incluye 2 figuras (12 piezas).
- Injected plastic (230 parts), clear plastic (8 parts), photo-etched (10 parts), plastic polycaps (20 parts), metallic chain (1 length). Two figures included (12 parts).
CALCAS – DECALS:
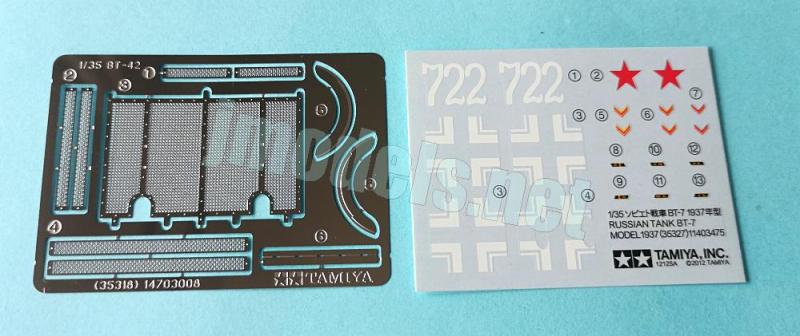
- Estrellas rusas, cruces alemanas, numerales, e insignias de rango. Aspecto fino y brillante. Buena saturación de color y registro. Sin soporte excedente.
- Russian stars, German crosses, numbers and rank insignia. Thin and glossy finish. Good color saturation and register. No excess carrier.
OPCIONES – OPTIONS:
- BT-7. Soviet Army. Unit unknown. Leningrad. Summer, 1943.
- BT-7. Soviet Army. 3rd Mechanized Corps.
- BT-7. German Army. Captured tank.
INSTRUCCIONES – INSTRUCTIONS:
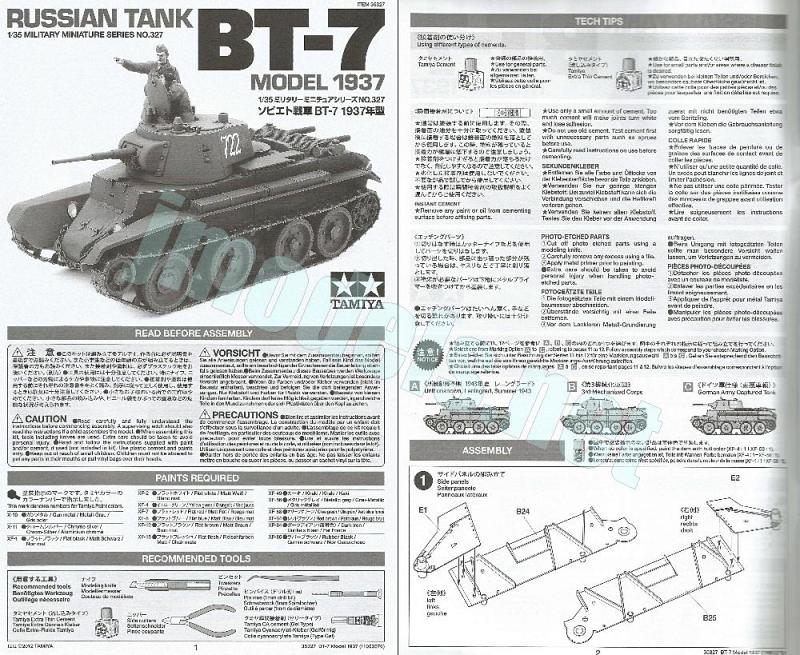
- Folleto de 12 páginas impreso en blanco y negro. Contiene una lista de pinturas del fabricante, 25 capítulos de montaje y 2 páginas de perfiles.
- 12-page booklet printed in black and white. It contains a list of Tamiya paints, 25 assembly steps and 2 pages of profiles.
LO MEJOR – THE BEST:
- Molde. Sencillez de montaje. Excelente detalle externo. Instrucciones.
- Mould. Ease of assembly. Excellent external detail. Instructions.
LO PEOR – THE WORST:
- Carece de interior.
- No interior detail.
VALORACIÓN – CONCLUSION:
- Debe estar entre la mejores maquetas que Tamiya ha hecho. Molde y detalle externo excelente con gran sencillez de montaje a cambio de no tener detalle interno. Muy recomendable a los aficionados al tema.
- This must be among the best kits Tamiya have ever released. Excellent mold and external detail, with great ease of assembly, though it lacks internal detail. Highly recommended for fans of the scale and topic.

La maqueta
Jamás pensé que una marca de primera línea como Tamiya fuese a lanzar algún día un BT-7. Este carro, al igual que el BT-5, parecía el coto exclusivo de otras marcas de no tan buen predicamento como Eastern Express o Zvezda. Lo cierto es que acabó apareciendo hace años, pillando al personal por sorpresa. Tamiya demostró que se atreve con todo cuando le da la gana, como cualquier hijo de vecino, o casi.
La primera maqueta en aparecer fue la del Modelo 1935 (referencia 35309), con una torre idéntica a la del T-26 fabricado en ese periodo y su antena de raíl incluso. Le siguió otro inesperado y feorro BT-42 finlandés (referencia 35318). La serie se detuvo en la maqueta y versión que reviso en este lugar, que también aprovechaba la nueva torre del T-26 de 1937. Obviamente las tres maquetas comparten la mayoría de sus piezas.
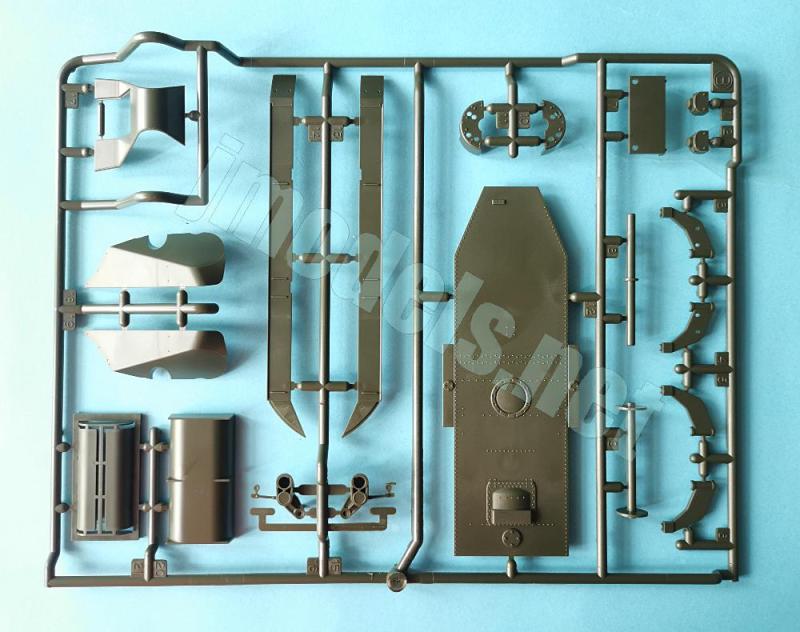
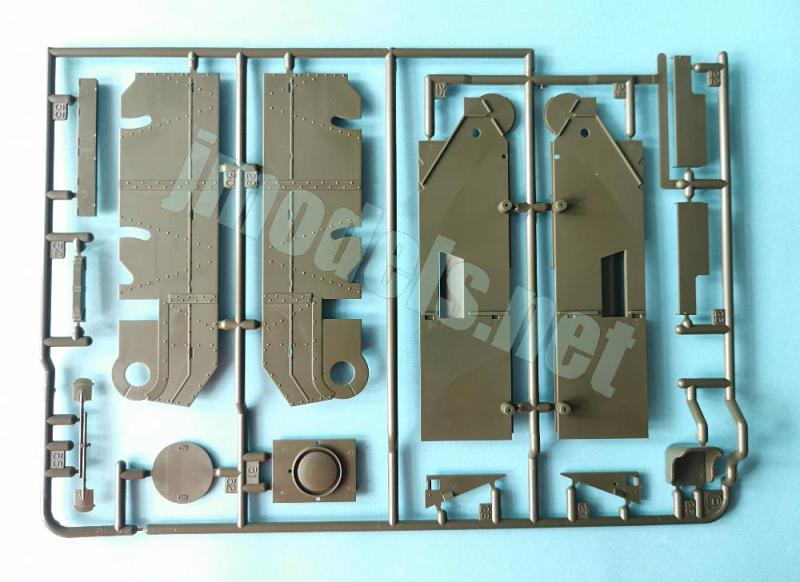
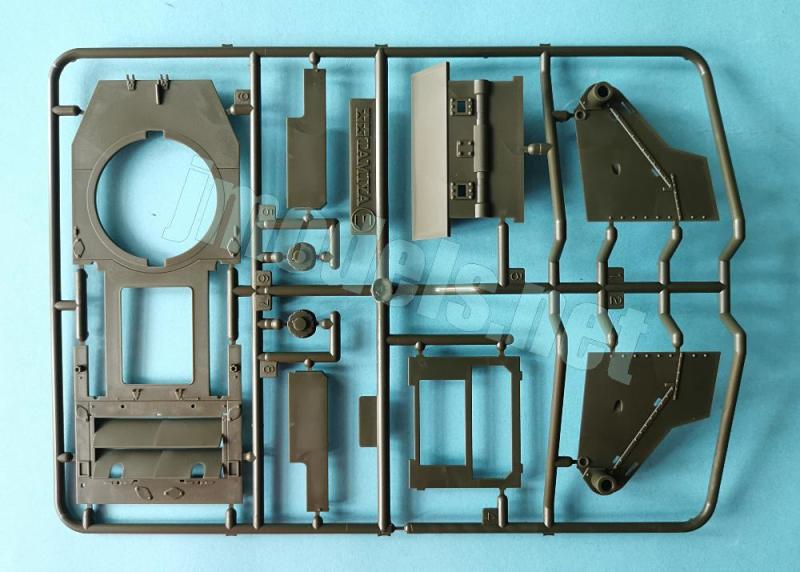
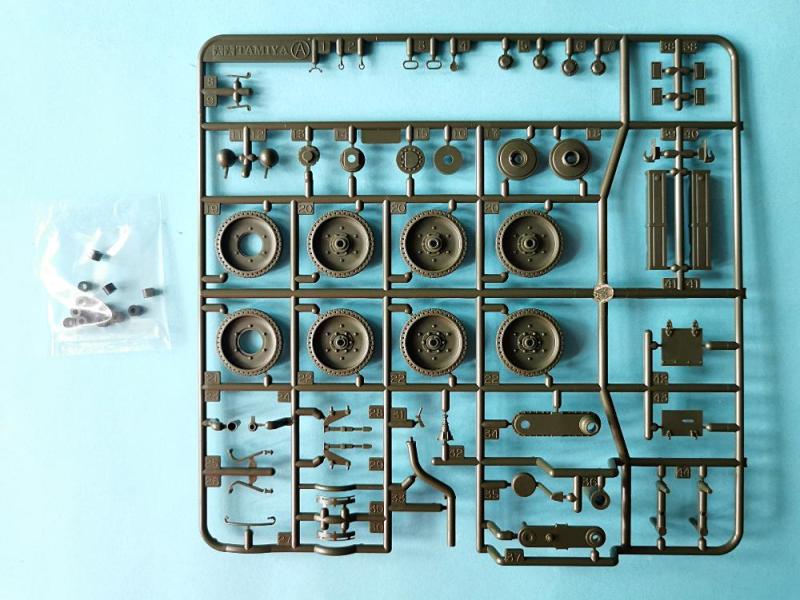
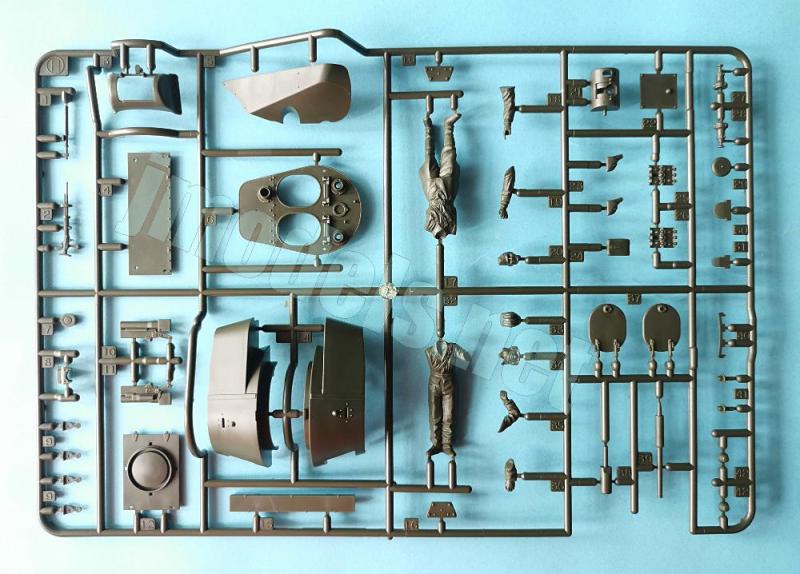
La caja trae ocho bastidores, un bastidor transparente, una plancha de fotograbados, un tramo de cadena metálica, dos bolsas con rodamientos de plástico de dos tamaños, las calcas y el manual de instrucciones. Entre las piezas hay dos buenas figuras para ambientar una posible escena.
El moldeado de las piezas es excelente, destacando por su limpieza y nitidez en el detalle. Hay marcas de eyector por decenas, pero Tamiya ha evitado que se vean en casi todos los casos, de modo que tendremos menos tiempo de limpieza y más para disfrutar montando la maqueta.
El despiece y la falta de interior, salvo algunos detalles, nos indica a simple vista que estamos ante una maqueta bien diseñada y relativamente fácil de montar, como aseguran quienes ya la han probado y es una característica habitual en el fabricante. Tamiya tuvo la buena idea de incluir algunos fotograbados imprescindibles para mejorar ciertos elementos, principalmente las rejillas del motor. Tal vez no gusten a todo el mundo, pero lo cierto es que su número no es agobiante y esto permite que los menos expertos no se abrumen.
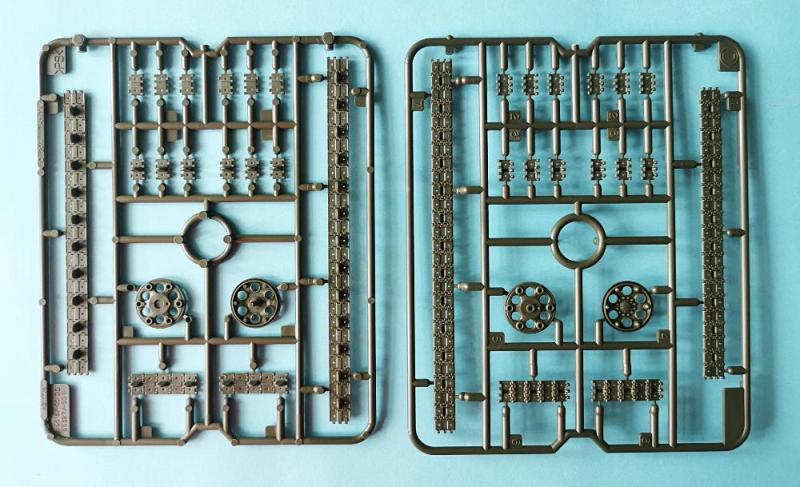
Otro aspecto que destacar son las cadenas de tramos y eslabones. En mi opinión Tamiya también acertó en proveerlas de esta forma si deseaba que el montaje fuese más cómodo y ágil. El tamaño de los eslabones tal vez no hubiese permitido que todo fuese coser y cantar de haberlas proporcionado en eslabones sueltos.
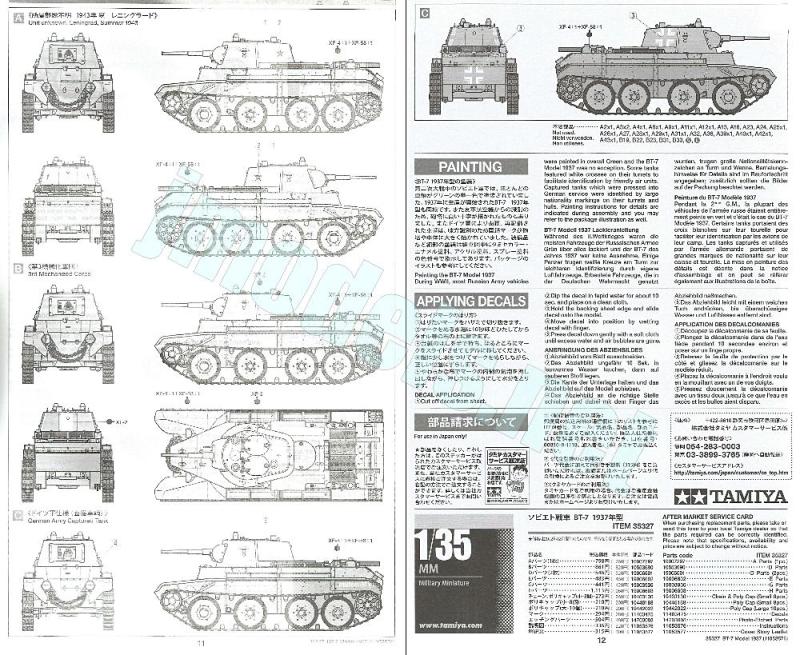
Como cabe esperar, los tres carros que ofrecen los perfiles de las instrucciones no llevan otro color que el verde ruso habitual, así que la única variación realmente significativa son las cruces alemanas del carro capturado.
Reseña
Siguiendo una secuencia lógica con la disposición de este carro BT, el montaje se inicia con el casco. Las planchas laterales son dobles. Las internas tienen las planchas anguladas delanteras separadas, pero no tenemos que medir la inclinación, porque van sujetas por clavijas y apoyadas en los resaltes de la plancha posterior de cada lado. Para unir las planchas en su justa anchura tenemos el eje delantero y trasero además de un bastidor transversal colocado en la mitad de las planchas para darles más consistencia. Tras haber formado la estructura básica del casco, podemos añadir el suelo y la plancha trasera inferior, dotada de algunos ojales separados.
Al añadir las planchas laterales exteriores queda un hueco entre ambas en el que falta la amortiguación, que Tamiya se ha comida por mor de simplificar. Las caras externas de las planchas muestran hileras de remaches finos y en el suelo un detalle algo más profuso con la escotilla bajo el motor y una moldura por debajo de la caja de cambios. Del interior no tenemos más que el asiento del conductor por si queremos emplear una figura en este puesto. La pieza está bien reproducida, aunque parece un poco grande y más ancha de lo necesario.
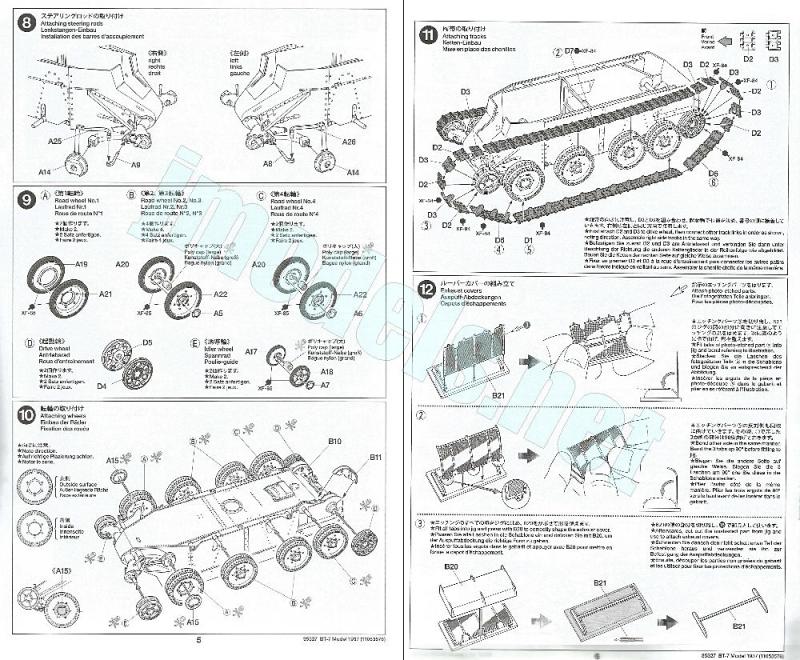
Los brazos de la suspensión de los ejes delantero y trasero están compuestos de mitades entre las que hay que situar rodamientos de distinto tamaño en cada eje. En la parte delantera la suspensión está complementada por dos finos mecanismos que actúan como barras de la dirección que permitían el giro de las primeras ruedas del tren de rodaje cuando el carro se movía sin cadenas. Este mecanismo va situado sobre la cubierta del diferencial de esta primera rueda y también sobre una biela unida al brazo de la suspensión. Todo esto parece muy complejo sin serlo, porque es más difícil de explicar que de entender en las instrucciones.
Tras pegar los brazos de suspensión de cada rueda, que quedarán perfectamente alineados gracias a las clavijas situadas en el lado interno, y la plancha frontal del casco, podemos colocar las planchas externas laterales y pegar las ruedas.
Las ruedas son dobles. Tienen un detalle excelente en las bandas de caucho y especialmente en las llantas, con mención especial para las de las ruedas tractoras y las cubiertas de los ejes separadas de las ruedas de carretera, que son distintas y correctas en las dos ruedas direccionables. Salvo las ruedas tractoras, las demás llevan un rodamiento de plástico interno sin pegar que permite fijarlas a los ejes.
Las cadenas comprenden a cada lado cuatro tramos, seis eslabones alrededor de la rueda tensora y otros seis sobre la tractora. El alargado tramo superior es totalmente recto, así que costará un poco darle una ligera caída si nuestro carro no está en marcha. Los tramos inferiores muestran unas mínimas marcas de eyector en la cara interna, pero no merece la pena ni limpiarlas porque son tan leves que no se notarán al pintar encima. El detalle de los eslabones es muy bueno y los dientes poseen buena definición y proporciones adecuadas.
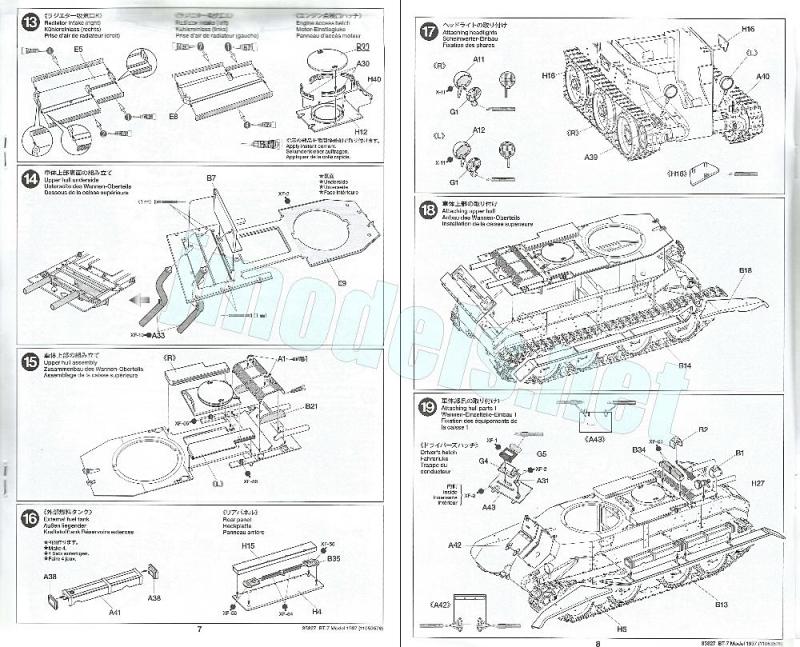
La siguiente fase del montaje consiste en montar la plancha superior del casco y todos sus elementos. El trabajo se inicia con la cubierta del motor, donde tenemos una pieza que sirve de molde para doblar la rejilla de fotograbado de la cubierta de los escapes. La operación es un tanto delicada para quien no tenga experiencia, pero los dibujos de las instrucciones son de gran ayuda por su claridad. Los tubos de escape vienen huecos en la salida y van pegados a una pieza vertical añadida por debajo a la plancha superior del casco. Los tubos tienen sus salidas a través de las lamas de ventilación oblícuas de esta plancha.
También hay que añadir rejillas en las tomas laterales del radiador y montar la escotilla separada de acceso al motor con su cubierta redonda. Las asas de la cubierta están moldeadas in situ, pero merece la pena sustituirlas. Otros detalles de la cubierta comprenden los gatos, los topes de los amortiguadores traseros, la luz trasera y los calzos de las ruedas estibados por detrás de la escotilla del motor.
Finalmente, se monta el depósito externo de carburante, que posteriormente colocaremos sobre el gurdabarros izquierdo, y la plancha trasera superior, provista de una caja de respeto y dos finas palas moldeadas aparte.
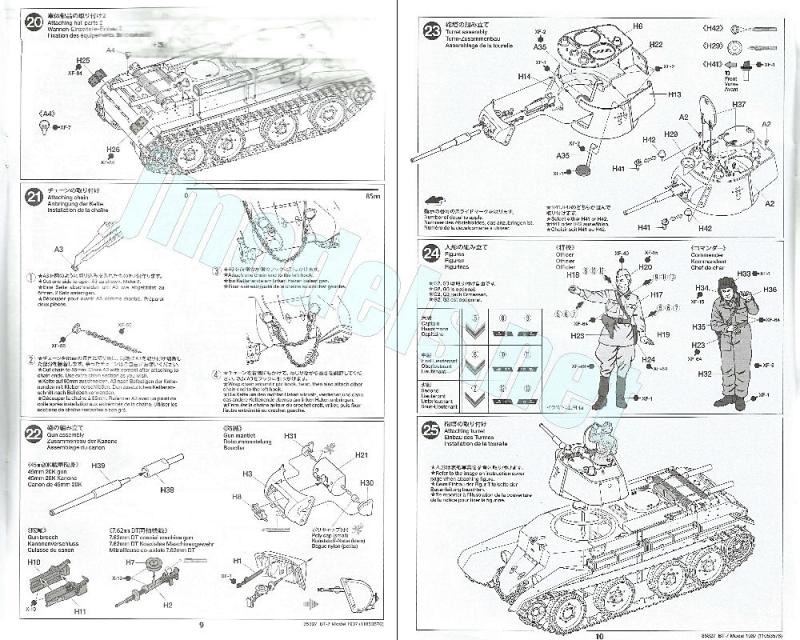
En la parte delantera del casco tenemos los ganchos de la cadena de remolque, los faros ahuecados y con lentes transparentes y la escotilla de acceso del conductor con las puertas separadas. Las nítidas bisagras de la pieza inferior debemos cortarlas si la colocamos abierta. La pieza superior está detallada con el visor también transparente. El montaje de la cadena de remolque está secuenciado en las instrucciones para lograr enrrollarla sobre sí misma y hacer que tenga un aspecto realista. Los extremos del tramo de 85 mm necesario están provistos de dos eslabones de plástico para unirlos a los ganchos laterales del casco.
Los guardabarros vienen en dos piezas, ambas bastante finas y ligeramente biseladas en los filos exteriores. La pieza delantera tiene formas bien reproducidas y está limpia de marcas, pero la trasera lleva varias en la cara interna que merece la pena eliminar por la gran distancia entre el guardabarros y la cadena. Esta pieza lleva eslabones de repuesto a cada lado. Las piezas traseras van insertadas en el casco mediante lengüetas.
La torre está formada por dos mitades, el mantelete, una plancha posterior y el techo, moldeado con la base de la antena. Los lados cuentan con sendas mirillas grabadas, pero no abiertas. El mantelete consiste en una cubierta externa y otra interna con pequeños muñones para insertar rodamientos que permiten mover el cañón. En su lado interno está la mira, una magnífica ametralladora coaxial con el tambor de munición aparte y la culata del cañón, con el extremo anterior abierto para introducir el vástago de la base del cañón, que queda así fijado en su lugar. El tubo del cañón viene de una pieza con la boca horadada. En el interior de la torre hay un asiento que permite colocar la figura del jefe de carro en pie a través de su escotilla.
Sobre el techo de la torre hay dos tapas de las escotillas separadas con las bisagras bien definidas, aunque las caras internas tiene diminutas marcas que deben ser fáciles de eliminar. Otros elementos adicionales son dos pequeños ojales, la cubierta blindada del ventilador así como los periscopios, con dos piezas opcionales para detallar la parte superior.
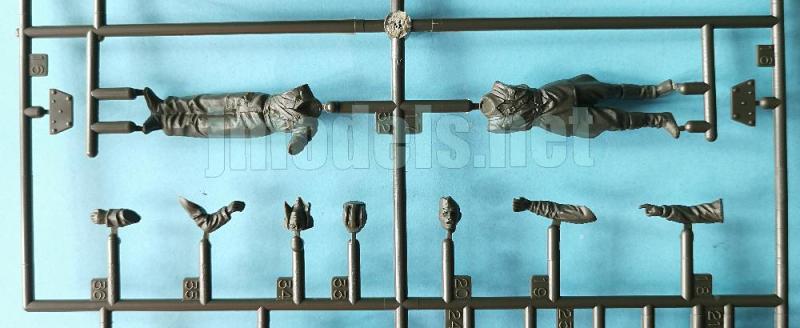
Acompañan a la maqueta dos figuras (oficial y jefe de carro) para ambientar una posible escena. Ambas están despiezadas con los brazos, cabezas y pistolas en sus fundas por separado. El carrista lleva además el casco aparte y el oficial una cartera portamapas. El modelado es bastante bueno, aunque no extraordinario. Los detalles del uniforme del oficial son mejores que los del mono de carrista, pero en ambos la textura y arruga de las prendas está bien conseguida. Los rostros tienen facciones bien definidas y distintas. El oficial cuenta además con calcas para indicar su rango tanto en el cuello como en la bocamanga. Podemos elegir entre las insignias de Capitán, Primer o Segundo Teniente.
La hoja de calcas está impresa con estrellas rusas, cruces alemanas, numerales, y las mencionadas insignias de rango. Poseen un aspecto fino y brillante, buena saturación de color y registro. No tienen soporte excedente.
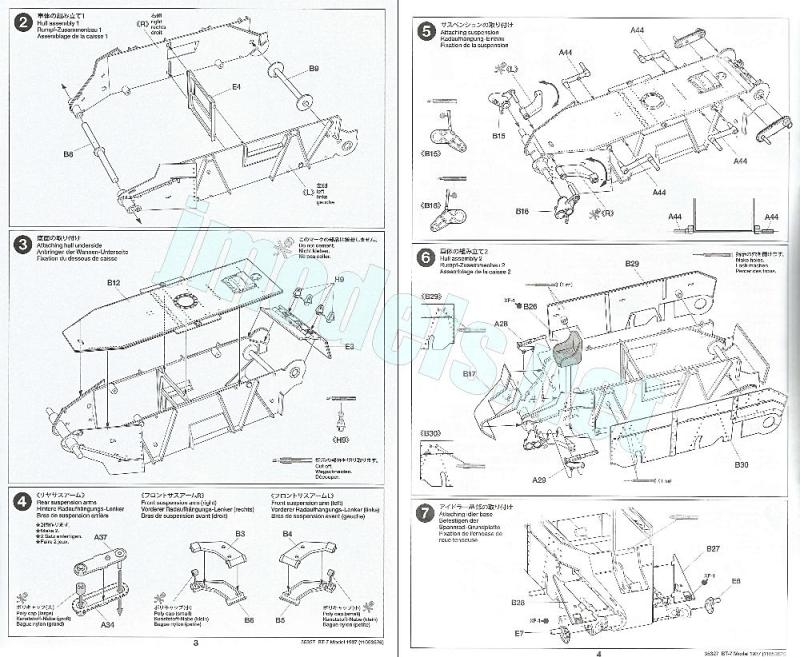
El manual de instrucciones consta de doce páginas impresas en blanco y negro. Contiene una lista de pinturas del fabricante, 25 capítulos de montaje y dos páginas de perfiles. Como es costumbre en Tamiya, las secuencias del montaje están anotadas con indicaciones en los márgenes. Se la ha dado una atención especial a la colocación de la rejilla del motor y de la cadena de remolque, así que ayuda no va a faltar. Las opciones de pintura, todas con la misma librea verde, ofrecen dos carros rusos y uno capturado por los alemanes.
El carro con numeral 722 blanco está acreditado en imágenes, probablemente procedentes de un documental, donde se le ve en una columna que avanza junto a una vía de tren en las inmediaciones de Leningrado en 1943. Esta imagen está publicada en el número 5 de 1996 de la revista rusa Bronekollekchiy (Lekky Tank BT-7). En la misma revista aparece un perfil que lo identifica como un vehículo del 51º Batallón Independiente de Carros del Frente de Leningrado en el verano de 1943.
El segundo carro ruso del Tercer Cuerpo Mecanizado lleva una cruz blanca pintada sobre el techo y los lados de la torre. Estas marcas servían de identificación aérea durante la anexión rusa de los países bálticos y era aún empleada durante la invasión alemana de 1941, según leo en la revista Wydawnictow Militaria Nº 57, 1998, pagina 34. Efectivamente, esta unidad blindada estuvo estacionada en Lituania en 1940, según afirma Wikipedia.
Valoración
No diré que esta maqueta no tenga margen de mejora porque en realidad todas la tienen, pero lo que trae la caja se puede convertir en una réplica notable de este importante carro ruso. Para el modelista seguidor del tema, independientemente de su nivel de destreza, esta es una pieza excelente y muy recomendable. Me atrevería a decir que está entre las mejores que Tamiya ha hecho, y ha hecho algunas.◊

The kit
I never thought a top brand like Tamiya would ever release a BT-7. This tank, like the BT-5, seemed to be the exclusive domain of other, less outstanding brands like Eastern Express or Zvezda. The truth is, it finally appeared years ago, catching everyone by surprise. Tamiya proved they’re willing to try anything when they want to, like any other company, or almost.
The first kit to appear was the 1935 Model (reference 35309), with a turret identical to that of the T-26 manufactured during that period, including its rail antenna. It was followed by another unexpected and rather ugly Finnish BT-42 (reference 35318). The series stopped at the kit and version I’m reviewing here, which also used the new 1937 T-26 turret. Obviously, the three kits share most of their parts.
The box contains eight sprues, a clear sprue, a photo-etched sheet, a length of metal track, two bags of plastic polycaps in two sizes, the decals, and the instruction manual. Among the parts are two good figures that look quite suitable for a scene.
The standard of molding is excellent, notable for its clean parts and sharp detail. There are dozens of ejector pin marks, but Tamiya minimized their visibility in almost all cases, so we’ll spend less time cleaning up pieces and more time enjoying assembly.
Parts breakdown and the lack of interior details, apart from a few minor issues, immediately indicate that this is a well-designed and relatively easy-to-assemble kit, as confirmed by many who have already built it. Tamiya had the good idea of including some essential photo-etched parts to improve some areas, mainly the engine grilles. PE parts may not appeal to everyone, but their number is not overwhelming, preventing less experienced builders from feeling daunted.
Another aspect to note is the link and length tracks. In my opinion, Tamiya made the right decision in providing them this way if they wanted assembly to be easier and faster. The size of the links might not have allowed for such a smooth process had they been provided as individual links.
As expected, the three tanks shown in the instruction manual are painted in the standard Russian green, so the only truly significant variation is the German crosses on the captured tank.
Review
Following a logical sequence with the layout of this BT tank, assembly begins with the hull. The hull side plates are double. The inner pieces have separate, angled front plates, but things are easier than expected because they are held in place by pins and rest on the raised detail of the rear panel. To join the panels at the correct width without attaching the hull floor, we have the front and rear axles, as well as a square piece in between the panels for added solidity. After forming the basic hull structure, we can add the floor and the lower rear panel, which has several separate eyelets.
When the outer side hull plates are added, there is a gap between them. This is where the shock absorbers are supposed to be installed, but Tamiya omitted them for the sake of simplicity. Anyway, they weren’t visible in the real tank. The outer sides of the plates show rows of tiny rivets, and the floor has some more detail with the hatch under the engine and a molding below the gearbox. The only interior detail is the driver’s seat, should we wish to use a driver figure. The part is well reproduced, although it seems a bit large and wider than the original.
The suspension arms of the front and rear axles are made up of halves with polycaps of different sizes placed between them. At the front, the suspension is complemented by two steering arms that allowed the first wheels of the running gear to turn when the tank was moving without tracks. The arms are attached on the differential cover of this first wheel and on a connecting rod attached to the suspension arm. All of this seems very complex, but it’s really easier to understand in the instructions than to explain.
After gluing the suspension arms of each wheel, which will be perfectly aligned thanks to the pins located on the inner side, and the front plate of the hull, we can attach the outer side hull plates and glue the wheels.
The wheels are double. They have excellent detail on the rubber treads and in the rims, with special mention for those of the drive wheels and the hubs, which are separate from the road wheels and distinct and accurate on the two steerable wheels. Except for the drive wheels, the rest have an internal polycap allowing to attach them to the suspension arms.
The tracks comprise four sections on each side: six links around the idler and another six on the drive wheel. The long upper section is perfectly straight, so it will be a little difficult to give it a slight sag if our model is not in motion. The lower lengths show minimal ejector marks on the inner sides, but it’s not even worth cleaning them because they are so slight that they won’t be noticeable when painted over. The detail on the links is very good, and the teeth have good definition and, apparently, correct size.
The following phase of assembly consists of attaching the upper hull plate and all its separate parts. Work begins with the engine deck, where we have a jig for bending the intake cover photo-etched mesh. This is somewhat delicate for those without experience, but the instruction drawings are very helpful and clear. The exhaust pipes are hollow and glued to a vertical piece attached below the upper hull plate. The pipes exit through the angled ventilation louvers of this plate.
Next in the assembly are the grilles added to the side radiator intakes, and the separate engine access hatch with its round cover. The hatch handles are molded in place, but it’s worth replacing them for more definition. Other elements on the deck include the jacks, the rear shock absorber mounts, a taillight, and the wheel chocks stored behind the engine hatch.
Finally, the external fuel tank is built to be later placed on the left fender, and the upper rear hull plate, provided with a spare box and two thin shovels molded separately.
At the hull front, we have the tow chain hooks; the headlights, detailed with clear lenses; and the driver’s access hatch with separate doors. The crisp hinges on the lower piece are trimmed if the door is posed open. The upper piece is detailed with a clear visor. The tow chain assembly is sequenced in the instructions to ensure you get a realistic look. The ends of the 85mm length you need for the chain are fitted with two plastic links to attach to the hull’s side hooks.
The fenders come in two pieces, both quite thin and slightly beveled on the outer edges. The front piece has well-reproduced shapes and is free from marks, but the rear piece has several on the inner side that need to be cleaned up due to the large gap between the fender and the chain. This piece includes spare links on each side. The rear fender pieces are inserted into the hull with tabs.
The turret consists of two halves, the gun mantlet, a rear plate, and the roof, this including an antenna base. Each side has an engraved but closed vision slit. The gun mantlet comprises an outer and an inner cover with small trunnions for inserting polycaps that allow the gun to be moved. The inner piece has a very thin gun sight, a superb coaxial machine gun with a separate ammo drum, and the gun breech, with the front end open to insert the barrel, thus fastening it in place. The gun barrel comes as a single piece with a hollowed muzzle. Inside the turret is a seat allowing the tank commander figure to be placed through the hatch.
On the turret roof are two separate hatch covers with clearly defined hinges, although the inner surfaces have tiny marks that should be easy to remove. Other additional elements are two small eyelets, the armored fan cover as well as the periscopes, with two optional pieces to detail the top.
Two figures (an officer and a tank commander) are provided with the kit to create a simple scene. Both have separate arms, heads, and pistols in their holsters. The tank commander also has a separate helmet, and there is a map case for the officer. The sculpting is quite good, though not extraordinary. The details of the officer’s uniform are better than those on the tank commander’s overalls, but the texture and wrinkles of the clothes look good. The faces have well-defined and distinct features. The officer also has decals to indicate his rank on both the collar and cuffs. We can choose between the insignia of Captain, First or Second Lieutenant.
The decal sheet is printed with Russian stars, German crosses, numbers, and the mentioned rank insignia. They have a fine, glossy appearance, good color saturation, and register. There is no excess scarrier.
The instruction manual consists of twelve pages printed in black and white. It contains a list of Tamiya paints, 25 assembly chapters, and two pages of profiles. As is usual with Tamiya, the construction sequences show useful directions in the margins. Special attention has been given to the placement of the engine intake screen and tow chain, so help will be readily available. Paint options, all having the same green livery, offer two Russian tanks and one captured by the Germans.
The white tank with serial number 722 is credited in images, probably from a documentary, where it is seen in a column advancing alongside a railway line near Leningrad in 1943. This image was published in issue number 5 of 1996 of the Russian magazine Bronekollekchiy (Lekky Tank BT-7). In the same magazine, a profile identifies it as a vehicle of the 51st Independent Tank Battalion of the Leningrad Front in the summer of 1943.
The second Russian tank, belonging to the Third Mechanized Corps, has a white cross painted on the roof and turret sides. These markings were used for aerial identification during the Russian annexation of the Baltic states and were still in use during the German invasion of 1941, according to Wydawnichow Militaria No. 57, 1998, page 34. Indeed, this armored unit was stationed in Lithuania in 1940, according to Wikipedia.
Conclusion
I won’t say this kit has no scope for improvement, because any kit does, but what’s included in the box can be turned into a remarkable replica of this important Russian tank. For followers of the topic and scale this is an excellent and highly recommended kit regardless of their skill level. I would even venture to say it’s among the best Tamiya have ever made, and they’ve made quite a few.◊
Publicado – Published: 8 / 2026
©www.jmodels.net


Debe estar conectado para enviar un comentario.