
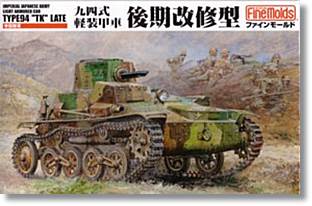

Esta maqueta es otra de las delicatessen del catálogo de Fine Molds. Concebido en realidad como tractor de aprovisionamiento para la infantería, el Type 94 TK fue puesto en servicio a mediados de los años 30, pero se destinó a misiones de apoyo y reconocimiento llegando incluso a servir de vehículo de tiro para contenedores de agentes químicos usados en China por los japoneses. Desde sus inicios adoleció de problemas de estabilidad en el tren de rodaje que a menudo ocasionaban la rotura o salida de las cadenas, de ahí que se fabricase una nueva versión, la de esta maqueta, de rueda tensora más grande con rodillo de goma y situada al nivel del suelo, en lugar de la anterior que era más pequeña, dentada y algo más elevada. Fine Molds comercializa ambas versiones que, como refiero, sólo diferían en el tren trasero y los guardabarros, lógicamente más largos en la versión tardía que en la inicial al estar el eje trasero más atrás.
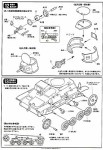
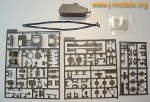
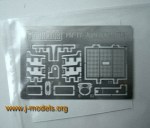
Para dar una idea de las dimensiones de la maqueta, basta con decir que el contenido apenas ocupa dos tercios de la caja, ya de por sí pequeña. Calculo que, una vez terminado, el vehículo no supera en altura a una figura en pie a la misma escala. Sin duda debe haber maquetas a 1/72 más grandes que este Type 94 TK. El modelo despiezado consiste en tres pequeñas grapas, el casco, dos finas cadenas de vinilo, un pequeño juego de fotograbados y una diminuta hoja de calcas. El total aproximado de piezas es de 127, 10 de ellas en fotograbado. De la calidad del plástico y del moldeado de las piezas poco hay que señalar. Tratándose de esta marca, la lija y la masilla no verán mucho la luz. El nivel de detalle para un vehículo tan pequeño es realmente excepcional, aunque sólo por el exterior, ya que en el interior sólo habremos de montar la ametralladora. Todas las escotillas pueden mostrarse abiertas. La del conductor, al ser más elevada, dificultaba el giro completo de la torreta, que además se movía manualmente ya que no había espacio para instalar un sistema de giro eléctrico. Ignoro si la escotilla trasera daba acceso al compartimiento del ametrallador o era un pequeño espacio cerrado de carga. Las fotos de época, como la que aparece en el lateral de la caja, parecen apoyar la suposición de que el ametrallador accedía al vehículo por la escotilla superior. Este punto sólo tiene relevancia si pensamos dejar la compuerta trasera abierta y en tal caso habría que realizar la parte visible del interior a scratch.
El montaje resulta un poco atípico si seguimos las instrucciones, puesto que no lo iniciaremos con el tren de rodaje, sino que primero cerraremos el casco y montaremos la cúpula del conductor junto con las principales escotillas, para luego seguir con las suspensiones y guardabarros, cuyos soportes vienen en fotograbado, así como la rejilla protectora del tubo de escape. Tras añadir enganches, herramientas y terminar la torreta, las últimas operaciones consistirían en añadir las ruedas y cadenas. Tal vez no sea muy aconsejable montarlo de esta forma, pues los pequeños guardabarros podrían entorpecer la colocación de las cadenas.
Las instrucciones vienen separadas en dos folletos. El más largo muestra los pasos de construcción y el segundo está dedicado a la historia, versiones y pintura del vehículo. Desgraciadamente ambos están sólo en japonés, lo que obliga aún más si cabe a un estudio detenido de los mismos antes del montaje. Las piezas de fotograbado, por ejemplo, vienen identificadas en las instrucciones mediante caracteres japoneses en lugar de por un número. Afortunadamente se comprende que los colores se refieren a las gamas de Gunze Sangyo (Mr Color y Hobby Color) y a Tamiya. El camuflaje del carro es verdaderamente polícromo a la usanza japonesa, con verdes, kakis y marrones. Teóricamente podemos elegir entre cinco unidades distintas para nuestro Type 94, pero en la práctica la única diferencia entre ellas es el numeral que llevaban en los laterales y la parte frontal, siendo su camuflaje idéntico. El resto de las diminutas calcas se usan en la matrícula trasera.
En el resumen final hay que significar el hecho de que esta magnífica maqueta se vea algo mermada por el hecho de que Fine Molds dirija sus productos esencialmente al mercado nipón. Bastaría con una buena traducción de las instrucciones al inglés para no quedarnos sin la mayor parte de la información, sin duda muy interesante, que se pierde al ser monolingües. De cualquier forma, este hecho no impedirá a modelistas de cualquier nivel disfrutar de este producto de calidad superior.◊

This kit is another top-of-the-line product from the manufacturer’s range. More than a tankette, the Japanese Type 94 TK was in fact a towing tractor aimed at providing ammunition and supplies to the battlefield troops. It entered service with the Japanese Army by 1930s, but, as it usually happens, it was frequently used for reconnaissance roles and even for towing toxic gas trailers used in China by the Japanese. From the very beginning it suffered from a faulty design in the idle wheels which often caused the tracks to break or be thrown out. To solve the problem the following version, TK Late, was fitted with a bigger idle wheel placed on ground level instead of the former cogged smaller idler. Fine Molds includes both versions in its catalogue that, as I say, were only different in the rear wheels and fenders, also longer in the late version as the rear axle was also moved backwards to improve stability.
To give you an idea of the kit size it is enough to say that the content of the small box takes just two thirds of it. I reckon that, once finished, the model is higher than a standing figure at the same scale. Unquestionably there must be 1/72 kits much bigger than this Type 94 TK. The kit includes three small sprues, the hull, two one-piece thin vinyl tracks, a PE set and a tiny decal sheet. The overall number of parts is 127, 10 made of PE. There is not much to say about the quality of the mold and parts. Sandpaper and putty won’t surely be on your workbench for too long. Exterior details are really excellent for the scale in such a tiny vehicle, however there is no other detail in the interior and we will only have to assemble the machine-gun. All the main hatches can be shown open. Being the driver’s hatch higher, it hindered the turret rotation which was manually moved by the gunner as there was little room for an electric rotating system to be fitted. I don’t know whether the back hatch gave access to the gunner’s compartment or this was a small cargo compartment. Some pictures, such as the one on the box side, seem to support the idea that the gunner used the turret hatch to get on the vehicle. This fact is only important if we wish to leave the back hatch open and scratchbuild some of the interior.
If we follow the instructions, the assembly is a bit unusual because we won’t begin with the road wheels. The first steps show the hull, driver’s cupola and hatches, then you move onto the suspension and fenders whose clamps will come from the photo-etched set as well as the exhaust grill. After adding more clamps, tools and finishing the turret, you will finally assemble the wheels and tracks. I think it is not advisable to do it this way because the tracks could be a pain to set after you glue the fenders.
The instructions come in two different leaflets. The longest one shows the assembly steps and the other is devoted to the historical background, versions and painting options. It is a pity that both are only in Japanese, so a careful study of the building steps is much more than necessary. Photo-etched parts, for instance, are identified in Japanese characters in the leaflet instead of their PE set number. At least one understands that the colour chart refers to Gunze Sangyo (Mr Color and Hobby Color) and Tamiya range. The camo scheme is really multi-coloured in the Japanese fashion, with green, khaki and brown shades. Presumably we can choose to build our vehicle from five different unit versions, but in fact there was no other difference among them but the mantlet and sides code numbers being the camo scheme virtually the same. The rest of the tiny decals are used in the rear number plate.
It is a pity that this fine kit is unbalanced by the lack of good bilingual instructions as Fine Molds kits are only aimed at the Japanese market. An English translation would be enough not to miss all the interesting information which is lost. Anyway, this fact won’t stop any modeler enjoying this top quality kit.◊
Actualizado – Updated: 4 / 2022
Actualizado – Updated: 5 / 2017
Publicado – Published: 8 / 2006
©www.jmodels.net


Debe estar conectado para enviar un comentario.