
De un vistazo – Quick look
MATERIAL Y PIEZAS
MEDIA & PARTS:
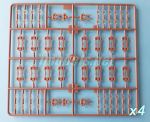
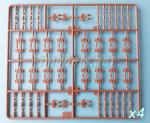
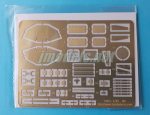
- Plástico inyectado (677 piezas), fotograbado (51 piezas).
- Injected plastic (677 parts), PE (51 parts).
CALCAS – DECALS:
- Matrículas y marcas de unidad británicas en una hoja pequeña. De apariencia fina y sin demasiada película de soporte.
- British number plates and unit markings in a small sheet. Apparently thin and without excess of carrier film.
OPCIONES – OPTIONS:
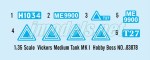
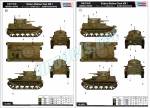
- Vickers Medium Tank Mk. I. Ejército británico, matrícula H1034.
- Vickers Medium Tank Mk. I. Ejército británico, matrícula ME 9900.
- Vickers Medium Tank Mk. I. British army, plate number H1034.
- Vickers Medium Tank Mk. I. British army, plate number ME 9900.
INSTRUCCIONES – INSTRUCTIONS:
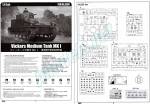
- Folleto de 12 páginas impreso en blanco y negro. Contiene un plano de piezas y 10 secuencias de montaje. Una hoja separada impresa a color en papel satinado muestra las opciones de pintura y una tabla de pinturas. Montaje claro y sencillo de seguir.
- 12-page brochure printed in black and white. It contains a parts plan and 10 main assembly steps. A separate sheet printed in colour on satin paper shows the painting options and a table of paints. Very clear assembly, easy to follow.
LO MEJOR – THE BEST:
- Tema diferente. Buen detalle externo.
- Alternative topic. Nice exterior detail.
LO PEOR – THE WORST:
- Interior del casco y la torre vacío.
- Empty hull and turret.
VALORACIÓN – CONCLUSION:
- Lo que no tiene dentro está bastante bien compensado por el detalle exterior. Una alternativa diferente a los temas más sobados del modelismo de vehículos militares. Para modelistas de nivel medio y avanzado.
- The lack of interior is balanced by the nice exterior detail. A different alternative for those tired of the usual AFV modelling topics. Recommended to modellers with at least some experience.

Era cuestión de tiempo que alguna marca popular pusiera a la venta una maqueta del carro Vickers Mk. I. Hace unos años, HobbyBoss fabricó un nuevo molde y editó esta maqueta junto con las variantes Mk. II, Mk. II* y Mk. II**, quedando así cubiertos los modelos principales y más fabricados en su momento de esta familia de vehículos militares.
Este carro medio no es precisamente muy atractivo y su interés probablemente reside en estar a medio camino entre dos épocas. Por un lado, el Mk. I heredó algunas características del diseño empleado en los carros de la I Guerra Mundial, como su perfil alto y cuadrado o el remachado de su blindaje. Sin embargo, ya apuntaba ciertas evoluciones respecto a aquellos, como la torreta giratoria, un primer intento de conseguir una suspensión más eficiente y adaptable al terreno (intento poco exitoso, por cierto) y una especialización en las funciones de los tres tripulantes que se alojaban en su torre, que liberaba al comandante de otras funciones ajenas a dirigir las operaciones. Esto último no volverá a verse en un carro de combate hasta la aparición del Panzer III, lo que parece demostrar que los alemanes aprendieron bien esta lección de los británicos.
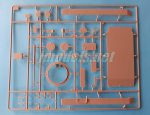
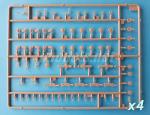
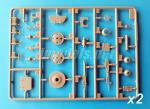
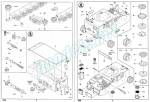
La maqueta de este Mk. I contiene doce bastidores, tres de ellos repetidos, el casco y la torre por separado, una plancha de fotograbados bien nutrida, la hoja de calcas y las instrucciones. Como de costumbre, el plástico de HobbyBoss tiene dureza media y las piezas están bien fabricadas y limpias de rebabas. Sólo algunas muestran pequeños puntos de restos del expulsor que son sencillos de limpiar. Hay algunas marcas de eyector, pero no se encuentran en lugares visibles.
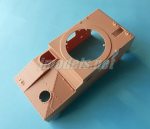
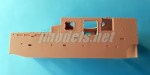
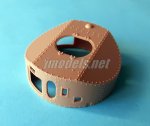
El casco viene en una sola pieza fabricada sin las diferentes escotillas y accesos ni el suelo. El interior está vacío, salvo la parte posterior de las ametralladoras laterales. Los huecos corresponden al anillo de la torre, la puerta posterior de acceso, la escotilla del conductor, dos accesos al motor en la cara frontal, así como otras escotillas laterales y los afustes de las ametralladoras. Estas piezas vienen todas aparte. Las uniones de las planchas y el remachado me parecen bastante buenos y dejan patente que el fabricante ha cargado el detalle en el exterior, ya que dentro del casco no hay nada.
La rejilla de ventilación principal viene moldeada en el casco, así como otras tres más pequeñas en la parte frontal izquierda, lugar donde iba situado el motor. Hay una más en la parte frontal compuesta de tres piezas, una de ellas es un filtro de fotograbado. Las piezas separadas de la parte posterior del casco son una puerta de acceso bien detallada por fuera, con estribo separado, y los enganches de arrastre.
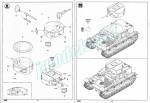
En la zona superior del casco hay que añadir una plancha blindada vertical situada entre la cubierta del motor y la de la torre, una rejilla de ventilación redonda compuesta de dos piezas, la interior de fotograbado, y la cúpula del conductor. Este elemento se compone de cuatro piezas, dos de ellas de perfil semicircular muestran las mirillas abiertas y detalladas con pequeños fotograbados. La escotilla de acceso viene separada y tiene buen detalle externo, pero ninguno interno. Los tapones de llenado de los depósitos de combustible están moldeados sobre el casco y llevan cierres de fotograbado.
También hay escotillas aparte a los lados del casco, además del armamento. Es una pena que las ametralladoras no puedan apreciarse completamente desde fuera porque HobbyBoss las ha replicado bastante bien. Las Vickers están moldeadas de una pieza que tiene el resorte de retroceso y la empuñadura en piezas de fotograbado. El afuste de bola consta de tres piezas y va pegado al panel de salida en el casco. El visor externo de cada arma está situado sobre el afuste y muestra una mirilla abierta. Al venir separada, la escotilla del visor puede mostrarse abierta.
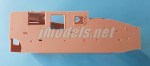
El suelo del casco viene en una pieza con algunas marcas no visibles en su lado interno y cierto detalle externo, especialmente en la parte delantera. La pieza puede pegarse al casco antes de montar las ametralladoras, ya que estas van pegadas desde el exterior.
La torre está fabricada de una pieza a la cual sólo le falta el anillo inferior, que viene aparte. Tanto las planchas como el remachado están bien definidos. También aquí las escotillas vienen separadas y las mirillas tienen cierres de fotograbado. La escotilla de acceso superior tiene doble tapa y muestra buen detalle externo y ninguno por dentro. El cañón viene de una pieza horadada en su boca, pero a diferencia de las ametralladoras, carece de la parte posterior, tan sólo el recuperador viene aparte. El arma va situada sobre una sencilla pieza semicircular con muñones que permiten encajarlo en el anillo de la torre que permiten elevarlo o bajarlo. Las instrucciones no señalan la presencia en los bastidores B de dos excelentes ametralladoras Hotchkiss. Esta arma portátil era parte del armamento defensivo del Mk. I y se emplazaba en la torre para ser operada a través de las escotillas trasera o la delantera. Tampoco indican la instalación de una de las ametralladoras en un pequeño montaje de bola situado en la parte posterior del techo de la torre. Sin embargo, sí vemos este armamento instalado sobre la torre en la hoja a color que complementa al folleto.
Si valoramos en conjunto tanto el casco como la torre, lo primero que podemos concluir es que el fabricante se ha molestado en detallar huecos y escotillas en ambos para no incluir nada que mostrar.
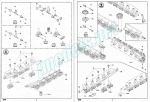
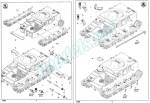
Estudiando las instrucciones, creo que el ensamblado del tren de rodaje va a consumir unos dos tercios de lo que tardemos en montar la maqueta. No es sencillo de montar por el gran número de piezas más que por su dificultad aparente, ya que las instrucciones son de gran ayuda y muy claras.
A cada lado se han de montar cinco carretones dobles y otros dos simples situados delante y detrás de ellos. Cada conjunto dispone de cuatro ruedas y dos soportes divididos en mitades. Entre los soportes se sitúa un amortiguador vertical, con tope separado. Cada conjunto va introducido en la plancha blindada lateral de protección. Cada plancha se ha fabricado de una pieza y muestra cierto detalle en el remachado. Va unida al casco mediante pestañas que permite alinearlo.
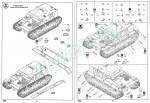
Las ruedas tensoras van situadas a proa y cada una de ellas es doble. Las caras exteriores muestran los extremos de los ejes y unos pernos de ajuste separados. El detalle general me parece fino y convincente, incluso en los diminutos remaches que jalonan los bordes de las piezas. La zona anterior interna de las planchas protectoras del tren está provista de una sección separada para poder introducir estas ruedas sin que se vea la separación desde afuera.
Las ruedas tractoras están compuestas de cuatro piezas cada una, dos de ellas formando los rotores internos detallados con pequeños fotograbados. Los dientes están claramente perfilados y no deberían suponer impedimento para ajustar las cadenas. Los rotores internos de estas ruedas van pegados al casco mediante dos pequeños vástagos de alineación, y no con ejes como es de esperar.
Los rodillos de retorno están formados por un eje y dos ruedas. Hay cuatro por lado, pero las instrucciones señalan la opción de montar o no el primero de cada lado, ignoro el motivo. Los cuatro rodillos van unidos por una barra lateral externa detallada con tres piezas pequeñas que semejan pequeñas palancas de ajuste.
Las cadenas, cuyos eslabones nos recordarán a uno de los modelos empleados por el carro Matilda posterior, están repartidas en cuatro bastidores idénticos. Hay 65 eslabones por lado que vienen muy limpios, sin marcas y con buena definición en su dibujo. He leído, pero no comprobado, que los eslabones no ajustan bien.
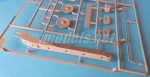
Los guardabarros están fabricados de una pieza y tienen lengüetas para pegarlos al casco y además están bien detallados con soportes de fotograbado. El del lado izquierdo lleva el tubo de escape en dos piezas. Los faros tienen soportes opcionales, pero no se indica si ambos son correctos para el Mk. I, por ello es aconsejable consultar fotos del vehículo. La lente no es una pieza transparente y los protectores están fabricados en una sola pieza de fotograbado.
Las calcas están impresas en una hoja pequeña que sólo contiene matrículas y marcas de unidad. Su apariencia es fina y están bien impresas, sin exceso de soporte.
El folleto de instrucciones tiene doce páginas impresas en blanco y negro. Trae un plano de piezas y diez capítulos de montaje. Como es habitual en el fabricante, también hay una hoja separada a color que muestra las opciones de pintura, nada originales puesto que son monocromas, y una tabla de pinturas con referencias de varios fabricantes (Gunze Sangyo, Vallejo, Model Master, Tamiya y Humbrol). No hay indicación sobre las unidades a las que pudieron pertenecer los dos carros que se muestran. Aunque el montaje aparece claramente secuenciado y no es difícil de seguir, conviene estudiar bien el tren de rodaje. Como he señalado, el folleto no dice nada sobre el armamento adicional en la torre y parece que HobbyBoss no ha previsto que se emplee en esta maqueta, aunque es factible hacerlo.
Aunque se echa de menos que HobbyBoss hubiese incluido al menos parte del interior de este Mk. I, desde mi punto de vista el detalle externo compensa en gran parte la merma. Por más que el vehículo no es precisamente agraciado y que la pintura no tiene variedad, me parece un acierto del fabricante el haber editado esta maqueta y los demás modelos del carro medio Vickers, no tan conocido como otros anteriores y posteriores. Siendo realista, no creo que la mayoría de modelistas de vehículos militares se sientan muy atraídos por la maqueta, pero siempre habrá quien desee tener opciones de hacer algo diferente. Recomendada a modelistas de nivel medio en adelante.◊

It was just a matter of time that a mainstream company brought us a new kit of the Vickers Mk. I. Some years ago, HobbyBoss released this new tool kit coupled with the Mk. II, Mk. II* and Mk. II** variants, thus completing the main, and most produced, members of the Vickers Medium family.
The tank is not very attractive indeed, and probably its main interest is in the fact that it was developed in between two wars. On one side, the Mk. I inherited some of the design features used in WWI tanks, such as the high and boxy profile or the rivetted armour plating. On the other, it was a development which had new characteristics as a rotating turret and a first attempt to get a more efficient suspension, unsuccessful as it was, and a specialization in the roles of the three-man turret, which left the commander the only role of leading the vehicle. This last fact would not be seen again in a tank until the German Panzer III appeared some years later and shows that the Germans learnt a few lessons from British tank designers.
This Mk. I kit consists of twelve plastic sprues, three of them in several copies, a separated hull and turret, a well provided PE fret, a decal sheet and the instructions. As usual in HB, plastic is medium hard and parts look quite clean, finely moulded and free from any flash. There are small pins on some parts, but nothing it can´t be cleaned up easily, and a few marks on invisible spots inside the hull.
The hull is moulded in one piece without the floor and most of the hatches. The interior is empty, except for the side machine-guns. There are separate pieces for the driver´s cupola and hatch, two front engine doors, side hatches and the machine-gun mounts. Armour plates and rivets on the surfaces look well rendered and show that HB has included a lot of detail on the exterior since there is nothing to show inside.
The main intake grille comes moulded on the hull as well as three smaller grilles on the front left side, just where the engine was placed. There is an air intake filter at the front consisting of three pieces, one of them a PE grille. Separated parts on the hull rear side are a nice access door, a foothold and the towing clevises.
There is a long and narrow armour plate to attach between the front engine deck and the turret deck, a round PE grille in two pieces and the driver´s cupola. This is moulded in four parts with the two frontal sections provided with visors detailed with small PE bits. The driver´s hatch is moulded apart and has good exterior detail, but it is flat on the inner side. Fuel tank fillers are also moulded on the hull and have separate photoetched latches.
In addition to the armament, there are also some hatches on the hull sides. It is a pity the machine-guns cannot be seen from outside as they are nicely moulded and detailed, with separate “fusee spring covers” (as the recoil spring was usually called in the Vickers gun) and PE handgrips. Ball mounts consist of three pieces each and are attached to separate hull panels. There are separate panels located above the machine-gun openings showing open slits that can be posed open.
The one-piece floor has a few pin marks on the internal side that will not be seen and also some rivets, especially at the front. The part can be attached to the hull even before the armament as this is added from the outside.
The turret also comes moulded in one piece without the ring, which is separated. Both the armour plating as the rivetted surfaces are well defined. Also included as separate parts are the side and roof hatches as well as the PE slit covers. The roof hatch has a split door showing nice exterior detail, but again nothing on the other sides. The one-piece plastic gun has a hollowed muzzle, but contrary to the machine-guns has no butt and only the recuperator is apart. The weapon is inserted into a semicircular mantlet provided with trunnions to fit on the turret ring that let the gun move upwards or downwads. Instructions do not show two excellent Hotchkiss machine-guns included in sprues Bs. This portable weapon was part of the Mk. I defensive armament and was fired through the two rear hatches or the front hatch. The brochure does not include the assembly of a gun in the ball mount placed on the turret roof. However, we can see it on the separate colour sheet.
Studying the instructions, I think the running gear and tracks assembly will take up about two-thirds of the build. The gear is not easy to attach due to the large number of parts rather than to its apparent difficulty since the instructions are very helpful and very clear.
Five double bogies and two single ones must be built on each side. Each bogie has four wheels and two support arms in halves. Between the arms there is a vertical shock absorber with a separate top. Each set is inserted into the side armored plate. The protecting plates have been made in one piece each and show some rivetted detail and tabs to be inserted into the hull sides.
Idlers are located forward and each of them is double. The outer faces show the shaft ends and separate bolts. Overall detail seems fine and convincing, even in the tiny rivets moulded along the edges. The internal front area of the plates is provided with a separate section to insert the wheels.
Sprockets comprise four pieces each, two of them for the internal rotors detailed with small photo-etched parts. The teeth are clearly profiled and should not be an issue to fit the chains. The internal rotors are attached to the hull by two small alignment rods, and not with axles as you would expect.
Return rollers are made up of a shaft and two wheels. There are four per side, but the instructions indicate the option of including or not the first one on each side, I do not know why. The four rollers are linked by a detailed external sidebar with three small pieces that resemble small levers or latches.
Track links will remind you of those used by the later Matilda tank and come in four identical sprues. There are 65 links per side these being very clean and showing good definition. I have read the links do not fit easily, but I have not checked this.
Fenders are made in one piece and have tabs to fit the hull. They are well detailed with PE supports. The left fender has a separate exhaust pipe in two pieces. Headlights have optional brackets, but instructions do not point out if both are correct for the Mk. I, so it is advisable to check photos of the vehicle. Lenses are not clear pieces, and the covers are made from a single folded PE part.
Decals are printed on a small sheet showing British number plates and unit markings. They are apparently thin and seem well printed. They dont show excess of film.
The instructions brochure has twelve pages printed in black and white. It contains a parts plan and ten assembly chapters. As usual, there is a separated colour sheet that shows the painting choices, which are nothing but the overall British army green, and a table of paints with references from Gunze Sangyo, Vallejo, Model Master, Tamiya and Humbrol. There is no information about the tanks shown on the sheet, the only difference is a white triangle on the hull and turret in one of them. Though the build is clearly sequenced, and it is not difficult to follow, a careful study of the running gear assembly is advisable. As said, the brochure does not say anything about the additional turret weapons, and it seems HB have included the parts but have not intended the modeller can use them.
Though one misses at least some of the interior, I think external detail largely compensates for the loss. As much as the vehicle is not exactly graceful and the paint has no variety, it is good news that the manufacturer has released this and the other kits of the Vickers medium tank, not as well known as others from the early and later periods. Being practical, I don’t think most AFV modellers are very attracted to this kit, but there will always be some who want to build something really different. Recommended to intermediate and experienced modellers.◊
Actualizado – Updated: 4 / 2022
Publicado – Published: 3 / 2021
©www.jmodels.net


Debe estar conectado para enviar un comentario.