
De un vistazo – Quick look
MATERIAL Y PIEZAS – MEDIA & PARTS:
- Plástico inyectado (118 piezas), vinilo (5 piezas), fotograbado (39 piezas).
- Injected molded styrene (118 parts), vinyl (5 parts), PE (39 parts).
CALCAS – DECALS:
- Hoja pequeña que contiene marcas nacionales, de la ONU y matrículas alemanas. Colores y registro correctos.
- Small sheet containing German and UN markings as well as two German number plates. Good colour and register.
OPCIONES – OPTIONS:
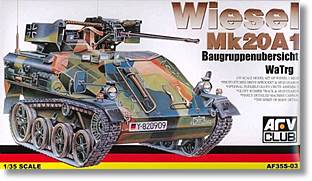
- Misión militar de ayuda humanitaria. Fuerzas de la ONU. Somalia, 1990.
- 262º Batallón Paracaidista alemán, año 1990 en adelante.
- International military aid mission. UN Forces. Somalia, 1990.
- 262nd Fallschirmjäger Battalion, 1990 onwards.
INSTRUCCIONES – INSTRUCTIONS:
- Folleto doblado de 10 páginas. Contiene datos históricos en alemán e inglés, diagrama de piezas, referencias de pintura en varias marcas, guía de pintura y colocación de calcas y 16 fases principales de montaje.
- Folded 10-page leaflet containing a short historical summary about the vehicle (German and English), parts plan, paint reference in several ranges, painting and decaling guide and 16 main assembly steps.
LO MEJOR – THE BEST:
- Molde bastante limpio, detalle general correcto.
- Clean tooling, correct overall detail.
LO PEOR – THE WORST:
- Cadenas de vinilo.
- Vinyl track lengths.
VALORACIÓN – CONCLUSION:
- Pese a sus años, maqueta más que aceptable para representar un Wiesel 1, aunque no apta para principiantes pese a su tamaño.
- Despite the years around, a more than acceptable kit to represent a Wiesel 1. Not suitable for absolute beginners.

Recientemente AFV Club ha vuelto a reeditar esta maqueta con los únicos cambios en el color del plástico (gris ahora), las calcas, que permiten hacerlo de unidades alemanas de la ISAF, y de la mira más moderna adosada a la torreta del cañón automático que lleva el modelo A3. Esta marca también dispone, e igualmente ha reeditado, el carro dotado con lanzador de misiles anticarro TOW. El lector poco ducho en vehículos modernos no debe confundir este Wiesel 1, fabricado en varias versiones durante décadas para el Bundeswehr, con el más reciente Ozelot (también llamado Wiesel 2), de dimensiones mayores, especialmente más alto y largo, por lo que su tren de rodaje incluye una rueda más. Revell tiene actualmente en catálogo su propio molde con tres versiones del Ozelot, dos de defensa antiaérea (LeFlaSys, compuesto de vehículo radar y vehículo lanzamisiles) y una de exploración.
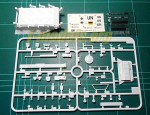
Las piezas vienen repartidas en tres bastidores principales realizados en plástico blanco para facilitar la pintura del vehículo de la ONU que se incluye como opción. También encontramos dos pequeños bastidores con piezas de vinilo y otro algo mayor con las piezas de fotograbado, destinadas a realzar algunos detalles menores y los dientes de las ruedas tractoras. Dos tiras de cadenas de vinilo, las calcas y las instrucciones completan el contenido de la maqueta. El plástico en general muestra buena calidad, sin rebabas ni marcas en lugares visibles, y el detalle es especialmente bueno en las piezas pequeñas. El tamaño del vehículo puede engañar al modelista sobre su facilidad de montaje. En realidad estamos ante una maqueta delicada, multimedia y con multitud de piezas pequeñas que no auguran un montaje con los ojos cerrados precisamente, de ahí que la haya calificado como no ideal para principiantes en el sumario.
El montaje general es el convencional en este tipo de maquetas. Se inicia con el tren de rodaje y la amortiguación, continúa con el cierre del casco (moldeado en dos piezas), cuyo interior viene completamente vacío, y termina con la adición de detalles exteriores y el montaje del armamento y la torre. La definición de los detalles externos es bastante buena. Siguiendo las instrucciones, una posible zona problemática a priori es el ajuste de los guardabarros, diferentes según el lado del vehículo, de una pieza el derecho y de varias el izquierdo, donde además hay que montar el tubo de escape y varias piezas de fotograbado. Se requiere cierto cuidado al pegar las piezas en estas dos zonas debido al perfil angulado hacia adentro de los lados del vehículo.
Las escotillas del conductor y del artillero vienen en piezas separadas, lo que permite mostrar el vehículo abierto. No todas las piezas de fotograbado resultan igualmente útiles para mejorar la maqueta. Las asas de las escotillas, por ejemplo, son completamente planas y conviene sustituirlas por hilo de cobre. Otro aspecto que hubiese acabado de redondear esta maqueta habría sido la inclusión de piezas transparentes para los faros y las luces giratorias de proa en lugar de fabricarlos completamente de plástico.
Tras pegar la multitud de pequeñas piezas del exterior (faros, guardabarros, periscopios, retrovisores, etc.), el montaje final corresponde al cañón automático y la torre. El cañón presenta buena definición, se compone de nada menos que dieciocho piezas incluidos los contenedores de munición. La cinta de munición es una pieza aparte fabricada de vinilo, igualmente con buena definición en los detalles. Resulta extraño que el fabricante decidiese emplear este material en lugar de plástico, aunque una posible explicación esté en el hecho de que es más fácil de adaptar a los dos contenedores laterales y permite simular la ligera caída que la cinta tiene entre el contenedor y el arma, como sucede en la realidad. Aunque para algunos modelistas el vinilo resulta un material problemático, en este caso será difícil de sustituir por la pieza correspondiente del fotograbado de Eduard (referencia 35291) ya que la munición es completamente plana y por ello irreal. La torre viene moldeada en una pieza, con escotilla en pieza separada y multitud de detalles como el visor, los soportes de los contenedores de munición y hasta los goznes de la escotilla, que son realmente diminutos. Redondea el montaje la adición de las herramientas y los correajes para sujetar la red de camuflaje (no incluida), que deben realizarse en papel según las instrucciones, y cuyas medidas exactas pueden verse en ellas.
Las cadenas merecen mención aparte porque son sin duda lo menos bueno de la maqueta. Vienen en dos largos ajustables mediante abotonadura. Ignoro si se dejarán pegar adecuadamente con pegamento al uso, pero el detalle de los diminutos eslabones es bastante correcto, sin marcas de eyector ni rebabas y con los dientes interiores en relieve. Lo mejor que se podía sacar en su momento del material para representar unos eslabones tan pequeños. Aunque son perfectamente empleables, existe un juego de cadenas de resina para sustituirlas de la marca Djiti’s Production (referencia 35022).
Las calcas incluyen marcas y dos pares de matrículas diferentes para dos vehículos (Naciones Unidas y Batallón Paracaidista alemán de los años 90). Presentan colores densos, son finas y no contienen exceso de película transparente. Las instrucciones están impresas en un folleto desplegable de 10 páginas y muestran 16 pasos generales de montaje. Las referencias de color corresponden a la gama de acrílicos de Tamiya, aunque se ha incorporado también una tabla de equivalencias en colores de Gunze, Humbrol y Revell. Las indicaciones están en chino con su correspondiente traducción al inglés y se incluyen detalles aumentados para la colocación correcta de algunas piezas muy pequeñas.
A modo de resumen, creo que se puede recomendar este Wiesel a los aficionados a los vehículos actuales. Los modelistas con tan sólo un nivel de experiencia medio-bajo puede sacarle bastante partido. A los que duden entre esta edición y la más actual, a similitud de precio les recomendaría esta última porque incluye versiones para Afghanistán y la opción de montar el modelo A3 si así lo desean.◊


AFV Club have recently re-released this kit with only minor changes in the plastic color (now grey), decal versions (a German ISAF vehicle is now included) and a couple of new parts for the updated sight present in the more modern A3 version. The Taiwanese brand has a TOW version which has also been reissued. The reader not used to modern AFVs should not mistake this Wiesel 1 I review here, which has been produced for the German Bundeswehr for decades, with the more recent Wiesel 2 (Ozelot) which is a different improved version easy to distinguish being higher and longer and whose running gear has an extra road wheel. Revell have their own tooling of the Wiesel 2 in three different version on their catalogue: two vehicles corresponding to the AA LeFlaSys system and one exploration vehicle.
Parts come in three main white sprues to help paint the UN vehicle which is one of the options included. We also find two little black vinyl sprues and a bigger sprue containing the PE parts to enhance some small detail and the teeth for the sprocket wheels. Two vinyl track lengths, a decal sheet and the instructions round up the content of the kit. Plastic shows a good quality and parts are clean, without flash or sink marks in visible spots. Detail is especially fine in the smallest parts. The size of the vehicle should not misguide the modeler about its ease of assembly. In fact, what we have is a delicate, multimedia kit with lots of tiny parts which do not announce a shake and bake process, that’s why I have labelled this kit as not suitable for beginners in the summary above.
Assembly is the usual in this type of kits. It begins with the running gear and shock absorbers, goes on with the hull assembly (molded in top and bottom halves) and finishes with the assembly of external detail, gun and turret. Definition of the exterior parts is quite good. Following the instructions, there may be one rather serious issue when fitting the mudguards, different depending on the side of the vehicle. The right mudguard comes in one piece whereas the left one comprises the exhaust and a few PE parts, such as the vented screen. Especial care is needed to glue these parts on the vehicle sides since the profile is angled inward.
Both the driver’s and gunner’s hatches are separate parts, which allows you to show the vehicle open. Not all the PE parts are essential to enhance the kit. The hatches handles, for instance are flat and it is advisable to replace them by wire. Another aspect that had made this a superb kit would have been the inclusion of clear parts for headlights and siren lights instead of plastic.
Having finished the addition of a handful of small parts on the vehicle (lights, mudguards, periscopes, mirrors and the like), final assembly arrives with the building of the automatic cannon and the turret. The gun has a good definition comprising no less than 18 parts including the different ammo boxes. The ammo belt is a separate vinyl part, with also good definition in detail. It seems strange that AFV Club used this media for the belt instead of styrene, although a possible explanation would be in the fact that it’s easier to adapt the belt to the side boxes and also it allows to simulate the slight sag the belt often has between the ammo boxes and the cannon. I know that for some modelers vinyl parts are problematic and in this case the part will be hard to replace by its counterpart on the Eduard PE set (reference 35291) as the ammo is completely flat and unrealistic. The turret is basically one part with separate hatch and another handful of tiny parts to add such as the gunsight, ammo boxes holders or even the microscopic hatch hinges. The finishing line for the assembly are the addition of the pioneer tools and the belts for the camo net (not included) and that are to be made with paper following their exact size also shown in the instructions.
Tracks are worth a separate comment because they are not on the same level with the rest of the kit, but this doesn’t mean they are unusable. The lengths have a good definition for the media, perhaps the best one could achieve with this material when the kit was first released. There is no flash or marks on the tiny links and they show the small inner teeth molded. In the old style, they are simply buttoned on their ends, but I don’t really know if common plastic glue can be used here. If you really hate this material, there is a resin replacement set made by Djiti’s Production (reference 35022).
The decal sheet includes German and UN markings, and two sets of different number plates. They are dense, in good register and without too much carrier film. Instructions are printed in a folded ten-page leaflet and show 16 main building steps. Color references in the assembly belong to Tamiya acrylic paints but a conversion table with other brands (Gunze, Humbrol and Revell) has also been included. Directions are explained both in Chinese and English and some smaller location details have been expanded to ease building.
Summing up, I think this kit is quite recommendable to modern AFVs fans. Modelers with only some kits on their belts can do a very good job with it. To those who hesitate between this edition and the most recent kit I would recommend this latter, as it includes markings for the German ISAF mission and the option to build an A3 version if they wish so.◊
Actualizado – Updated: 4/ 2022
Actualizado – Updated: 5 / 2017
Publicado – Published: 6 / 2015
©www.jmodels.net


Debe estar conectado para enviar un comentario.