
De un vistazo – Quick look
MATERIAL Y PIEZAS
MEDIA & PARTS:
- Plástico inyectado (76 piezas).
- Injected molded styrene (76 parts).
CALCAS – DECALS:
- No tiene.
- Not included.
OPCIONES – OPTIONS:
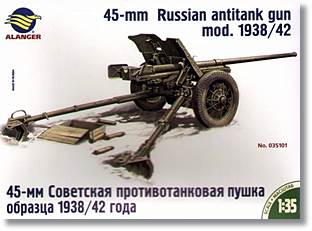
- Modelo 1938 con tubo corto y ruedas de radios.
- Modelo 1942 con tubo largo L/62 y ruedas de disco.
- Model 1937 with short barrel and spoked wheels.
- Model 1942 with long L/62 barrel and disk-rim wheels.
INSTRUCCIONES – INSTRUCTIONS:
- Hoja tamaño A4. Incluye sumario histórico y datos técnicos (en ruso), diagrama de piezas, montaje y referencias de color en la gama de Humbrol.
- A4 sheet showing historical summary and technical data (in Russian), parts plan, building steps and colour reference in the Humbrol range.
LO MEJOR – THE BEST:
- Sencillez de montaje, maqueta (por ahora) única, versatilidad para ser usada en diferentes escenas con o sin vehículos.
- Easy assembly, assembly choice, unique (for the time being) kit, versatile kit to be shown in different scenes with/without towing vehicles.
LO PEOR – THE WORST:
- Cada vez más difícil de encontrar. Sin sustituto a la vista por el momento. No hay mejoras para detallarla.
- As time goes on, more difficult to find. Still no replacement kit in sight. No aftermarkets.
VALORACIÓN – CONCLUSION:
- Aunque no está al nivel de las mejores marcas, es sencilla y decente. Recomendable.
- Although not at the same level as other manufacturers, it’s an easy and decent kit of an important WWII Soviet artillery piece. Recommendable.

Si la memoria no me falla, desde que Italeri sacó en colaboración con Zvezda algunas maquetas de diferentes piezas de artillería soviéticas (me refiero en plástico) y algún mortero en esta escala hará no menos de 15 años, el tema ha sido sistemáticamente relegado al olvido por los principales fabricantes occidentales. En tiempos más recientes, sólo Bronco Models y Trumpeter se han atrevido a editar nuevos moldes de diferentes cañones soviéticos, especialmente los de más grueso calibre. En el lado europeo oriental, Zvezda, ICM y especialmente MiniArt son los principales productores de moldes para las piezas rusas de mediano calibre, como los diferentes modelos del cañón ZIS. Sin embargo, desde que Alanger dejó de existir hace algunos años, nadie (ni siquiera Ark Models, que heredó sus moldes) ha tomado el relevo para los cañones más livianos como esta pieza anticarro de 45 mm. Y es una pena porque en concreto este cañón fue muy importante dentro del Ejército Soviético, especialmente en los primeros años del conflicto en el Frente del Este, hasta 1943 más o menos. Originalmente su vehículo de tiro era el tractor T-20 Komsomolets, aunque ya iniciada la guerra algunas fotos de época lo muestran también guiado por camiones, Jeep o caballos de tiro.
La maqueta de Alanger comprende 76 piezas. El plástico tiende a blando, no presenta rebabas, marcas de eyector y muy pocas líneas de molde. Las piezas son razonablemente finas. Sólo el escudo del cañón tiene algo más de grosor para la escala, aunque personalmente tampoco soy muy partidario de los fotograbados excesivamente finos para sustituir estas piezas, puesto que llegan a resultar igual de irreales.
El montaje comprende cinco fases principales. En primer lugar, debemos decidir qué tubo vamos a montar sobre la cuna. La maqueta trae dos cada uno de ellos fabricado de una sola pieza: el corto es el del modelo inicial de 1938, que es el que más aparece en fotos de la época, y el largo es el L/62 modernizado del modelo 1942. El bloque de culata es común a ambos y consiste en una pieza con inserción para pegarlo al tubo.
El siguiente paso consiste en montar el cañón sobre el cureñín, añadir el escudo (despiezado en tres partes, por lo que hay que cuidar el ángulo de las dos partes laterales), pegar las gualderas, la mira, las manivelas de rotación y elevación y otros pequeños elementos como los soportes del escudo.
A continuación, hay que montar la cureña, que viene despiezada en dos mitades pare permitir la inserción de los mástiles y que estos se puedan situar en posición de tiro o de transporte. Teóricamente los mástiles son móviles, pero es aconsejable fijarlos, una vez decidida la posición en la que queramos ponerlos, para evitar problemas al manipular la maqueta o pintarla. Los mástiles vienen de una pieza con la parte superior de las rejas. Para las ruedas hay dos modelos. Las de radios pertenecen al modelo 1938 (tubo corto) y vienen en dos mitades, las de disco corresponden al modelo posterior (tubo largo) y están fabricadas de una pieza. En estas el detalle es algo peor y hay que eliminar líneas de molde de las llantas, que además tienen las bandas de rodadura completamente lisas. Sólo tengo constancia de la existencia de un solo ejemplar, conservado en un museo ruso, que está montado con tubo largo y ruedas de radios, o lo que es lo mismo, ruedas de 1938 y tubo de 1942, combinación que bien pudo darse en algún momento durante la guerra cuando se fue introduciendo el cañón L/62 en las cureñas iniciales.
Los dos últimos pasos de montaje consisten en pegar el cañón (escudo incluido) sobre la cureña y montar las cajas de munición. El detalle de las dos cajas es bastante simple y carecen de los soportes de madera interiores. Para cada caja la munición comprende nueve proyectiles de distinto tipo (explosivos o perforantes) y tres vainas vacías.
Las instrucciones vienen en una hoja tamaño A4 escrita en ruso, salvo las indicaciones de colores de Humbrol. Además, la parte posterior de la caja sirve también como guía de pintura y montaje de las dos opciones de este cañón. La hoja de instrucciones contiene también un resumen histórico y un diagrama numerado de piezas en el bastidor.
La maqueta se puede recomendar por su sencillez de montaje y su polivalencia para diferentes vehículos o escenas. Sin embargo, sería deseable contar con una actualización de esta importante pieza de artillería, tan usual en el Ejército Rojo como el PAK 36 en el alemán.◊


It’s been a long time since Italeri released some Zvezda’s kits of different Soviet artillery guns and a mortar at this scale, no less than 15 years back, and the issue has been neglected by western manufacturers since then. In recent years, Bronco Models and Trumpeter have brought us new kits of the heaviest guns of the Soviet arsenal and eastern European manufacturers, such as ICM, Zvezda again and especially MiniArt have dedicated their efforts to the medium guns of the ZIS family, for instance. However, since Alanger went out of the market some years ago, nobody (not even Ark Models, which inherited their molds) has taken over the production of Russian WWII light guns including this 45mm anti-tank gun. This weapon was very important in the Red Army especially in the first years of the conflict, at least until 1943. Originally it was designed to be towed by the T-20 Komsomolets tractor, although some wartime pictures show it attached to trucks, jeeps and horses.
Alanger kit comprises 76 parts. Plastic is rather soft with no flash, ejector marks and just a few seam lines to eliminate. Parts are reasonably thin with only the shield a bit thick for the scale. Personally, I’m not very fond of very thin PE parts to replace these shields because they tend to look as unrealistic (but for opposite reasons) as the thick parts that some manufacturers provide.
Assembly covers five main stages. First, we have to decide which barrel we will use on the cradle. The kit has two options each of them molded as one part: the short barrel corresponds to the early 1938 model, which is the one mostly seen in pictures, and the long L/62 barrel belongs to the later 1942 version. The breech block is a common part to both barrels and consists of just one part with an insert to be joined to the barrel.
The next step takes you to set the barrel and cradle on the chassis, build the shield (which consists of three parts and needs careful alignment of the left and right sections), add the elevation racks, the sight, the elevation and rotation hand wheels and some other small bits such as the shield holders.
The following step is building the carriage, which comes in two halves to allow the insertion of the trail arms. These can be shown in towing or combat position and are moveable, but it is advisable to affix them in the desired position to avoid problems when we handle or paint the model. The arms come in just one part each with the upper side of the spades. There are two types of wheels. Spoked wheels were used with the 1938 version (short barrel), these come in two halves and detail and finesse are quite acceptable. The 1942 (long barrel) disk-rim wheels are molded as complete parts. Detail here is worse, with no pattern and a seam line to be eliminated on the tread. I have only seen one example, preserved in a Russian museum, with a combination of spoked wheels and long barrel (that is 1938 wheels and 1942 L/62 gun). This combination seems likely to have been used in the war while the new L/62 gun was being introduced.
The last two main steps are setting the gun on the carriage and build the ammunition boxes. Detail on the boxes is quite simplistic and lack the interior wooden brackets for the shells. There are nine complete shells (with both explosive and piercing rounds) and three cases to be used as spent rounds per box.
Instructions consist of a single A4 sheet written in Russian, except for some colour indications in the Humbrol paints. The back of the box shows both versions of this gun and can be also used as painting guide. The sheet also contains some historical data and a diagram to locate parts, almost unnecessary for a single sprue.
Easy assembly and versatility to be used with different vehicles and settings make the kit recommendable. But modelers should have an updated release of this important gun soon, as usual in the Red Army as the PAK 36 in the German side.◊
Actualizado – Updated: 4 / 2022
Actualizado – Updated: 5 / 2017
Publicado – Published: 4 / 2012
©www.jmodels.net

Debe estar conectado para enviar un comentario.