
De un vistazo – Quick look
MATERIAL Y PIEZAS
MEDIA & PARTS:
- Plástico inyectado (89 piezas), acetato (2 piezas). Incluye 1 figura (6 piezas).
- Injected plastic (89 parts), acetate (2 parts). One figure included (6 parts).
CALCAS – DECALS:
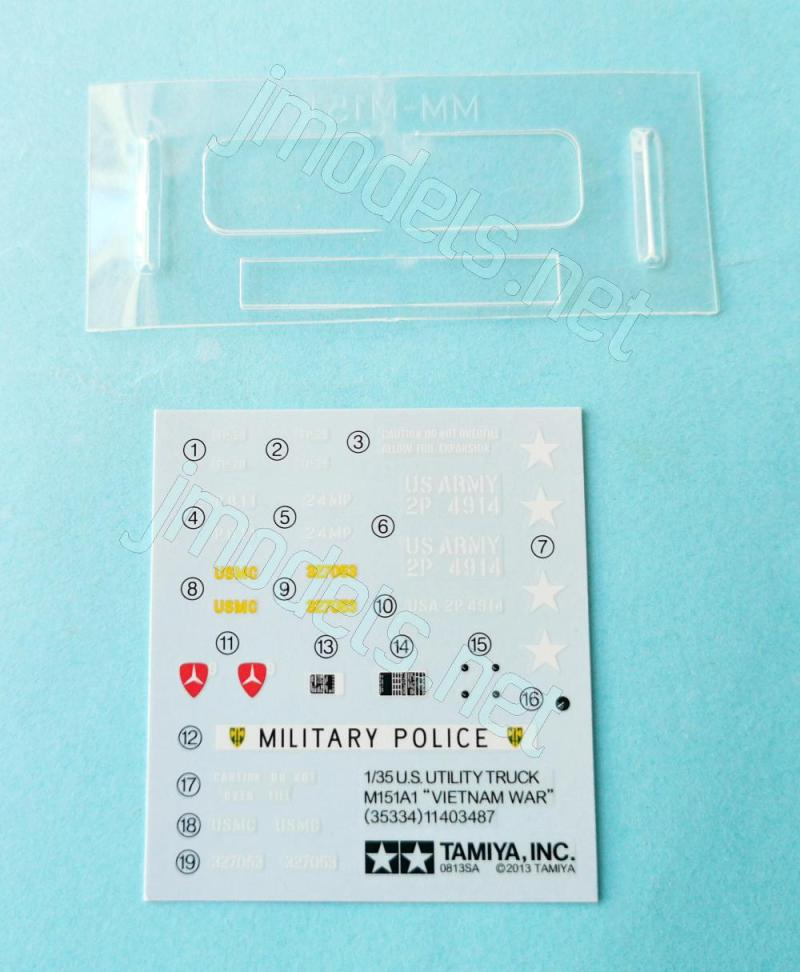
- Insignias nacionales y de unidad, matrículas, números de registro, calcas del salpicadero. Aspecto fino y brillante. Buen registro y saturación de color. Sin demasiado soporte.
- US and unit insignia, number plates, registration numbers, dashboard decals. Thin and glossy finish. Good register and color saturation. No excess of carrier film.
OPCIONES – OPTIONS:
- M151A1. USMC. 3rd Marine Division. Vietnam.
- M151A1. US Army. 18th Military Police Brigade. Vietnam.
INSTRUCCIONES – INSTRUCTIONS:
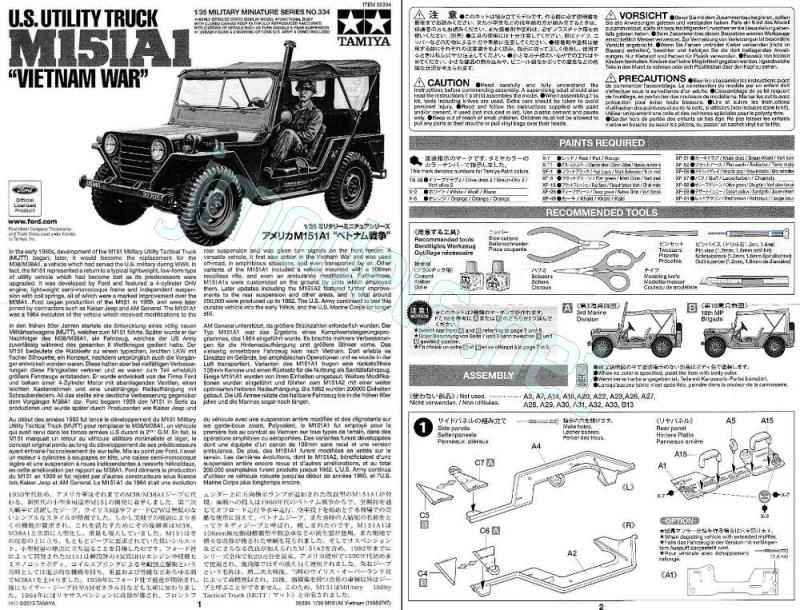
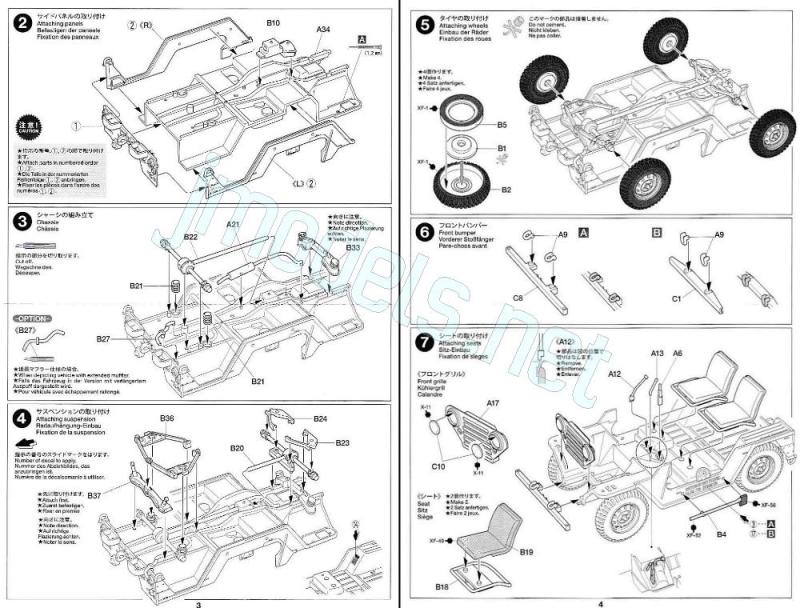
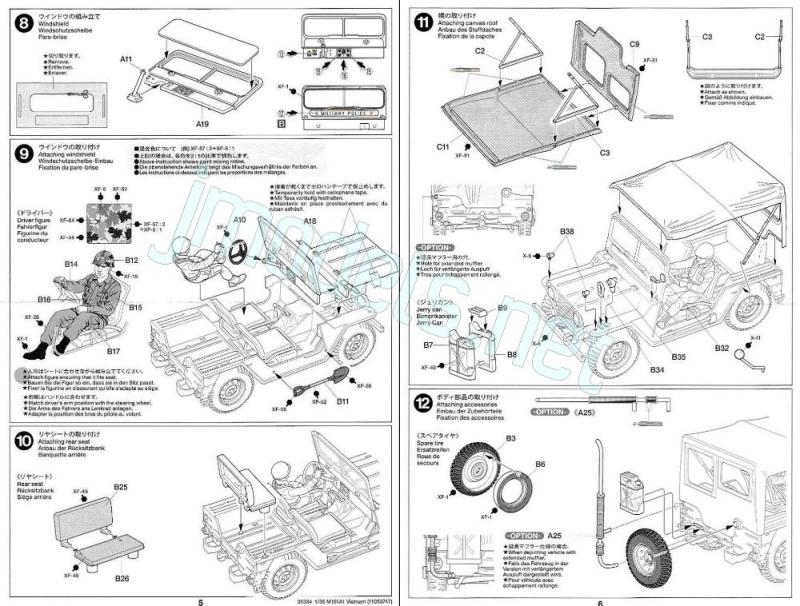
- Folleto doblado de 8 páginas impreso en blanco y negro. Contiene una introducción histórica sobre el vehículo en varios idiomas, 13 secuencias de montaje y perfiles con referencias de pintura del fabricante.
- 8-page folded booklet printed in black and white. It shows a historical summary about the vehicle in several languages, 13 assembly chapters and profiles with paint references from the manufacturer.
LO MEJOR – THE BEST:
- Buen detalle general. Sencillez de montaje.
- Nicely detailed overall. Ease of assembly.
LO PEOR – THE WORST:
- Faros no transparentes. Volante erróneo. Ausencia de motor, pedales y piezas transparentes para el toldo.
- Headlight lenses are not clear parts. No engine, pedals and canvas clear windows provided.
VALORACIÓN – CONCLUSION:
- Reedición con modificaciones del M151A2 con una mayoría de cambios acertados para el modelo A1, aunque Tamiya olvidó hacer alguno más y mantuvo los errores y omisiones de maquetas anteriores.
- It is a reissue of the M151A2 kit with correct new parts for the A1 variant, though Tamiya forgot to change one and still kept the omissions and mistakes of previous boxes.

La maqueta
En 2013 Tamiya lanzó dos nuevas cajas de su Ford Mutt. Una de ellas era básicamente una reedición con algunos cambios del M151A2 anterior (U.S. Utility Truck “Grenada 1982”, referencia 35332). La segunda, realmente más novedosa por ser la primera maqueta del fabricante dedicada al modelo inicial M151A1, la llevaban esperando los aficionados mucho tiempo. Lo cierto es que la maqueta convence, aunque sólo parcialmente.
Para comparar esta maqueta con la del M151A2, el lector puede consultar las dos revisiones que ya he publicado anteriormente en esta páginas: M151A2 w/ TOW Missile Launcher (referencia 35125) y U.S. M151A2 Ford Mutt with M416 Cargo Trailer (referencia 35130).
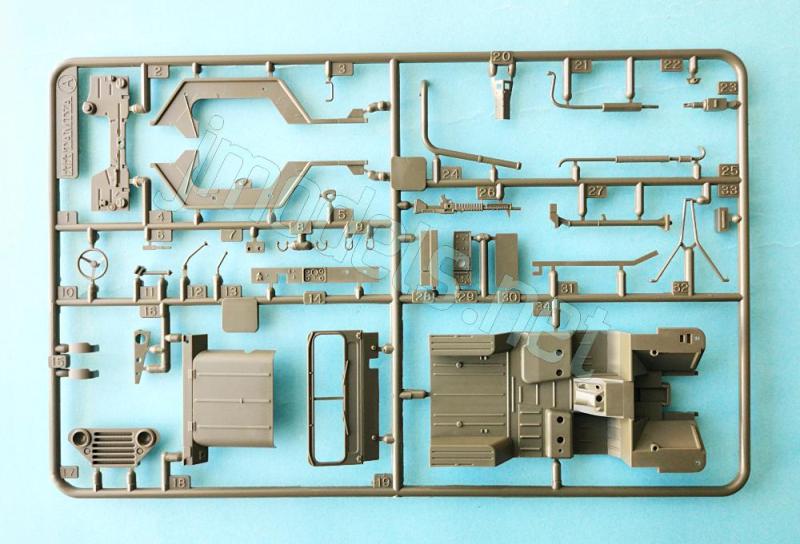
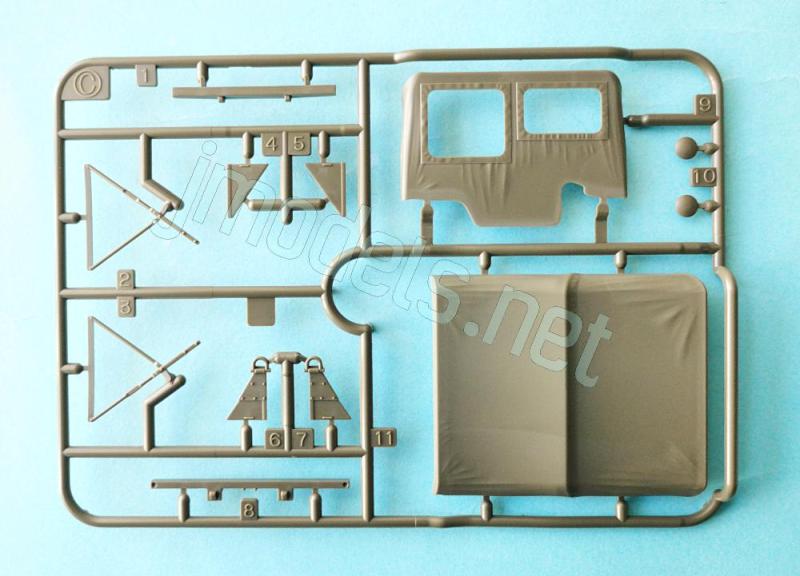
La caja contiene tres bastidores de piezas, una lámina de acetato transparente, la hoja de calcas y las instrucciones. Como en sus ediciones anteriores, Tamiya combina dos bastidores del molde repetidos en todas ellas con otro nuevo. En este caso, el bastidor C nuevo incluye las piezas del toldo y sus soportes, más dos paneles alternativos, con y sin ojal de enganche, para aerotransportar el vehículo.
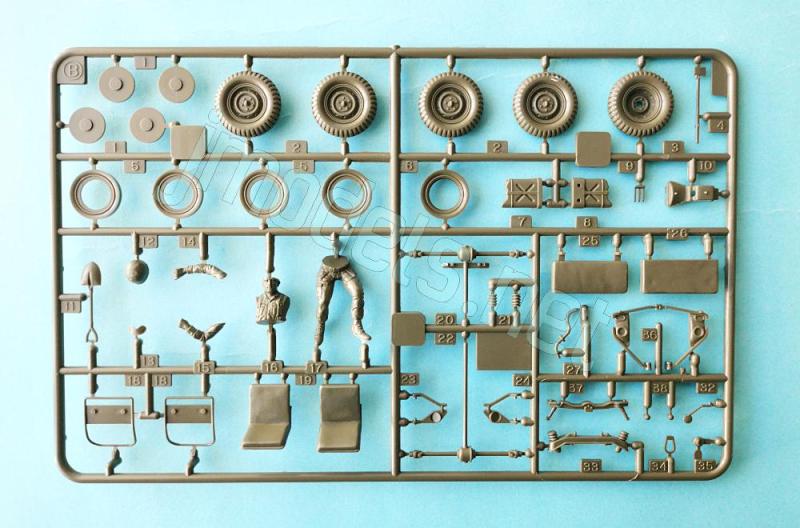
En los bastidores A y B se observan algunas piezas nuevas que Tamiya ha empleado para retrotraer el molde a un modelo inicial del Mutt, como la pieza A1 (el panel trasero de la carrocería), o la B36 (brazos de suspensión inferiores). Sin embargo, el fabricante se ha dejado otras piezas no pertinentes para el modelo M151A1, además de mantener los errores presentes en maquetas previas, como veremos. Lo que sigue igual, pero para bien, es la limpieza y la finura del molde, que no presenta deficiencias ni debe plantear problemas de montaje.
Esta versión básica del todoterreno incluye dos acabados pertenecientes al Ejército norteamericano y los Marines, por ello las pocas alternativas de montaje están relacionadas con cada versión. Además de la mencionada en la parte posterior de la carrocería, la maqueta permite emplear un tubo de entrada de aire al motor pegado en uno de los lados del capó y la salida extendida del tubo de escape en la parte trasera como equipo de vadeo. Estas opciones ya aparecen en maquetas anteriores, así que en esto tampoco hay novedad.
Reseña
La construcción del modelo sigue las mismas secuencias de las maquetas anteriores. Como he mecionado arriba, Tamiya ha incluido nuevas pieza para representar la suspensión trasera del M151A1 así como la forma del lado posterior del paso de rueda trasero de la carrocería, con una pieza alternativa que nos permite emplear una pieza con el pefil recto y puntiagudo, o bien otra con un ojal de enganche moldeado en dicha punta, más propia de la versión de los Marines.
La carrocería ha tenido que ser necesariamente alterada para cambiar la forma de los extremos delanteros de los guardabarros, que en el modelo inicial son rectos y en el A2 tienen un rebaje justo donde van colocados los faros. Las luces son las correctas de este modelo, con el faro de conducción nocturna y su protector en el lado izquierdo y un faro de menor tamaño sobre cada guardabarros. Del mismo modo, se ha cambiado la parrilla delantera, que muestra ahora los dos intermitentes ausentes en el A2. El panel trasero de la carrocería lleva las luces traseras del modelo A1, así como los paragolpes en piezas separadas.
En el habitáculo también hay algunas novedades, como el parabrisas con los cristales separados por un travesaño, aunque la pieza de acetato es común para ambos. Esta pieza muestra también los motores de las escobillas en la parte interna y la parte frontal bien adaptada a la versión inicial.
Finalmente, el toldo es completamente nuevo y está compuesto de un lado trasero y el techo, ambas piezas muestran marcas de eyector muy leves que deberían rellenarse si se van a emplear, pues son parcialmente visibles. De forma extraña, el lado trasero tiene las dos ventanillas propias del A1 sin piezas transparentes para simular los cristales, pese a que ambas disponen de un fino rebaje para instalarlos. El techo tiene una textura fina y realista en la cara externa y menos convincente y plana por dentro. Las varillas de soporte están moldeadas en una pieza fina a cada lado.
Junto a estos cambios acertados, a Tamiya se le escapó haber incluido el volante plano y con radios finos del modelo A1, y dejó el del A2, hundido en su centro y de radios más gruesos. Otros errores de la maqueta que Tamiya podría haber enmendado provienen del molde original. Entre ellos cabe señalar las lentes de los faros, que son piezas opacas pese a que los huecos están perfectamente reproducidos; la ausencia de pedales en el puesto de conductor; los paneles inferiores de la carrocería son inexactos y carecen del depósito de combustible y el alojamiento de la batería, además de faltar la barra antivuelco y algunas conectores de la suspensión delantera. Y por pedir, todo se hubiese redondeado más con un motor, siquiera someramente representado, en lugar de la pieza insulsa que trae por tal.
La figura es la misma que Tamiya incluye en otras ediciones de este vehículo. Su descripción está expuesta en la revisión de la maqueta 35125.
La hoja de calcas contiene insignias nacionales y de unidad, matrículas, números de registro y calcas del salpicadero con un aspecto fino y brillante, buen registro y adecuada saturación de color. El soporte excedente es mínimo.
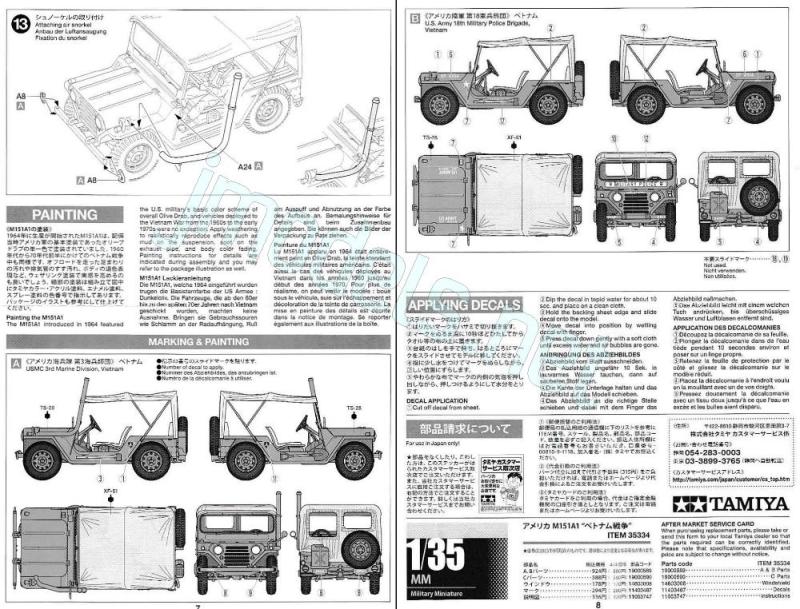
El folleto doblado de las instrucciones consta de ocho páginas impresas en blanco y negro. Contiene una introducción histórica sobre el vehículo en varios idiomas, 13 secuencias de montaje y perfiles con referencias de pintura del fabricante.
Las dos terminaciones tienen el mismo color sin camuflaje y pertenecen a la 3ª División de Marines y a la 18ª Brigada de Policía Militar. La 3ª División de Marines estuvo en Vietnam de 1965 a finales de 1969, tomando parte en numerosas operaciones de importancia así como en la defensa de Khe Sanh y la Batalla de Dong Ha, mientras que la Brigada de Policía Militar destacó en la defensa de la embajada norteamericana durante la Ofensiva del Tet en 1968.
Valoración
Tamiya pretendió hacer los mínimos cambios al molde original para representar el M151A1 empleado en Vietnam. Los que hizo, desde luego son correctos e importantes, pero se dejó algún error por el camino, además de mantener los desaciertos y omisiones heredados de las maquetas previas.
Uno se queda con la sensación de que el fabricante perdió la oportunidad de haber convertido una maqueta buena en excelente con sólo haber cambiado el acetato por un bastidor de piezas transparentes y haber incluido escasos elementos más. Realmente, con poco hubiese ganado mucho.
En general, este A1 será una pieza de gusto para una gran mayoría de modelistas que obviará ausencias y errores disfrutando de un montaje rápido y sencillo. Quienes pretendan terminar la maqueta con un punto más de realismo y acierto, el mínimo aceptable podría ser enmendar los faros, cubrir las ventanillas del toldo, además de hacer los pedales y un volante acorde a la versión.◊

The kit
In 2013, Tamiya released two new kits of their Ford Mutt. One was a reissue with some new parts of the previous M151A2 (U.S. Utility Truck “Grenada 1982”, reference 35332). The second, really more innovative as it was the manufacturer’s first kit dedicated to an early M151, had been eagerly awaited by modelers for a long time. The truth is, the kit is convincing, though only partially so.
To compare this kit with the M151A2, the reader can check the two reviews I have previously published on this site: M151A2 w/ TOW Missile Launcher (reference 35125) and U.S. M151A2 Ford Mutt with M416 Cargo Trailer (reference 35130).
The box contains three sprues of parts, a clear acetate sheet, the decal sheet, and the instructions. As in previous kits, Tamiya combines two sprues from the same tool with a new one. In this case, the new C sprue includes the canvas top and the support rods, plus two alternative angled rear wheel openings, with and without a hook for airlifting the vehicle. Sprues A and B contain some new parts that Tamiya have used to backdate the kit to an earlier vehicle, such as part A1 (the rear body panel) or B36 (lower suspension arms). However, the manufacturer has retained the mistakes present in previous kits. What remains the same, and for the better, is the clean and refined quality of the tool, which has no flaws and should not pose any assembly problems.
The kit offers you to build a US Army or a Marine M151A1 and the few assembly options are related to each version. In addition to the alternative mentioned above, the kit allows for the use of an engine air intake pipe attached to one side of the hood and the extended exhaust pipe at the rear as wading equipment. These options have already appeared in previous kits, so there’s nothing new there either.
Review
The kit construction follows the same sequence as the previous kits. As mentioned, Tamiya have included new parts to represent the M151A1 rear suspension, as well as the shape of the body rear wheel arch. An alternative part allows to use either a piece with a straight, pointed profile or one with a molded-in eyelet at the end, typical of the Marine version.
The body has been changed to render the flat shape of the front fenders, which are straight on the early model but have a recess on the A2 for the headlights. The lights are correct for the A1, with the night driving light and the guard on the left side and a smaller headlight on each fender. Similarly, the front grille has been changed, now displaying the two turn signals which are missing on the A2. The rear body panel features the tail lights from the A1 model, as well as the bumpers, which are separate pieces.
Inside the cab, there are also some new features, such as the windshield with the glass panes separated by a center post, although the acetate piece is common to both. This piece also shows the wiper motors on the inside and the front side is also changed to the early version.
Finally, the canvas top is completely new and consists of a rear panel and the roof. Both pieces show very shallow ejector marks that should be clean up if the tarp is to be used, as they are partially visible. Oddly, the rear panel has the two correct A1 windows without clear pieces, even though they have a thin recess for installing them. The roof has a fine, realistic texture on the outside and is less convincing and flat on the inside. The support rods are molded as a thin piece on each side.
Along with these correctly reworked parts, Tamiya left some others untouched. They overlooked the flat, thin-spoked steering wheel of the A1, providing the A2 wheel with dished thicker spokes instead. Other mistakes Tamiya could have corrected include the headlight lenses, which are solid despite the nice hollowed out grille; the lack of pedals in the driver’s seat; the inaccurate lower body panels, lacking the fuel tank and battery compartment, as well as the missing sway bar and some front suspension linkages. And, ideally, a basic engine, even a rudimentary one, would have been a more complete package instead of the bland, generic half engine provided.
The figure is the same one Tamiya have used in other M151 boxings. I described it in the kit 35125 review.
The decal sheet contains national and unit markings, license plates, registration numbers, and dashboard decals with a fine, glossy finish, good registration, and adequate color saturation. Carrier film is minimal.
The folded instruction booklet consists of eight pages printed in black-and-white. It contains a historical introduction to the vehicle in several languages, 13 assembly sequences, and profiles with Tamiya paint references.
Paint finishes depict two A1s from the 3rd Marine Division and 18th Military Police Brigade, both painted in the same overall color. The 3rd Marine Division was in Vietnam from 1965 to late 1969, taking part in numerous significant operations, including the defense of Khe Sanh and the Battle of Dong Ha, while the Military Police Brigade distinguished itself in the defense of the U.S. Embassy during the Tet Offensive in 1968.
Conclusion
Tamiya intended to make minimal changes to the tool to represent the M151A1 used in Vietnam. The changes they made are certainly correct and important, but they left some mistakes from previous kits along the way.
One is left with the feeling that the manufacturer missed the opportunity to turn a good kit into an excellent one simply by replacing the acetate sheet with a clear sprue and including a few more elements. Certainly, with a little more, they could have gained a lot.
Overall, this A1 will be the choice for a large majority of modelers who will overlook the omissions and mistakes, enjoying its quick and easy assembly. The modeler wishing to finish the kit with a greater degree of realism and accuracy will need to make a few changes, such as correcting the headlights, covering the canvas windows, and scratching the pedals and a steering wheel appropriate to the version.◊
Publicado – Published: 6 / 2026
©www.jmodels.net


Debe estar conectado para enviar un comentario.