
De un vistazo – Quick look
MATERIAL Y PIEZAS
MEDIA & PARTS:
- Plástico inyectado (84 piezas más 3 piezas transparentes).
- Injected moulded styrene (84 parts plus 3 clear parts).
CALCAS – DECALS:
- Hoja pequeña con distintivos para las tres versiones. Se incluyen algunos rótulos minúsculos. Buen registro y color, sin demasiada película transparente.
- Small sheet including markings for three versions. Some tiny stencils included. Fine colour and register, not too much carrier film.
OPCIONES – OPTIONS:
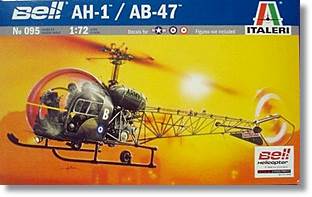
- AH-1 del Ejército Británico.
- AB-47 Fuerza Aérea Italiana.
- AH-1 del Ejército Norteamericano.
- AH-1 British Army.
- AB-47 Italian Air Force.
- AH-1 U.S. Army.
INSTRUCCIONES – INSTRUCTIONS:
- Folleto doblado de 10 páginas. Muestra diagrama de piezas, breve referencia histórica en varios idiomas, 10 pasos generales de montaje y localización de las calcas. Referencias de pintura de Model Master.
- Folded 10-page leaflet containing parts plan, short historical reference in several languages, 10 main assembly steps and location of decals. Paint reference in Model Master colours.
LO MEJOR – THE BEST:
- Buen detalle general para la escala. Opciones: dos versiones de depósitos de combustible y armamento (versión norteamericana). Posibilidad de montar puertas abiertas.
- Well detailed for the scale. Assembly choices: two types of fuel tanks and armament (American version). Choice for open/close doors.
LO PEOR – THE WORST:
- Piezas pequeñas que requieren manejo cuidadoso. Falta información sobre algunas opciones de montaje en las instrucciones.
- Tiny parts need especially careful handling. Some assembly options are not described in the instructions.
VALORACIÓN – CONCLUSION:
- A esta escala no se puede pedir mucho más: Decentemente detallada, algunas opciones en el montaje y tres versiones distintas de pintura. Para iniciados y noveles.
- Not much can be asked for at this scale: well detailed, some assembly options and three different paint versions. For any modeller except absolute beginners.

Lo realmente novedoso de esta maqueta son las versiones, puesto que Italeri ya sacó hace años este helicóptero con opciones norteamericanas de la Guerra del Vietnam (OH-13S Sioux). De hecho, la denominación de caja no es completa, ya que además de la versión AH-1, construida por Westland en Gran Bretaña y la Italiana AB-47 de Agusta Bell, se puede montar un AH-1 del U.S. Army. Ignoro si esta última denominación corresponde a aparatos británicos transferidos a EE.UU. por acuerdos comerciales o cualquier otra circunstancia, o se debe a un simple error de Italeri. Que el molde es idéntico al anterior lo prueba el hecho de que se incluyen piezas para montar opcionalmente sobre los patines los subsistemas de armamento XM1, compuesto de dos o cuatro ametralladoras Browning M37C, o M2, dotado de dos ametralladoras M60C. Estos dispositivos fueron usados por los OH-13 en Vietnam. Según esto, parece que la versión norteamericana es un OH-13 en lugar del mencionado AH-1.
Las piezas vienen repartidas en tres bastidores, uno de ellos contiene las tres piezas transparentes de la carlinga. La calidad del molde en general es buena. El plástico tiende a blando, típico de Italeri, sin rebabas ni marcas de eyector visibles. La presentación de esta maqueta es correcta, con las piezas transparentes selladas en su propia bolsa dentro de otra que contiene los dos bastidores restantes. En este punto parece que por fin Italeri va mejorando.
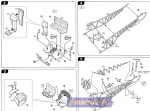
El montaje de este pequeño helicóptero requerirá cuidado especial por parte del modelista. En primer lugar, para separar la mayor parte de las piezas de la estructura de cola y el motor de sus soportes debido a su finura. A mí me suele ir bien con una minisierra de fotograbado, cuidado y paciencia, por ello es lo que recomiendo. En segundo término, durante el montaje es conveniente asegurar bien la alineación correcta de la estructura de cola. Afortunadamente las instrucciones son una gran ayuda por su claridad en este punto si se estudian bien previamente.
De forma diferente a otras maquetas, el montaje de este Bell no comienza por la carlinga, sino por el motor, compuesto nada menos que de 14 piezas, algo sorprendente a esta escala pero lo es menos si pensamos que será de los elementos más visibles una vez terminada la maqueta. En este punto, como en otros, Italeri ha hecho un esfuerzo de detallado incluyendo piezas separadas para distintos conductos y escapes. El interior de la carlinga, también muy visible, está compuesto de un suelo, asientos con soportes en piezas separadas, palancas de control, columna de instrumentos con diales en relieve y dos pares de pedales unidos en una única barra para facilitar su montaje. Se nota que Italeri ha cuidado mucho el despiece interior ya que todos estos elementos mencionados forman un conjunto que puede montarse y pintarse antes de unirlos al fuselaje propiamente dicho.
El siguiente elemento más importante del montaje es la estructura tubular de la cola que requiere, como digo, de atención especial y montaje cuidadoso. Cada cual tiene su sistema, pero parece más razonable pintar toda esta zona, el motor y la carlinga por separado antes de unirlas. Los toques finales al montaje (someramente descrito) lo dan las antenas, depósitos de combustible (hay dos opciones: una para la versión británica y otra para las demás), rotor, aspas y el transparente. Hay dos tipos de aspas para el rotor de cola, pero las instrucciones no señalan a qué versiones van destinadas. La «pecera», de grosor razonable y sin distorsiones, tiene piezas separadas para las puertas, que pueden pegarse abiertas si se desea. El paso número 9 de las instrucciones muestra el montaje del armamento, pero no se menciona que va destinado a la versión norteamericana. Las ametralladoras Browning y las M60 están decentemente representadas a la escala, aunque podría buscarse un sustituto mejor si lo hubiera. Todos los soportes laterales del armamento incluyen las cintas de munición como piezas separadas.
El folleto de instrucciones parece totalmente renovado respecto al de la versión antigua de esta maqueta. Los diagramas de montaje son especialmente claros y eso es de agradecer en una miniatura como esta. Las referencias de pintura vienen en la gama de Modelmaster. Los distintos colores de las tres versiones aparecen en la caja, uno en la ilustración anterior y dos en la parte posterior. Para ser un aparato con tan poca superficie, las versiones elegidas por Italeri son bastante coloristas, con camuflaje a dos colores para la británica e italiana. Con la hoja de calcas también habrá que lidiar fino, pues éstas llegan a ser realmente diminutas. Además de las marcas nacionales y algunos rótulos, se incluyen bandas de distinto color para el rotor de cola y las aspas según la versión elegida.
En resumen, esta es una maqueta recomendable a cualquier aficionado a la escala y que puede hacer las delicias de modelistas de cualquier nivel de experiencia. Si además se tiene vista de lince y manos de cirujano, los resultados pueden llegar a ser espectaculares.◊


This is not a new kit really but the same OH-13S Sioux kit from the Vietnam war that Italeri released some years ago with new versions and decals. In fact, the name on the box is misleading because you can choose from a Westland-built British AH-1, an Italian Agusta Bell AB-47 but also a U.S. Army AH-1. I don’t really know whether the designation AH-1 is correct for the American version, but the tooling is certainly the same since this kit also includes parts for both XM1 and M2 weapon subsystems such as they were used by OH-13s in Vietnam. The first sported two or four Browning M37Cs and the second a couple of M60C machine-guns. According to this, it seems clear the third option is an American OH-13 instead of the mentioned AH-1.
The kit comprises three sprues, one of them contains the clear parts for the cockpit. The quality of the tooling is generally good. Plastic is rather soft, typical of Italeri kits, without flash or ejector marks on visible spots. The wrapping of the kit is especially good, clear parts are bagged separately inside another bag for the rest of sprues. Italeri is improving a lot if we remember their older kits.
Assembling this little kit will need especial care from the modeller. First you need to be careful to remove most parts corresponding to the tail boom and engine components from their sprues as they are really tiny and fiddly. I usually do this job with a PE microsaw, care and a bit of patience and this is what I could recommend. Secondly the tail parts should be correctly aligned in order to affix the cockpit and engine on later steps. Fortunately, the diagrams in the instructions are quite clear and useful if you have previously studied them thoroughly.
Contrary to other kits, the assembly of this Bell starts with the engine instead of the cockpit. There are no less than 14 parts for it, a bit surprising at this scale but not so much so if we consider the fact that it will be quite visible when the model is finished. Italeri have made an effort including separate parts for exhausts and pipes. The interior cockpit is also busier than usual for the same reason. You get the seats, the floor, a couple of control sticks, the instrument panel with raised dials and two pairs of pedals moulded on a single stick which makes assembly easier. I think all this parts breakup has been sensibly engineered because they can be assembled and painted separately before you attach them to the fuselage/bulkhead.
The next assembly step is the tail boom which needs especial attention, as I said before. There are more ways than one to skin a cat, but I think the most reasonable is to paint the tail, engine and cockpit before you glue them all together. The final touches of the build (just in a rough hint) are the aerials, fuel tanks (there are two types, one for the British version and another for the other two), rotor, main blades and the clear canopy. There are also two types of tail blades, but the instructions do not show which one to use in each case. The «fish bowl», three reasonably thin parts with no distortion, lets you show the doors open if you wish. You may also want to leave them off for the American version. Step number 9 in the instructions shows the assembly of the armament but it is not mentioned that they are for the U.S. Army helo either. Both the Brownings and the M60s are decently represented, although they would be better replaced by a resin set supposing there is one in the market. Ammunition belts in all the weapon arrangements come as separate parts.
The instruction booklet also seems new and a bit different from the older kit. Exploded diagrams are clear and that is fine in such a tiny kit. Paint references are given in the Modelmaster range and the box shows the three colour schemes, one is the boxart itself and the other versions are printed on the other side. Versions are colourful if one considers the small surface to be painted, with two-colour schemes for the AH-1 and the AB-47. Decals are also as tiny as one could expect. Apart from national markings and some stencils there are also some colour stripes for the blade tips according to the version you choose.
This is a recommendable and beautiful kit which any helo fan will enjoy provided he is not a true beginner. If you also have an eagle eye and surgeon hands, results can simply be eye-catching.◊
Actualizado – Updated: 4 / 2022
Actualizado – Updated: 5 / 2017
Publicado – Published: 6 / 2011
©www.jmodels.net


Debe estar conectado para enviar un comentario.