
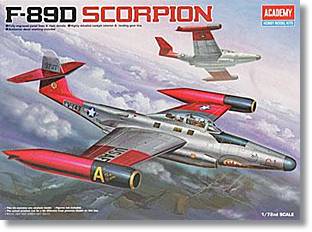
De un vistazo – Quick look
MATERIAL Y PIEZAS
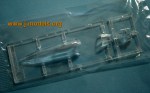
MEDIA & PARTS:
- Plástico inyectado (61 piezas) y tres piezas transparentes.
- Bien impresas y colores excelentes. Sin exceso de soporte.
CALCAS – DECALS:
- Bien impresas y colores excelentes. Sin exceso de soporte.
- Well printed and excellent colours. Not too much carrier film.
OPCIONES – OPTIONS:
- USAF F-89D, 61ª Escuadrilla Interceptora de Cazas, Base Ernest Harmon, Terranova (Canadá), 1955.
- USAF F-89D, 321ª Escuadrilla Interceptora de Cazas, Base Paine, Washington.
- USAF F-89D, 61st Fighter Interceptor Squadron, Ernest Harmon Air Force Base, Newfoundland, 1955.
- USAF F-89D, 321st Fighter Interceptor Squadron, Paine Air Force Base, Washington.
INSTRUCCIONES – INSTRUCTIONS:
- Folleto de ocho páginas que contiene resumen histórico multilingüe, diagrama de piezas, ocho pasos generales de montaje y guía de pintura y calcas para las dos opciones.
- Eight-page folded leaflet containing brief multi-lingual historical reference, parts diagram, eight main assembly steps and painting and decaling guide for the two options.
LO MEJOR – THE BEST:
- Buen detalle exterior e interior, panelado fino, montaje sencillo, versiones atractivas.
- Fine exterior and interior detail, thin panel lines, easy assembly, attractive versions.
LO PEOR – THE WORST:
- Errores en las salidas de los cohetes. Las calcas de Academy, como siempre, una incógnita.
- Mistakes in the wingtip pods. Academy decals, as usual, not very reliable.
VALORACIÓN – CONCLUSION:
- Buena maqueta bastante fácil de montar. Recomendada para cualquier modelista.
- Good kit easy to assemble. Recommended to any modeler.

Este molde, procedente de Minicraft, debe llevar décadas rodando por el mercado y ha dado para varias versiones del F-89 y también para varios fabricantes. Que recuerde, Academy tiene los modelos D y J, y Minicraft el A/B, C, D, H y J. Además, Revell también reempaquetó este molde para su versión D/J a esta escala que aún puede encontrarse sin gran dificultad. Así que estamos bien servidos de Scorpions los de la escala pequeña. La maqueta de este modelo D se compone de tres bandejas de piezas, más otra de transparentes, las calcas y las instrucciones. El plástico es el típico de Academy, gris claro y fácil de lijar. El detalle es muy bueno y el panelado fino, es de elogiar en un molde con sus años a la espalda, como digo. Hay que poner cuidado especial al separar las piezas de las grapas, pues es fácil dañar alguna.
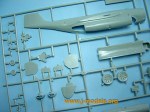
La carlinga parece bastante completa. Los asientos, la palanca del piloto y los paneles de mandos van insertos en el suelo, moldeado en una sola pieza junto a una multitud de controles dispuestos en dos consolas a ambos lados. Tanto los paneles de control como los asientos semejan a los reales, diferentes para ambos tripulantes. Creo que con un poco de trabajo extra los asientos podrían detallarse algo más con resultados muy buenos. Trabajo que estaría compensado por el hecho de que la carlinga puede mostrarse abierta porque viene en dos piezas separadas.
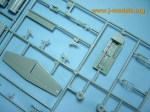
Una vez terminado el interior, el resto del montaje parece bastante sencillo. Hay que tener cuidado en añadir algo de lastre en el interior del morro antes de pegarlo, puesto que el avión se asienta de cola una vez colocado el tren de aterrizaje. La única pieza que puede plantear problemas de ajuste es la A11 que cierra la panza del aparato y que hay que pegar antes que las piezas A13 y A14 (deflectores de salida de las toberas) aunque esto no viene señalado en las instrucciones. Otro aspecto importante que reseñar es que las piezas I3 e I8, que corresponden a la parte delantera de los pods de los extremos de las alas son distintas cuando deberían ser idénticas y de hecho en las instrucciones aparecen como intercambiables para el ala derecha o izquierda. Un vistazo detenido basta para darse cuenta de que el número de pequeños cohetes FFAR que aparecen insertado en sus lanzadores es distinto y tiene diferente disposición. Para empeorar las cosas, ambas piezas muestran las cabezas de los cohetes sobresaliendo de sus tubos, cuando en realidad los cohetes quedaban totalmente dentro de ellos cuando estaban listos para operar. También los diámetros de las aperturas de los lanzadores son ligeramente distintos. Ignoro si se debe a un error generalizado del molde o si sólo corresponde a mi maqueta, pues una de estas piezas venía suelta, aunque la caja estaba sellada.
El tren de aterrizaje está bastante bien detallado, así como los pozos, pero éstos tienen escasa profundidad como en otras maquetas de Academy. Ojo al sistema de cierre de los pozos del tren principal a menos que se quiera mostrar la maqueta en vuelo. Cada rueda llevaba dos tapas, pero la interna (más grande) permanecía siempre en posición plegada excepto en el momento de extraer o retraer el tren de aterrizaje. Al menos eso puede deducirse viendo fotos del aparato real tanto en tierra como en vuelo. Esto implica que la mayor parte de los detalles de los pozos no se verán al montar la maqueta con las ruedas. Señalo este detalle pues no sé si será también común en otros reactores.
La hoja de calcas tiene muy buena pinta y muestra buenos colores e impresión. Se incluyen multitud de estarcidos y códigos para las dos opciones, como suele ser habitual en el fabricante. También habitual es la duda sobre el resultado de sus calcas. Las instrucciones se muestran en un folleto grande doblado que contiene un diagrama de las piezas, un resumen histórico sobre el avión, 8 pasos generales de montaje y una guía de pintura y calcas. Las referencias de colores son genéricas. En general los diagramas de montaje son muy claros, excepto en el caso mencionado de la colocación de las tapas del tren de aterrizaje.
En resumen y pese al error mencionado, la maqueta merece la pena. Me parece un avión muy vistoso (bonito sería decir tal vez demasiado), sencillo de montar por cualquier modelista y curiosamente poco habitual en el panorama modelístico.◊

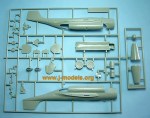


This tooling must have been on the market for decades and has been used for several F-89 versions by a bunch of manufacturers, the last one of these being Academy. If I’m not wrong, Academy produces models D and J and Minicraft all the models from A to J. On top of that, Revell also sold this same tooling for their D/J version at this scale, a kit that can still be easily found. So, small scale fans are more than served. This kit comprises three light grey sprues plus another clear sprue, the decal sheet and the instructions. The plastic is Academy’s usual easy-to-sand stuff, the kit shows a very good detail overall with thin and well moulded recessed panel lines. A good point to consider in an old tooling such as this one. Be careful when cutting parts from their sprues, as they can be easily damaged.
The cockpit comes very well detailed. The seat, control stick and both instrument panels are glued on the floor which has been moulded in one part with the gadget consoles on both sides of the crew. Both the panels and the seats look quite realistic, with different stations for each one. I think a bit of extra detailing in the seats will improve the interior even more as the canopy (which comes in two parts) can be showed open.
Once the cockpit is finished, most of the assembly seems quite straightforward. Only a few hints to consider along the build. First, remember to include some ballast inside the nose (as specified in the instructions) because as you probably have guessed, the model is a typical tail-sitter. Next, the only part which seems more difficult to fit is A11, the one which closes the fuselage belly, and that should be glued before parts A13 and A14 (exhaust shields). The instructions don’t show the correct assembly order. Finally, and sadly the only real flaw I have found in the kit, parts I3 and I8 corresponding to the front section of the wingtip pods are not identical. The instructions show them as being interchangeable but in fact a close inspection shows the number of small FFAR rockets is different as well as the pattern of the tubes inside the pods. Also, the diameter of the circular opening of the pods is slightly different. To make things worse the rockets warheads project from their tubes and this only happened when the pods were being rearmed but not when they were fully loaded and ready for operation. I don’t know if this is a mistake in the tooling or just a matter of my kit because one of the parts came loose inside the box although this was sealed.
The landing gear is finely detailed, but the wheel wells seem a bit shallow as in other Academy kits. Pay attention to the wheel covers unless you want to show your Scorpion in flight. Each wheel had two, but the bigger inside cover was always closed except when the landing gear was being folded or opened. This is what I can guess watching pics of the real aircraft on land and in flight. I just leave the hint here because I don’t know whether this feature was also common in other jets.
The decal sheet looks great and shows nice colours and register. There are a handful of stencils and codes for both versions as usual in Academy’s kits. Also usual is the doubt about the final result of their decals on the model. Instructions consist of a big folded leaflet which contains a historical summary about the aircraft, a parts diagram, 8 main assembly steps and a painting and decals guide. Colour reference is generic and does not refer to a particular paint brand. Building diagrams are generally clear except for the matter of the wheel covers which I really didn’t know.
To sum up, and despite the obvious mistake in the wingtip pods, this is really a fine rendition of the F-89D. I think the aircraft is attractive (to say beautiful is perhaps too much), the kit seems easy to build for any modeller and not very often seen in the modeling panorama.◊
Actualizado – Updated: 5 / 2022
Actualizado – Updated: 5 / 2017
Publicado – Published: 8 / 2008
©www.jmodels.net


Debe estar conectado para enviar un comentario.