
De un vistazo – Quick look
MATERIAL Y PIEZAS
MEDIA & PARTS:
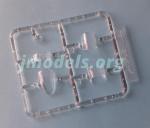
- Plástico transparente (5 piezas), plástico inyectado (35 piezas Me 163 y 18 piezas tractor de transporte), máscara adhesiva (27 unidades).
- Clear plastic (5 parts), injected plastic (Me 163: 35 parts; tractor: 18 parts), paint mask (27 pieces).
CALCAS – DECALS:
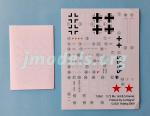
- De Cartograf. Cruces alemanas de varios tipos, estrellas rusas, insignias de unidad, numerales y estarcidos. Aspecto brillante, finas con motivos nítidos y sin exceso de soporte.
- Printed by Cartograf. German crosses in several sizes and types, Russian red stars, unit badges, codes and stencils. Glossy finish, thin and sharp without too much carrier.
OPCIONES – OPTIONS:
- Me 163 B. Lt. Reinhard Opitz. 7./JG400. Brandis (Alemania), abril de 1945.
- Me 163 B. Uffz. Kurt Schiebeler. Brandis (Alemania), agosto de 1944.
- Me 163 B. Lt. Hans-Ludwig Löscher. 1./JG400. Brandis (Alemania), febrero de 1945.
- Me 163 B. 1./JG400. Brandis (Alemania), febrero de 1945.
- Me 163 S. TsAGI (Instituto Central de Aerodinámica, Moscú). 1945-1946.
INSTRUCCIONES – INSTRUCTIONS:
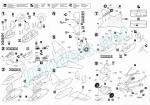
- Folleto doblado de 6 páginas impreso en color en papel satinado. Muestra un plano numerado de piezas, una tabla de colores con equivalencias en varias marcas, 9 secuencias de montaje y perfiles a color. Las vistas explosionadas son poco nítidas.
• 6-page folded leaflet printed in color on glossy paper. It shows a numbered parts plan, a color chart with matches in several paint ranges, 9 assembly steps and profiles in color. Exploded view are not very sharp.
LO MEJOR – THE BEST:
- Buen detalle general. Fácil montaje con alternativas. Incluye versión biplaza y tractor de transporte.
- Nice detail overall. Easy build with assembly choices. Two-seat version and tractor included.
LO PEOR – THE WORST:
- Piezas transparentes algo gruesas. Tractor simplificado.
- Thickish clear parts. Simplified tractor.
VALORACIÓN – CONCLUSION:
- Reedición de la anterior de Academy con mucho mejores calcas y mascarillas para pintar. Recomendable a los que no llegaron a conocer la original.
- A rebox of the old Academy kit with much better decals and handy masks for painting. Recommended to those who did not arrive in time to get the original kit.

La maqueta
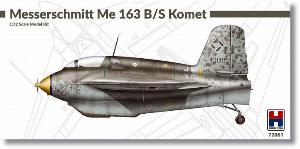
Hobby 2000, el gran reeditor de maquetas moderno, se ha decidido en esta ocasión por el Me 163 de Academy, una maqueta con cierto predicamento entre los modelistas de esta escala en su día.
La caja trae tres bastidores de piezas, uno para el tractor y dos para el avión, un bastidor transparente, una hoja de calcas, una hoja de mascarillas y las instrucciones. Salvo las piezas de la maqueta, lo demás lo aporta Hobby 2000, como es habitual.
El plástico está bien moldeado. Las piezas vienen muy limpias de restos de plástico y muestran buena definición en general. No observo marcas en lugares visibles. El número de piezas augura un montaje sencillo y rápido, sin dificultades mayores para el modelista inexperto ni para el cagaprisas del concurso de turno.
La maqueta permite montar el modelo B monoplaza, el caza de serie, o bien el S con doble puesto en la carlinga para tareas de entrenamiento. Academy complementó la maqueta sabiamente con el tractor de transporte (Scheuch-Schlepper) que servía para desplazar el avión.
Carlinga
La carlinga del monoplaza contiene un suelo moldeado con las consolas laterales que muestran los instrumentos en relieve. Hay un panel trasero con reposacabezas sobre el que va pegado el asiento y dos palancas. El panel de control presenta el instrumental en relieve y va pegado a la mitad superior del fuselaje. Hobby 2000 ha incluido también calcas para el panel. Tras el mamparo posterior, una pieza semicircular parece simular la parte superior del depósito de T-Stoff.
La versión biplaza tiene el suelo algo más alargado y moldeado en dos niveles, de modo que el puesto trasero queda a mayor altura que el delantero. Los elementos del puesto delantero son los mismos que los del monoplaza, mientras que en el puesto trasero encontramos un panel trasero más pequeño, un asiento, dos palancas y un panel de instrumentos diferente, también en relieve y con calcas.
Todas las piezas transparentes están bien moldeadas, pero las veo un poco gruesas para esta escala. En las dos versiones el parabrisas blindado está replicado en una pieza transparente gruesa añadida bajo la cubierta y que no cuenta con la mira Revi. La cubierta está dividida en dos secciones en el modelo monoplaza. La posterior cubre el hueco del acristalamiento trasero, y la delantera es de una pieza provista de salientes a modo de bisagras en el lado derecho que permiten pegarla abierta. Para cerrarla, no tenemos más que cortar las bisagras.
La cubierta del biplaza es igual a la anterior en su sección delantera, pero la trasera está dividida en dos piezas. De acuerdo con las instrucciones, parece que la cubierta no puede ponerse abierta en el puesto trasero.
Fuselaje
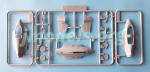
El fuselaje está dividido en dos mitades, superior e inferior. La superior es alternativa según la versión. Los paneles externos están replicados con líneas muy finas, limpias y algunas de ellas también remachadas. Las piezas están moldeadas sin la cola pero incluyen las raíces alares, que muestran las tronera abiertas de los cañones.
Antes de pegar la carlinga, hay que añadir el soporte del patín en una ranura practicada en el lado inferior del fuselaje. Ademas de esto, las únicas piezas propiamente del fuselaje por añadir son la antena del receptor sobre la carlinga y la pequeña hélice del generador a proa.
Alas y cola
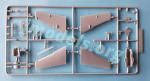
Las alas vienen divididas en finas mitades. Los bordes de ataque exteriores llevan secciones separadas para simular la ranura fija de cada ala. Las superficies están grabadas con gran finura tanto en las líneas de panel como en registros y accesos. Los elevones están bien marcados y las superficies enteladas muestran un relieve acorde a la escala.
La mitad inferior tiene moldeadas las carenas de los tubos de los depósitos de combustible, así como los de las de los actuadores de los flaps y elevones. El fino tubo Pitot es una pieza separada, pero falta la antena vertical bajo el ala izquierda.
La cola está seccionada en mitades que incluyen el puro del fuselaje, que muestra las ranuras de ventilación de la tobera. El extremo de la tobera es una pieza separada y hueca que debe pegarse entre las mitades de la cola.
El panelado de la cola es muy bueno, con líneas bien grabadas y limpias, que tienen más anchura en el timón. La superficie entelada muestra buen aspecto también.
Tren de aterrizaje
El patín de aterrizaje es de una pieza. Los soportes son sólo dos en lugar de tres. Vienen cegados y sin el mecanismo de lanzamiento del carretón. El carretón es una pequeña pieza moldeada con los ejes de las ruedas. Estas son de una pieza y presentan los neumáticos adecuadamente marcados y las llantas con detalle por ambas caras.
La rueda de cola posee alternativas de montaje. Puede mostrase plegada en el fuselaje o desplegada, en ambos casos los brazos, la horquilla y la rueda tiene buen detalle.
Scheuch-Schlepper
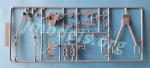
Como decía arriba, Academy tuvo la feliz idea de incluir el tractor de transporte en la maqueta. El vehículo está despiezado en su propio bastidor y su montaje no tiene dificultad porque está muy simplificado.
La parte superior de la carrocería viene de una pieza unida a los guardabarros, que no son excesivamente finos, mientras que la mitad inferior está representada apenas por dos plancha en ángulo unidas a los ejes de las ruedas.
La cabina muestra un asiento, un volante y una columna de dirección separados. El salpicadero es mínimo y hay una pequeña manivela separada en uno de los lados del motor. Las ranuras frontales de ventilación del motor se ha representado igualmente.
La suspensión se compone de dos ballestas separadas. Las ruedas tal vez sean lo mejor del vehículo. Vienen en una pieza y no sólo presentan muy buen detalle en las llantas, sino que la banda de rodadura de los neumáticos está bien realizada, a falta sólo de repasar las finísimas líneas de molde.
El remolque lo componen ocho piezas. La horquilla posee tres piezas superpuestas y el enganche delantero otras tres. El tren de rodaje está muy simplificado y comprende dos piezas que simulan carretones de dos ruedas con gruesas cadenas.
Calcas
Las ha impreso Cartograf que siempre suele ser garantía de calidad. La hoja lleva cruces alemanas de varios tipos, estrellas rusas, insignias de unidad, numerales, paneles de instrumentos y estarcidos. Los motivos tienen aspecto brillante, fino y nítido. No poseen exceso de soporte.
Instrucciones
Consisten en un folleto doblado de seis páginas impreso en color sobre papel satinado. Muestra un plano numerado de piezas, una tabla de colores con equivalencias en varias marcas, nueve secuencias de montaje y perfiles a color. Las vistas explosionadas son poco nítidas, desgraciadamente.
Las opciones de pintura muestran cuatro Me 163B del KG 400, una de las dos unidades que los operaba en la guerra, con diferentes camuflajes y un único modelo biplaza probado en el Instituto Central de Aerodinámica de Moscú tras la contienda.
Valoración
Echaba de menos una reedición de esta maqueta, por ello me alegro de volverla a ver, ahora con el sello de Hobby 2000. El detalle general me parece bueno y es sencilla de hacer incluso para los inexpertos. Pese al escaso número de piezas, posee opciones de montaje para que su tamaño no sea obstáculo para hacerla más atractiva. La inclusión de las mascarillas de pintura y las buenas calcas de Cartograf no hacen sino revalorarla. La recomiendo a los que llegaron tarde para conocer la edición de Academy.◊


The kit
Hobby 2000, maybe the biggest reboxing company of modern times, has chosen the Me 163 from Academy this time, a kit with a certain prestige among 1/72 modellers in its day.
Inside the box there are three sprues of parts, one for the tractor and two for the aircrat, a clear sprue, a decal sheet, a sheet of painting masks, and the instructions. Except for the kit parts, the rest is provided by Hobby 2000, as usual.
Plastic is well molded. Pieces come very clean from flash and show good overall definition. There are no marks in visible spots. Parts count promises a simple and fast assembly, without major difficulties for the inexperienced modeller.
The kit caters for the single-seater B model, the standard fighter, or the S with double seats in the cockpit for training duties. Academy wisely complemented the Komet with the tractor (Scheuch-Schlepper) that was used to carry the aircraft.
Cockpit
The cockpit contains a floor including the side consoles with raised instruments. There is a rear bulkhead with a headrest molded on, a seat and two sticks. The control panel has raised gauges and is attached to the upper fuselage half. Hobby 2000 has also included decals for the panel. Behind the rear bulkhead, a rounded piece seems to be the upper part of the T-Stoff tank.
The two-seater version has a somewhat longer floor and is molded in two levels, so that the rear seat is higher than the front seat. The pieces in the front station are the same as those in the single-seater, while in the rear station we find a smaller rear panel, a seat, two sticks and a different instrument panel, also with raised detail and decals.
All the clear parts are well molded, but they look a bit thick for this scale. In both versions the armored windshield is rendered in a thick clear piece added under the canopy and missing the Revi sight. The canopy is divided into two sections on the single-seater. The rear one covers the gap of the rear glazing, and the front one is made of one piece with hinges on the right side that allow it to be glued open. To close it, we only have to trim the hinges.
The two-seater canopy is the same in the front station, but the rear is divided into two pieces. According to the instructions, it seems that the canopy cannot be showed opened in the rear seat.
Fuselage
The fuselage is molded in two halves, upper and lower. The upper fuselage is alternative depending on the version we choose to build. The external panels are rendered with very thin, clean lines and some of them are also riveted. The halves are molded without the tail but include the wing roots, which show the gun muzzles open.
Before attaching the cockpit, the skid support is inserted into a slot opened in the belly. In addition to this, the only proper fuselage parts to be added are the antenna on the canopy and the small generator propeller forward.
Wings and tail
The wings are divided in thin halves. The outboard leading edges carry separate sections to render the fixed slot on each wing. The surfaces are engraved with great finesse both in the panel lines and in the registers and accesses. The elevons are well marked and the tapered surfaces show raised detail which looks right for the scale.
The lower half has molded fairings for the fuel tank tubes, as well as those for the flap and elevon actuators. The thin pitot tube is a separate part, but the vertical antenna under the left wing is missing.
The tail is sectioned in halves including the fuselage cone, which shows the nozzle vents. The nozzle is a separate, hollow piece that is attached between the tail halves.
The tail panels are engraved, with clean lines which are wider in the rudder. The tapered surface looks good too.
Undercarriage
The landing skid is one piece. The folding arms are only two instead of three. They come solid and without the cart launch mechanism. The cart is a small piece molded with the wheel axles. The wheels are one piece having nicely engraved tires and detailed rims on both sides.
The tail wheel is optional. It can be shown folded inside the fuselage or unfolded, in both cases the arms, the fork and the wheel have good detail.
Scheuch-Schlepper
As said above, Academy had the good idea of including the transport tractor in the box. The vehicle is molded on its own sprue and assembly is not difficult because it is very simplified.
The body comes in one piece with the fenders, which are not very thin, while the lower chassis is rendered as two angled plates including the wheel axles.
The cabin shows a separate seat, a steering wheel and the steering column. The dashboard is minimal and there is a separate small crank on the engine side. The engine front is detailed with tiny vents.
The suspension is made up of two separate leaf springs. The wheels are perhaps the best pieces in this vehicle. They come in one piece and they not only have very good detail on the rims, but the tire treads are nice and just needing some sanding to clean up the slight seam lines.
The trailer is made up of eight pieces. The fork has three overlapped pieces and the front hitch another three. The undercarriage is very simplified and comprises two parts that simulate two-wheeled carts with thick tracks.
Decals
They have been printed by Cartograf, which is always a guarantee of quality. The sheet shows several types of German crosses, Russian stars, unit badges, codes, instrument panels, and stencils. The items look glossy, thin and sharp. They do not have too much carrier.
Instructions
They consist of a six-page folded leaflet printed in color on glossy paper. It shows a numbered parts plan, a table of colors with matches in AK Interactive, Alclad2, Ammo Mig, Mr. Color and Tamiya paint ranges, nine assembly sequences and color profiles. The exploded views are not very sharp, unfortunately.
Paint choices show four Me 163Bs of the KG 400, one of the two units that operated the type during the war, with different camouflage and a single two-seater aircraft tested at the Central Institute of Aerodynamics in Moscow after the war.
Conclusion
I missed a rebox of this kit, so I’m glad to see it again, now with the Hobby 2000 logo. General detail looks fine and the kit is easy to build even for the inexperienced. Despite the small number of pieces, it has assembly options so that its size is not an obstacle to make it more attractive. The inclusion of the paint masks and the good Cartograf decals make this release more valuable. I recommend it to those who arrived late to see the Academy original kit.◊
Publicado – Published: 11 / 2022
©www.jmodels.net


Debe estar conectado para enviar un comentario.