

De un vistazo – Quick look
MATERIAL Y PIEZAS – MEDIA & PARTS:
- Plástico inyectado (133 piezas), vinilo (7 piezas), plástico transparente (9 piezas).
- Injected styrene (133 parts), vinyl (7 parts) and 9 clear parts.
CALCAS – DECALS:
- Hojita con códigos de unidad para las puertas y parte posterior de la caja. Finas y bien impresas.
- Small sheet containing unit codes for doors and rear cargo box. Thin and well printed.
OPCIONES – OPTIONS:
- GAZ MM pintado de verde medio (aproximadamente FS34102) y field drab (FS 30118).
- GAZ MM painted in medium green (approximately FS34102) and field drab (FS30118).
INSTRUCCIONES – INSTRUCTIONS:
- Folleto A4 de 6 páginas. Incluyen resumen histórico en 6 idiomas, diagrama de piezas, 10 pasos generales de montaje y guía de pintura y calcas. Colores de las gamas Zvezda y Model Master.
- A4 6-pages folded leaflet. Includes historical summary in 6 languages, parts plan, 10 main assembly steps and painting and decalling diagram. Colour reference in the Zvezda and Model Master ranges.
LO MEJOR – THE BEST:
- Buen molde en general. Fácil montaje. Interior (motor, cabina) y superficies de madera bien detallados. Piezas transparentes finas.
- Overall good tooling. Easy build. Interior (engine, cabin) and wooden elements nicely detailed. Thin transparent parts.
LO PEOR – THE WORST:
- No es edición nueva. Llantas de vinilo.
- Reboxing of an old tooling. Vinyl tyres.
VALORACIÓN – CONCLUSION:
- Recomendable a los aficionados a los vehículos ligeros.
- Recommended to soft-skinned vehicles fans.

Este molde procede de otro anterior del desaparecido fabricante Toko que Zvezda ha reeditado con su sello como ya hizo con los GAZ de dos y tres ejes. La maqueta consiste en siete bastidores, uno de ellos contiene las piezas transparentes y otro las llantas de vinilo. Las piezas presentan muy buena factura, sin rebabas ni marcas, pero con el habitual punto de grosor que Zvezda suele dar a sus moldes. No quiero decir que las piezas sean bastas, de hecho hay detalles muy bien conseguidos, pero al fabricante ruso aún le queda camino por recorrer si quiere igualar a lo que otras marcas están ofreciendo a esta escala.
Entre lo mejor está sin duda los detalles de la madera en las puertas y caja de carga. Otro aspecto positivo es que la maqueta trae el motor, que viene repartido en siete piezas básicas, aunque para poder mostrar el compartimiento abierto habría que hacer cirugía en la pieza del capó. La cabina también lleva lo esencial en un vehículo que, ya de por sí, era bastante espartano. Tres pedales, dos palancas, además del volante y el cuadro de instrumentos es lo que encontramos. En esta zona hay que suprimir algunas ligeras marcas de eyector en la parte interior del techo y puertas. Las puertas vienen en piezas separadas, pero no se podrán enseñar abiertas a menos que se corte la zona trasera del morro que se ha moldeado de una pieza con ellas. La pieza que representa el techo de lona muestra suaves ondulaciones que bien podrían remarcarse algo más pues es demasiado lisa. Algunos GAZ-MM llevaban también la parte trasera de la cabina de lona para ahorrar materiales básicos, pero en este caso la pieza presenta una de textura metálica. Cerrando todo este conjunto, las piezas transparentes son finas y muy claras. Zvezda sigue sin embalar los bastidores aún con riesgo de que se arañen. En el caso de estos transparentes sería una auténtica lástima. En el mismo bastidor encontramos también el cristal del único faro que ha de montarse, aunque vienen los dos (de nuevo el ahorro en tiempos de crisis). Aquí también el detalle es fino.
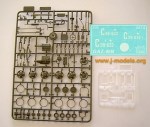
El montaje del chasis, la suspensión y la transmisión es bastante sencillo, y el detalle también parece más que suficiente para un vehículo de estas características; las ballestas de la suspensión, por ejemplo, llevan muy bien marcadas las láminas de metal que las componen. La zona de carga se compone del suelo completo de una pieza y los cuatro laterales de la caja, cada uno de ellos con sus correspondientes pestillos de cierre. Las instrucciones no hacen ninguna referencia a la posibilidad de mostrar el portón trasero abierto, pero a simple vista no parece haber nada que lo impida. Hay también cuatro bancos transversales para el transporte de tropas, este es un buen detalle para los que no deseen hacer uso del toldo. Éste viene también de una sola pieza con detalle suficiente y creo que puede ser usado si se mejoran las aberturas de lona en todos sus lados. El montaje de las ruedas es también bastante básico, los neumáticos de vinilo lucen bastante bien. la única pega es que les falta detalle en las zonas de rodadura.
La hoja de calcas sólo contiene tres matrículas para las puertas y la parte posterior de la caja, y un círculo blanco. Las instrucciones muestran un único vehículo pintado de verde (con un tono más o menos parecido al FS34102) y en field drab (FS30118) para los toldos. La hoja de instrucciones (también casi idéntica a la maqueta del GAZ-AAA de Zvezda) se presenta en una hoja A4 doblada con diagramas a buen tamaño y sencillos de seguir.
En conjunto, esta es una maqueta bastante bien detallada (aunque siempre con la posibilidad de mejorarla) y sencilla de montar que está al alcance de cualquier modelista, incluso de nivel básico.
[NOTAS DE MONTAJE: El montaje del chasis siguiendo las instrucciones no tiene mayor problema con la excepción del paso 8. En las instrucciones no se ve con claridad el lugar exacto donde van colocadas las piezas D67 y D43. Tras consultar planos, la primera debe ir pegada al chasis aproximadamente a la altura de la base de la columna de dirección, y la D43, que representa una de las bielas de la dirección y que en realidad era un engranaje algo más complejo, debe ser afinada y pegada al eje por debajo de la barra de dirección (con la maqueta colocada boca abajo). Otro zona complicada de montar es la cabina y el morro por la ausencia de guías o marcas para alinear las piezas correctamente. Lo mejor es empezar de atrás hacia delante, teniendo cuidado de alinear las puertas de manera que el motor no estorbe. De cualquier forma, es conveniente revisar bien los encajes antes de pegar nada de manera definitiva. Ojo también a los estribos pues las instrucciones están equivocadas. Las piezas F8 y F9 deben pegarse justo una en lugar de la otra; esto es, la más larga hacia delante (en el sentido de la marcha) y la más corta hacia atrás.]◊

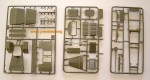


This tooling is an ex-Eastern Express release with Zvezda’s new box and instructions as they did with other GAZ trucks (two and three axels). The kit consists of seven sprues, one of them containing the clear parts and another the vinyl tyres. Parts are well moulded without flash or visible pin marks, but they have the usual thickness Zvezda give to their toolings. I don’t mean they are crude or oversized, in fact there are very good details all around, but the Russian manufacturer have a long way still to go if they wish to catch up with the kits, others are offering at this scale today.
Among the best things of this kit is the detail on both cab doors and body wooden planking. Another good point is that it also includes the engine which comprises seven basic parts, although to be able to show the engine compartment, the hood needs some careful surgery. The elements inside the cab are also basic but they truly represent the spartan interior of these Soviet vehicles. We only find three pedals, two levers, the steering wheel and a basic dashboard. There are some slight ejector marks to be cleaned on the inner side of doors and roof canvas. Doors come as separate parts but here again some work is needed to show them open as they have been molded together with part of the cab sides. The canvas roof has some texture which could also be improved because the part looks quite smooth. Some GAZ-MM also had a canvas rear wall in their cabs in order to save basic materials, but in the kit such part shows a smooth surface indicating a plate. Closing the cab there are three parts for the windshield and windows which are made in thin and very clear plastic. Mine at least have been fortunately saved from scratching as Zvezda still include the sprues loose inside the box. In the same sprue we also find a couple of headlights but we only need one of them (yes, raw materials shortage again). Detail here is really crisp and fine.
Assembling the chassis, suspension and trasmission looks quite easy and straightforward, detail seems more than enough for such a simple vehicle too; springs, for example, are quite well detailed. The body includes a complete floor and four sides with finely detailed wooden planking, each corner also shows its own latch. Instructions don’t show whether you can leave the back door open but nothing in the kit assembly seems to indicate the opposite. There are also four cross boards for troop transport inside the body, this is a welcomed detail if you don’t want to use the canvas provided. Canvas comes in only one part. I think detail is again enough with only the «windows» and back opening to be improved somehow. Assembly of wheels is quite simple, vinyl tyres look good, even though some modelers are not keen on this material. The treads are the weak point here as they show no detail at all.
The decal sheet only contains three serial numbers for the cab doors and the body back door and a white circle. Instructions show only one truck with no reference to year or place (perhaps they do, but it’s in Russian) painted overall green (approximately FS34102) with canvas in field drab (FS30118). The assembly guide, which is almost identical to that of Zvezda’s GAZ-AAA, consists of an A4 folded sheet showing ten clear and easy-to-follow general steps and an useful diagram to locate parts in sprues.
Overall this is a good kit of an important Soviet WWII truck which is easy to build and can be recommended to any modeler regardless his experience. I suppose it will be welcomed by most soft-skins fans.
[ASSEMBLY NOTES: Building the chassis following the instructions is no major problem except for step 8, where the location of parts D67 and D43 is not clear. After checking plans of the truck I found on the net, it is clear that part D67 should be glued near the steering column end and D43, which represents one of the connecting rods in the steering gear and which was in fact a more complex gear, should be refined and glued to the front axle crossing under the gearing bar (with the kit being upside down). The cab and nose are also difficult to build due to the lack of pins or guides to align parts correctly. The best thing is to start from back to front, being careful to align the doors with the base edge, this way the engine won’t be a problem. Anyway, it’s more than advisable to double-check fitting before gluing a single part here. Be also careful with cab steps. Steps 8-a and 8-b in the instructions are wrong. Parts F8 and F9 should be located exactly the other way round, with the longer part in the place of the shorter one.]◊
Actualizado – Updated: 4 / 2022
Actualizado – Updated: 5 / 2017
Publicado – Published: 5 / 2009
©www.jmodels.net

Debe estar conectado para enviar un comentario.