

De un vistazo – Quick look
MATERIAL Y PIEZAS
MEDIA & PARTS:
- Plástico inyectado (134 piezas), acetato (5 piezas).
- Injected plastic (80 parts), acetate (5 parts).
CALCAS – DECALS:
- Tres juegos de matrículas y marcas de unidad. Bien impresas y nítidas en general.
- Three sets of number plates and unit markings. Well printed and mostly sharp.
OPCIONES – OPTIONS:
- Opel Blitz Kfz. 385 Tankwagen. WL-157059. Frente Oriental. Aeródromo de Odessa (Ucrania). Noviembre 1943-abril 1944.
- Opel Blitz Kfz. 385 Tankwagen. WL-323851. Alemania. Verano de 1943.
- Opel Blitz Kfz. 385 Tankwagen. WL-183675. Sicilia, 1942.
- Opel Blitz Kfz. 385 Tankwagen. Frente de Leningrado. Aeródromo de Hostkino (Rusia). Febrero de 1942.
- Opel Blitz Kfz. 385 Tankwagen. WL-157059. Eastern Front. Odessa airfield (Ukraine). November 1943-April 1944.
- Opel Blitz Kfz. 385 Tankwagen. WL-323851. Germany. Summer 1943.
- Opel Blitz Kfz. 385 Tankwagen. WL-183675. Sicilia, 1942. Sicily, 1942.
- Opel Blitz Kfz. 385 Tankwagen. Leningrad Front. Hostkino airfield (Russia). February 1942.
INSTRUCCIONES – INSTRUCTIONS:
- Folleto de 8 páginas impreso en blanco y negro. Muestra una historia del vehículo con datos técnicos, una lista de colores con referencias a pinturas de Vallejo, un plano numerado de piezas, 15 capítulos de montaje y dos páginas de perfiles. Muy claras.
- 8-page brochure printed in black and white. It shows a history of the vehicle with technical data, a list of colors with matches in Vallejo paints, a numbered parts plan, 15 assembly chapters and two pages of profiles. Very clear.
LO MEJOR – THE BEST:
- Incluye motor. Detalle exterior decente. Variedad en las opciones de pintura.
- Engine included. Decent external detail. Varied paint finishes.
LO PEOR – THE WORST:
- Detalle en la cabina escaso con puertas cerradas. Algunas marcas de eyector indeseables.
- Sparsely detailed cab with doors molded closed. Some ejector pin marks.
VALORACIÓN – CONCLUSION:
- En general esta bien detallada por fuera y en el motor, pero el montaje requiere un poco de experiencia y refinar algunas piezas. Variadas opciones de pintura que son un activo.
- It is well detailed outside and has a nice engine, but assembly needs a bit of experience and refining some parts. The different paint finishes are a clear asset.

La maqueta
Por el momento, esta es la última maqueta de una serie que Roden ha ido sacando de este camión alemán a lo largo de los años. La serie tiene tres modelos: el camión estándar con cabina metálica, el modelo L701 fabricado por Daimler-Benz y este vehículo especial de transporte de combustible del que sólo llegaron a fabricarse entre 300 y 500 ejemplares. Poca cosa si se compara con las decenas de miles de las otras versiones.
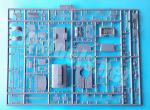
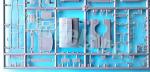
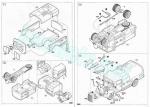
La maqueta está repartida en tres bastidores, dos de ellos idénticos, compuestos de piezas que están bien moldeadas y no presentan rebabas. Sin embargo, hay marcas de eyector evidentes en los faros y menos visibles en el interior de las puertas de la carlinga y una de las puertas del depósito de combustible. Por lo demás, la maqueta incluye una lámina de acetato con 5 piezas, las calcas y las instrucciones.
Hay algunas piezas finas y otras muy pequeñas que hay que manipular con cuidado. Además, en el caso del parabrisas hay que extremar la precaución al sacarlo del bastidor pues no hay espacio suficiente entre el bastidor y la pieza.
El detalle en algunas zonas, como el motor, la dirección y la parte delantera del vehículo, es bastante minucioso y necesita un trabajo más delicado, como si se tratase de una escala mayor. El montaje está organizado en varias unidades menores, como el bastidor, cabina, depósito de combustible, pero no en el orden que solemos encontrar en otras maquetas de esta escala.
Motor y transmisión
El bloque motor y la caja de cambios están moldeadas en una pieza dividida en mitades. El detalle es bastante bueno y se acentúa con piezas separadas para el filtro de aceite y de aire, los colectores de escape, el tubo de escape y el alternador. El radiador y su ventilador también vienen aparte, aunque el primero muestra más detalle por el lado interno que por fuera, que aparece liso y sin la malla debido a su escaso tamaño.
El árbol de la transmisión está moldeado de una pieza con escaso detalle en las juntas cardan. La pieza abarca desde la caja de cambios al eje trasero.
Bastidor, suspensión y ruedas
El bastidor es de una sola pieza salvo un travesaño situado en la zona posterior que soporta la rueda de repuesto. La pieza tiene dos soportes que hay que eliminar a cada lado.
Las ballestas son piezas separadas con detalle solo en sus lados externos ya que el interno es liso. Los ejes van pegados sobre ellas. En el caso del delantero, la pieza me parece un poco fina y con escasa rigidez, algo delicado para las ruedas. Los extremos del eje cuentan con diminutos pivotes para insertar dos topes que van unidos al tambor de freno de cada rueda. Si pegamos con cuidado estos diminutos topes, se pueden poner las ruedas giradas sin tener que hacer más modificaciones.
El eje trasero incluye el diferencial y está dividido innecesariamente en mitades. Los tambores de freno también vienen separados y con un disco superpuesto como los delanteros.
Las ruedas son de una pieza, salvo los tambores internos, con los neumáticos bien marcados y un detalle digno en la banda de rodadura. La banda muestra una línea de molde muy fina que se puede eliminar con sencillez.
Las llantas de las ruedas delanteras muestran buen detalle aunque los huecos característicos, pese a estar marcados, no vienen abiertos debido a las limitaciones de material y tamaño. A las ruedas traseras les ocurre lo mismo. Estas ruedas van unidas mediante un diminuto pivote moldeado en cada rueda interna.
Para completar el chasis hay que añadir los guardabarros delanteros, el motor y el depósito de combustible, moldeado en mitades y situado bajo la cabina.
Cabina y carrocería delantera
El lado trasero de la cabina lo forma un panel con marcas de eyector en el lado externo que no se verán una vez instalado el depósito de combustible. La parte superior externa cuenta con un perfil separado que incluye dos lentes de acetato.
El suelo es de una pieza y está ahuecado bajo el asiento dejando visible el depósito de combustible del camión. En esta pieza sólo hay que añadir la palanca de marchas y el asiento.
El lado delantero de la cabina muestra en el interior algunas marcas de eyector pequeñas situadas junto a las puertas. La pieza incluye un salpicadero bastante malo, el volante y la columna de dirección separados, además de unos pedales pasables moldeados in situ. La pieza incluye el marco del parabrisas y los limpiaparabrisas unidos a este. El cristal es de acetato insertado en un rebaje del marco.
La cabina está rematada por el techo de lona, una pieza fina con un par de marcas en el lado interno que no llegarán a verse, y las puertas. Extrañamente, estas tienen los marcos de las ventanillas separados del resto. Las ventanillas son también de acetato. La parte inferior de cada puerta posee una marca positiva en su cara interna que habrá que eliminar por precaución, ya que puede ser visible desde fuera. El detalle en las bisagras y pestillos externos es decente al menos. Desgraciadamente, las puertas no pueden ponerse abiertas al estar unidas a parte de los lados de la cabina.
Una vez pegados los guardabarros al bastidor, se puede proceder al montaje de la zona delantera del camión. La pieza de los guardabarros está unida al paragolpes, detallado con el gancho de remolque y la placa de matrícula.
El capó está dividido en tres piezas que representan los lados y la superficie fija entre ellas. Los lados tienen bien marcadas las rejillas de ventilación y los pestillos de cierre. Dado que tenemos un motor bastante detallado, nada impediría mostrarlo si las piezas no fuesen tan gruesas y no tuviesen marcas de eyector que rellenar por dentro. La calandra frontal es relativamente fina y está bien reproducida.
En la zona delantera hay además varias piezas, en general muy pequeñas, que representan el retrovisor unido a un faro auxiliar, los indicadores de giro, los gálibos, herramientas (pico y pala) y los faros. Estos últimos tienen una pequeña marca de eyector que arruina su aspecto. Lo mejor sería ahuecarlos y hacerles una lente transparente en condiciones. Por último, tenemos también un faro Notek con su soporte. Las instrucciones indican que para pegar el soporte hay que practicar una muesca en el lado izquierdo frontal de la carrocería, aunque lo veo innecesario ya que el soporte se puede pegar directamente sin necesidad de hacer cirugía.
Depósito de combustible
Está compuesto de un suelo, moldeado con los guardabarros traseros, dos lados detallados con rejillas de ventilación y algunos paneles, la parte delantera y trasera y el techo. La cara anterior no tiene detalle, pero el compartimento posterior tiene las puertas separadas para mostrar algunos dispositivos de control de bombeo moldeados en relieve en su interior. Este panel incluye también la placa de matrícula posterior.
El techo está bien detallado con una plataforma sobreelevada donde hay que instalar dos asas y una pequeña tarima de madera como zona de trabajo. La escalera de acceso lateral, fina y limpia de rebabas, está dividida en dos tramos. También tenemos el triángulo de remolque que puede ponerse plegado o no. El techo no parece difícil de pegar, ya que va encajado en los rebajes de la parte superior de las piezas laterales.
Calcas
La hoja es pequeña y bastante parca. Incluye tres juegos de matrículas y marcas de unidad. Los motivos están bien impresos y son nítidos en general.
Instrucciones
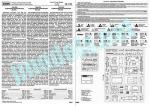
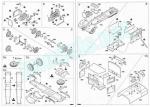
Se muestran en un folleto de ocho páginas impreso en blanco y negro que contiene una historia del vehículo con datos técnicos del mismo, una lista de colores con equivalencias de pinturas de Vallejo, un plano numerado de piezas, 15 capítulos de montaje y dos páginas de perfiles. Los capítulos de montaje son claros.
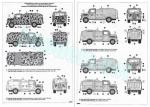
Los acabados de pintura muestran cuatro posibilidades distintas para la maqueta, que varían desde esquemas monocolores en Dunkelgrau (RAL 7021) o Gelb (RAL 1006), camuflaje invernal o camuflaje tricolor.
Valoración
En general la maqueta posee un buen detalle para esta escala en el motor y en el exterior. De la cabina no se puede decir tanto, ya que el salpicadero deja bastante que desear y las puertas se han dividido en dos mitades para después dejarlas cerradas, lo que resulta incomprensible.
El montaje requiere un poco de experiencia para refinar algunos detalles, como los faros, o montar otros como los cristales de acetato. El ensamblaje de la dirección tampoco parece muy sencillo debido a la poca rigidez del eje delantero y a las pequeñas piezas que hay que colocar en sus extremos.
Dicho esto, también hay que valorar la variedad en las opciones de pintura, que prácticamente permiten situar esta maqueta en casi cualquier frente y época del año, lo que es una ventaja si pretendemos incluir el modelo en una escena.◊


The kit
For the moment, this is the last kit in a series of this German truck Roden have been releasing over the years. The series comprises three kits: the standard truck with a metal cabin, the L701 model manufactured by Daimler-Benz and this bowser of which only between 300 and 500 examples were manufactured, a small quantity compared to the tens of thousands of other versions.
The kit is broken down in three sprues, two of them identical, with parts that are well molded and have no flash. However, there are visible ejector marks on the headlights and less evident ones on the inside of the cab doors and one of the fuel tank doors. The kit also has an acetate sheet with 5 pieces, the decals and the instructions.
There are some fine pieces, a few of them very brittle that must be handled with care. The windshield also needs care when taking it out from the sprue as the piece is molded next to the frame.
Detail in some areas, such as the engine, steering and the front of the vehicle, is quite busy and needs more delicate work, as if it were a larger scale. Building the model comprises several sub-assemblies, such as the frame, cabin, fuel tank, but not in the order that we usually find in other kits in this scale.
Engine and transmission
The engine block and gearbox are molded in one piece divided in halves. Detail is quite good and the piece has separate parts for the oil and air filter, exhaust manifolds, tailpipe and alternator. The radiator and the fan also come separately, although this shows more detail on the internal side than on the outside, which is flat and without the mesh probably due to its small size.
The driveshaft is molded in one piece with little detail on the cardan joints. The piece extends from the gearbox to the rear axle.
Frame, suspension and wheels
The frame is made of a single piece except for a crossbar located in the rear area that holds the spare wheel. The piece has two supports that must be removed on each side.
The leaf springs are separate pieces with detail only on their external sides. The axles are glued on them. The front axle seems too thin and soft, which is not good news when attaching the wheels. The ends of the axle have tiny pins to insert two pieces attached to the brake drum of each wheel. If we glue these tiny pieces carefully, the wheels can be steerable without any further modifications.
The rear axle includes a differential that is unnecessarily divided in halves. The brake drums also come separate and with an overlapping disc as in the front axle.
The wheels are one piece with separate brake drums and show nicely engraved tires and decent detail on the tread, which has a very thin seam line easy to remove.
The rims on the front wheels show good detail although the characteristic openings, though engraved, are not hollow probably because they are too small. The same happens to the rear wheels. These are attached by a tiny pin molded on each inner wheel.
To complete the chassis, assembly continues with the front fenders, the engine and the fuel tank, molded in halves and located under the cabin.
Cab and front body
The rear cab side has ejector marks on the external side that will not be seen once the fuel tank is installed. There is a separate piece on the external side including two acetate lenses.
The one-piece floor has a gap under the seat to install the truck’s fuel tank. The only pieces to add are the gear lever and the seat.
The front firewall shows some small ejector marks next to the doors. The piece includes a pretty bad dashboard, separate steering wheel and steering column, plus the pedals molded on. The windshield frame and the wipers are molded with the front piece too. The glass is a small acetate sheet inserted in a recess in the frame.
The canvas roof finishes off the cab. This is a thin piece with a couple of marks on the inside that will not be visible, and the doors. Strangely, these have the window frames separated from the rest. The windows are also acetate. The doors has a positive mark on the inside to clean up as it may be visible from the outside. Detail on the external hinges and latches is decent at least. Unfortunately, the doors cannot be posed open as they include small surfaces of the cab sides.
Once the fenders are glued to the frame, the front of the truck can be assembled. The fender piece is attached to the bumper, detailed with the tow hook and license plate.
The hood is divided into three pieces that represent the sides and a long thin panel in between. The sides have defined gills and latches. Since we have a fairly detailed engine, we could show it if pieces were not so thick and did not have ejector marks inside. The front grille is nicely rendered and not very thick.
The front of the vehicle comprises several pieces, generally very small, that represent the rearview mirror joined to the auxiliary headlight, turn indicators, clearance indicators, tools (pick and shovel) and the headlights. These have a small ejector mark on the middle of the lens. The best solution would be to hollow them out and make proper clear lenses. Finally, we also have a Notek headlight with the base. Following the instructions, you have to make a notch in the front body side to insert the base, but I see it unnecessary as it can be attached without the need for surgery.
Fuel tank
Parts breakup comprise a floor, molded with the rear fenders, two sides detailed with vents and some panels, the front and rear pieces, and the roof. The front panel has no detail, but the rear compartment is provided with separate doors to show some pump controls inside. This panel also includes the rear license plate.
The roof is well detailed with a raised platform to install two handles and a small wooden inspection platform. The side ladder, thin and clean from flash, is divided in two lengths. We also have the towing triangle that can be shown folded. The roof doesn’t seem difficult to attach as it fits into recesses molded on the side pieces.
Decals
The sheet is small and quite sparse. It includes three sets of plates and unit markings. Decals are well printed and sharp.
Instructions
They are shown in an 8-page booklet printed in black and white containing a history of the vehicle with technical data, a list of colors with Vallejo paint matches, a numbered parts plan, 15 assembly chapters and two pages of profiles. The assembly chapters are clear.
Paint finishes show four different possibilities for the model, varying from overall schemes in Dunkelgrau (RAL 7021) or Gelb (RAL 1006), winter camouflage or tricolor camouflage.
Conclusion
In general, the kit has good detail for this scale in the engine and exterior, but the same cannot be said of the cabin. The dashboard leaves a lot to be desired and the doors are molded in halves with the only possibility to show them closed, which is a bit disappointing.
Assembly requires a little experience to refine some details, such as the headlights, or build others such as the acetate lenses. The steering assembly does not seem very simple either due to the soft front axle and the small pieces that are placed at the ends.
That said, we should also value the variety in painting choices, which in fact allows the model to be placed on almost any front and time of year, which is an advantage if we intend to include it in a scene.◊
Publicado – Published: 2 / 2024
©www.jmodels.net


Debe estar conectado para enviar un comentario.