

De un vistazo – Quick look
MATERIAL Y PIEZAS
MEDIA & PARTS:
- Plástico inyectado (43 piezas, incluidas dos figuras), 8 piezas transparentes.
- Injected moulded styrene (43 parts, including 2 pilot figures), 8 clear parts.
CALCAS – DECALS:
- Incluyen hinomarus, marcas de unidad, panel de instrumentos del piloto y marcas amarillas para hélices y alas. Buen registro y color.
- Include hinomarus, unit markings, pilot’s instrument panel and other markings for wings and propellers. Good colour and register.
OPCIONES – OPTIONS:
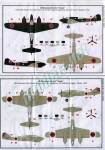
- 81º Hiko Sentai, 1er Chutai, Fuerza Aérea del Ejército Imperial japonés, Malasia, 1942.
- 6º Dokuritsu Hiko Chutai, Defensa Aérea de Japón, Osaka, 1944.
- 81st Hiko Sentai, 1st Chutai, IJA Air Force, Malaya, 1942.
- 6th Dokuritsu Hiko Chutai, Air Defence of Japan, Osaka, 1944.
INSTRUCCIONES – INSTRUCTIONS:
- Folleto doblado tamaño A4. Incluye 10 pasos generales de montaje y dos hojas a color para la pintura y calcas. Diagramas claros y sencillos de seguir.
- A4 folded leaflet comprising 10 main assembly steps and two colour-printed sheets for painting and decals. Clear and easy to follow.
LO MEJOR – THE BEST:
- Molde limpio. Montaje sencillo. Versiones.
- Clean tooling. Easy assembly. Versions.
LO PEOR – THE WORST:
- Molde antiguo y simplificado. Líneas de panel en fino relieve.
- Old and simplified tooling. Thin raised panel lines.
VALORACIÓN – CONCLUSION:
- No es la ni la mejor ni más detallada maqueta de este avión a la escala, pero promete un montaje rápido y sin complicaciones.
- Not the best and most detailed kit of the aircraft at this scale, but it’s a promising quick and easy build.

Si tuviese que elegir sólo un avión japonés para una galería de los más bonitos de la Segunda Guerra Mundial, probablemente pasaría por encima de otros más famosos e importantes para escoger el Ki-46. Con sus líneas aerodinámicas tan bien estudiadas y el perfil tan «deportivo» de su fuselaje (especialmente en el morro del Ki-46-III), este bimotor sin duda les salió casi redondo a los japoneses. No es poco si además añadimos algunas de sus prestaciones, como la velocidad punta, que le permitían escapar en multitud de ocasiones de los cazas enemigos más modernos, especialmente en China, cuestión primordial para llevar a cabo sus misiones de reconocimiento avanzado.
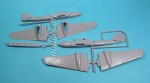
La maqueta de Airfix es una reedición simplemente actualizada en su caja, instrucciones y versiones de pintura. Desgraciadamente no ha corrido la suerte de otras que han visto actualizar sus moldes en los últimos tiempos. Leo en Scalemates que el original es del año 1965, aunque no hay más que ver la disposición de las piezas pequeñas en los bastidores, moldeadas a cada lado del vástago y sin protección en los bordes, para darse cuenta de que muy moderna no debe ser.
Para saltarme el procedimiento habitual comenzaré escribiendo sobre las instrucciones. Están impresas a tamaño A4 en un folleto doblado de seis páginas, dos de ellas impresas a color, que muestran la pintura y la disposición de las calcas. Los diagramas son claros, sin posibilidad de error o duda. Las secuencias principales de montaje son diez y como opciones tan sólo hay la posibilidad de mostrar el tren de aterrizaje desplegado o cerrado. Es una buena idea el que Airfix haya decidido desde hace un tiempo a esta parte imprimir los perfiles de pintura y calcas a color en todas sus maquetas, actuales o de antaño, como otros fabricantes. Aunque en ocasiones no es del todo imprescindible, siempre da mejor impresión que el fabricante se esmere por mejorar su producto. Las referencias de colores, como siempre, son de la gama de Humbrol.
El interior de la maqueta incluye el suelo, los dos asientos (formas en general correctas), el panel de instrumentos detallado mediante una calca, los mamparos trasero y delantero respectivamente del piloto y observador, y la palanca de mandos con forma en X ladeada, similar a la auténtica. Hay que colocar también por dentro las ventanillas para las cámaras fotográficas laterales, pero de estas, obviamente, no cabe esperar ni rastro. Van incluidas también dos figuras idénticas de pilotos con escaso detalle, se aprecian las máscaras de oxígeno y las gafas, pero dan un poco de repelús con sus piernas cortadas por debajo de las rodillas. Quizá lo más caritativo sea relevarlos de su misión y mandarlos en comisión de servicio a la caja de sobras. El motivo de la poda es claro: para evitar colisionar con las lengüetas de inserción de las alas y su diedro, Airfix elevó el suelo y tuvo que aplicar cirugía a las figuras. También por este motivo el panel de instrumentos va pegado directamente sobre el suelo de la carlinga. Como sucede en los reactores modernos, el suelo del Ki-46 no resulta tan evidente en un fuselaje tan estrecho, a menos que uno se coloque casi en perpendicular sobre la carlinga, y a las pruebas fotográficas del Ki-46-III conservado en Cosford (Gran Bretaña) me remito. Para detallar el interior y algo del exterior, Airwaves tiene un fotograbado específico para esta maqueta.
Los estabilizadores son finos y vienen de una pieza con líneas delgadas en relieve como el resto de las alas y fuselaje. Las góndolas de los motores también son de una pieza e incluyen las tomas de aire inferiores y los escapes a cada lado, con formas vagamente correctas, aunque los escapes resultan algo alargados y demasiado estrechos. Además, deberían ir colocados rehundidos en la góndola para ofrecer menos resistencia y no sobre ella, como es el caso. Quizá también el perfil escasamente redondeado de los cubremotores sea erróneo, pero esto no puedo asegurarlo categóricamente. Las hélices vienen moldeadas con los bujes. Después de mirar un buen puñado de fotos antiguas y más recientes, creo que la forma de los bujes es incorrecta para este modelo y corresponde más bien a un modelo III. Así parecen delatarlo su excesiva longitud y el perfil menos puntiagudo. El diámetro de los bujes también es excesivo, cubriendo la mayor parte del espacio de entrada al motor. Aunque a esta escala no se nota tanto, la maqueta terminada da un cierto «cante» al ojo avezado.
Al examinar el tren de aterrizaje se comprueba que las patas tienen formas correctas y detalles bien vistos, como los servos de los amortiguadores situados hacia delante y no hacia detrás como solía ser lo habitual en otros aviones, si bien están representados por un vulgar saliente triangular de plástico. Los pozos del tren en las góndolas están limpios de polvo y paja, sin el menor detalle. Las compuertas del tren, como de costumbre, quedan algo gruesas, pero esto siempre suele tener buen remedio adelgazándolas con lija o cuchilla, según. Las ruedas son cuestión aparte. Por más que las miro, me siguen pareciendo demasiado grandes y desde luego el tapacubos exterior no es correcto. El motivo es sin duda aquella extendida preocupación de los fabricantes de antaño por moldear partes móviles en las maquetas: ruedas, flaps y hasta trenes de aterrizaje y alas plegables. Airfix era uno de los más conspicuos practicantes de esta manera de hacer y por eso la maqueta hereda lo que actualmente muchos consideran taras de aquel tiempo (para otros modelistas de gustos pretéritos son una bendición, ojo). En primer lugar, las ruedas vienen en dos mitades con lo que habrá líneas que tapar y en segundo, el eje que permite su giro es demasiado grueso y está moldeado con el tapacubos. En principio pensé que este, realizado con radios en vez de ser simplemente liso, era directamente erróneo, pero he encontrado una sola imagen de un modelo III con marcas japonesas que lo llevó. Bien podría tratarse del prototipo o de un aparato capturado y dotado de piezas canibalizadas. El caso es que Airfix convirtió la excepción en regla. Afortunadamente la cosa, vista así, tiene un arreglo no demasiado complicado en eliminar los radios y tapar con plástico. Lo difícil hubiese sido al revés, sin ruedas de resina.
Las piezas transparentes son muy claras y razonablemente finas para la edad y escala de la maqueta, pero siguen sin convencerme esa especie de lengüetas de ajuste que Airfix ha dejado a cada lado para insertarlas en sus respectivos rebajes del fuselaje. Además de las tres ventanillas mencionadas antes, hay otras dos situadas bajo el piloto y la panza más la luz de correteo del morro.
La hoja de calcas incluye hinomarus, marcas de unidad, el panel de instrumentos del piloto y marcas amarillas para hélices y alas, lo básico. Aparentan buen registro y color, aunque dicen por ahí que las de Airfix suelen ser algo gruesas y pejigueras. Ya veremos en su momento. En cualquier caso, es de alabar el hecho de que se hayan incluidos dos versiones de pintura distintas en gris ceniza y verde por arriba, a elegir. Me resultó rara la marca del 81º Sentai, esa especie de ave en picado estilizada (o lo que sea) y creí que podía tener los colores invertidos, o ser de otro color, como la de una de las maquetas de Hasegawa a esta escala, pero es correcta para lo que representa: un avión del primer Chutai de la escuadrilla.
Turno de recomendaciones. Si se me pidiese consejo, diría que depende de las circunstancias y el momento. A día de hoy, si se tiene a tiro y se dispone de presupuesto para algún Ki-46 de Hasegawa, la opción es clara por detalle y calidad general, aunque no por precio. Además suele ser cada vez más rara por apetecible y poco reeditada. Otras alternativa, que yo conozca, es el molde de Arii/LS, que tiene lo menos cuatro maquetas de diferentes modelos, incluida una rara versión de entrenador biplaza. No es ninguna maravilla, aunque es algo mejor que la de Airfix, pero también resulta difícil de encontrar y su precio fluctúa del puro chiste al descaro más evidente según humores y modas. La de Airfix es la opción a elegir si no importa excesivamente el detalle, se busca facilidad de montaje, disponibilidad y precio razonable.◊


If I had to choose the most beautiful WWII Japanese aircraft, I’d probably skip of more famous and important types and pick the Ki-46. With its well-studied profile and that advanced look in the fuselage (especially evident in the nose of the Ki-46-III), the Japanese got an almost just perfect twin-engine fighter. This is not a trifle if we also consider its performance in some aspects such as the top speed, which allowed it to leave most enemy fighters far behind, especially in the Chinese front, a crucial factor to carry on its advanced reconnaissance role.
The kit is just a re-release with new box(art), instructions and painting choice. Unfortunately, this tooling has not been as lucky as others which Airfix have recently updated. I read in Scalemates that the original release dates back from 1965 no less but just an overview of the sprues, moulded on each side of their gates with no protection around them, tells you the kit is not brand new.
To break the usual script in my reviews, I will start with the instructions. They are printed in a folded six-page A4 leaflet, two of them printed in colour to be used as painting and decaling guide. Diagrams are clear with no room for doubts or mistakes. There are ten main assembly steps and you only have the choice for a folded or unfolded landing gear. It is good to see Airfix printing colour profiles as an aid for painting and decals, as other companies do. Although not always essential, it looks fine seeing a company do their best to improve a product. Paint reference are, as usual, in the Humbrol range.
The main sprues which contain the wings, fuselage and the long narrow cockpit floor, a common and simple breakup. The tooling is quite clean from flash with most ejector marks in non-visible spots. There are only four shallow marks (two on each side) to fill on the sides of the aft station. Those in the pilot’s station are placed behind the bulkhead and in front of the instrument panel, so it is not necessary to fill them. Being an old kit, panel lines are raised except for control surfaces, but they are thin, and this is probably good news for those who hate rescribing panels and still have a hope to save this kit. I have not made dry fit tests, but I think Airfix clearly convey the aircraft’s beautiful wing dihedral. Unluckily, this also involves inaccuracies in the interior as you will see below.
The interior comprises the floor, two seats, correct in overall shapes, only the pilot’s panel with instruments represented with a decal, the rear and front bulkheads for the pilot and observer respectively and the control lever with correct X-shaped grips. Before closing the fuselage halves, there are three side clear windows for cameras to be added but of course these are missing. You also get a couple of identical and poorly detailed figures but you can see their goggles and masks. They look frightening with their legs cut behind their knees. I think one should be charitable and leave them to rest inside the spare box. The reason for pruning these poor plastic people’s legs is clear: Airfix raised the cockpit floor to avoid the wing tabs and so figures were simply cut to match their seats. For the same reason the instrument panel is glued directly on the floor. As in modern jet fighters, the Ki-46 floor was not visible in a narrow fuselage unless you could see it from above as pics from the Ki-46-III from Cosford Museum (UK) show. If you wish to spice up the interior, Airwaves make a PE set for this kit which includes some parts for the wings too.
Stabilizers are thin and come in one part. They also show very thin raised lines as in wings and fuselage. Engine cowlings also come in one part with air intakes and exhausts as separate parts. These are too long and narrow and they should be placed inside a recessed hollow to be flat with the cowling surface and not just hanging outside them as is the case. Cowling shapes do not seem rounded enough for me, but I can’t tell definitely. Propellers are moulded with their spinners. After looking at a bunch of old and modern pics of the aircraft for some time, I think the profile of the spinners, longer and less pointed, is incorrect for this model and they correspond to a model III instead. Propeller hubs also look too wide in diameter covering most of the front cowling. Although it’s difficult to detect at this scale, the expert eye quickly finds the flaw.
After inspecting the landing gear, you can see the legs are quite correct with good detail, such as the spring servos looking forward instead of rearwards as in other aircraft, but they are represented by just a crude triangular plastic. Wheel wells inside the cowlings are simply empty but you have two thick doors which can be easily thinned by sanding or scraping with a blade. Wheels are a different question. As much as I look at them, they still seem too large and the exterior hubs are also incorrect. The reason seems the trouble that manufacturers took to include movable parts in their kits: wheels, flaps and even folding landing gear and wings. Airfix was quite prone of doing this in their old toolings and this kit has inherited former flaws (but for some more traditional modelers this can be even funny). Wheels come in halves which means lines to fill and secondly the axle that allows rotation is too thick and molded with the hubcap. At first, I thought the hubs, spoked instead of flat, was just another mistake until I found the only picture I have seen of a Ki-46-III in Japanese markings with those wheels. It could be a prototype or a captured aircraft with cannibalised wheels, but the fact remains that it is only an exception and not the rule that Airfix took for granted. Luckily mending this is just a question of sanding the spokes and making more simple flat hubs with rounded sheet plastic. The hard thing would have been doing the opposite without resin wheels at hand.
The kit’s clear parts are quite transparent and not too thick for the time and scale of the kit, but I still dislike the trim tabs Airfix left on either side of the canopies to match their recesses in the fuselage. Besides the three windows mentioned before, there are two others located under the pilot’s cockpit and belly plus a rounded landing light in the nose.
The decal sheet includes hinomarus, unit markings, the pilot’s instrument panel and yellow markings for propellers and wings, just the basics. Colours are dense and they look in register, although I heard the recent Airfix decals are sometimes thick and difficult to set. I will test them in due time. Anyway, it’s good to see two painting alternatives (grey or green on top surfaces) this time instead of just one as in earlier releases. I thought the unit marking for the 81st Sentai, that stylized diving eagle or similar bird, were wrongly coloured and did not match the same decals included in one of Hasegawa Ki-46 kits at the scale, but I was wrong. Airfix decals correctly represent an aircraft of the first Chutai of this unit which sported a white symbol outlined in red.
Time for recommendations. If I were asked, I would say it depends on chance and circumstances. If you ever find the Hasegawa kit and money is not a problem, go and get it. Choice is clear for quality and detail but not for price. It is becoming hard to find because kit hunters are alert and Hasegawa do not reissue the kit as often as they should. Another alternative that I know is the Arii/LS kit, there are at least four of them including an uncommon trainer version. None of them is the Eighth Wonder but they are still better than this old Airfix Ki-46. The problem is they are not easy to find sometimes, and price can range from bargain to luxury depending on sellers and moments. The Airfix kit is your pick if detail is not crucial and you are looking for an easy to build and affordable kit.◊
Actualizado – Updated: 5 / 2022
Actualizado – Updated: 6 / 2019
Publicado – Published: 8 / 2015
©www.jmodels.ne


Debe estar conectado para enviar un comentario.