

De un vistazo – Quick look
MATERIAL Y PIEZAS
MEDIA & PARTS:
- Plástico inyectado (51 piezas), fotograbado (34 piezas), acetato (4 piezas).
- Injected plastic (51 parts), PE (34 parts), acetate (4 parts).
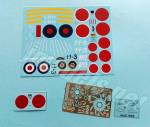
CALCAS – DECALS:
- Hinomarus y escarapelas británicas, matrículas y códigos japoneses de unidad, dos paneles de instrumentos y diversas líneas para el fuselaje, alas y cola. De apariencia muy fina y mates. Bien impresas.
- Hinomarus and British roundels, numbers and codes, Japanese tail codes, two instrument panels and several lines for fuselage, wings and tail. Apparently very thin and matt. Well printed.
OPCIONES – OPTIONS:
- Nakajima E8N1 Tipo 95. Crucero Nachi, Mar Amarillo, 1936.
- Nakajima E8N1 Tipo 95. 5ª Flota, 21º Sentai, Islas Aleutianas, 1942.
- Nakajima E8N1 Tipo 95. Crucero Ashigara, Provincia de Jiangsu (China), 1938.
- Nakajima E8N1 Tipo 95. Aparato alemán con camuflaje y marcas británicas. Crucero alemán Orión, Islas Maug, 1941.
- Nakajima E8N1 Tipo 95. Cruiser Nachi, Yellow Sea, 1936.
- Nakajima E8N1 Tipo 95. 5th Fleet, 21st Sentai, Aleutian Islands, 1942.
- Nakajima E8N1 Tipo 95. Cruiser Ashigara, Jiangsu province (China), 1938.
- Nakajima E8N1 Tipo 95. In German service with British marking. German cruiser Orion, Maug Islands, 1941.
INSTRUCCIONES – INSTRUCTIONS:
- Hoja A4 doblada. Contiene un diagrama de piezas, 13 secuencias de montaje y una guía para arriostrar el modelo. Opciones de pintura en la parte posterior de la caja. Colores genéricos. No malas, pero mejorables.
- Folded A4 sheet showing a parts plan, 13 assembly chapters and a guide to rig the model. Painting choices printed on the back of the box. Generic paint colors. Not too bad but can be improved.
LO MEJOR – THE BEST:
- Detalle interior. Opciones de pintura.
- Cockpit detail. Paint choices.
LO PEOR – THE WORST:
- Ausencia de guías para pegar la carlinga. Montaje de las alas.
- Lack of alignment guide to attach the cockpit. Wing assembly.
VALORACIÓN – CONCLUSION:
- A la fecha, la mejor maqueta de este avión a la escala. Como la mayoría de las ediciones limitadas, detalle notable y ciertas dificultades de montaje. Para modelistas con experiencia.
- The best offer at the scale today. As most short-runs, nice detail added and some extra work in assembly. For experienced modellers.

No ha sido el Nakajima E8N un avión con demasiada suerte en el mundo modelístico. Mientras que a escala 1/72 no hemos pasado aún de la era de las ediciones limitadas, Hasegawa cuenta con una excelente maqueta a 1/48, la mejor tal vez para quien desee hacer este bonito hidro un día. RS Models editó hace algún tiempo los dos modelos (N1 y N2) y lo trajo al siglo XXI. Eso sí, también en edición limitada, pero mucho mejor que la añeja y rara de Aviation USK.
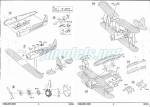
Esta maqueta comprende dos bastidores de plástico, una hoja de calcas, una plancha de fotograbados, una hoja de acetato y las instrucciones. Todo esto viene en una única bolsa de cierre sellado, como es costumbre en el fabricante.
El plástico está bien moldeado, tiende ligeramente a blando y el detalle, sin ser sobresaliente, podemos calificarlo de bien definido en general, considerando la naturaleza de la maqueta. No hay rebabas ni marcas de eyector en sitios visibles. Hay dos internas en relieve a cada extremo de la carlinga, pero no se verán. Los bordes de las alas sí necesitan un ligero repaso con lija para eliminar tenues líneas de molde.
La carlinga viene provista de un suelo con cierto detalle, dos asientos diferentes, una palanca de control, una barra con pedales ausentes (se conoce que RS los olvidó), dos paneles de instrumentos detallados con acetato y fotograbados (también hay calcas adicionales), y la ametralladora, dotada de mira y punto de mira de fotograbado. Los cinturones de los tripulantes también son de fotograbado. Los lados interiores del fuselaje muestran la estructura interna del avión y algunos instrumentos en los dos puestos. No hay líneas para guiar la unión del suelo con el interior del fuselaje.
Tampoco hay guías para unir las mitades del fuselaje, cuyo lado de estribor está fabricado sin la cola, que viene representada en la mitad opuesta para ganar en finura. El exterior del fuselaje está bien representado mediante líneas de panel finas a proa y en relieve a popa que simulan la estructura. Las raíces alares se han incluido también en el fuselaje, probablemente debido a las curvas de su perfil, por eso es probable que el encaje de los planos inferiores sea dificultoso. El fuselaje queda detallado con la adición de una mira y un pequeño tubito para la ametralladora de proa. Los parabrisas son piezas de acetato, rotuladas erróneamente en las instrucciones como piezas de fotograbado.
El motor está bien detallado, lástima que apenas se va a apreciar al estar tapado por la persiana frontal de refrigeración. El capó anular se compone de dos mitades. El motor está fabricado en una pieza muy limpia de rebabas. Está detallado con dos anillos de fotograbado que representan los empujadores de los cilindros y diversos conductos. Los escapes son piezas separadas con definición correcta y sin horadar. Finalmente, en la parte externa tenemos la persiana y una hélice de hechuras y perfil correctos, aunque el eje es demasiado corto. Las instrucciones se saltan el paso de cómo unir el motor al morro, aunque afortunadamente hay un aro con incisión en el morro que ayuda a orientarlo correctamente.
Montar las alas no va a ser muy fácil porque la posición de los soportes no está muy bien marcada en los planos, aunque sí en el fuselaje. Las alas vienen completas y simulan la estructura por medio de finas líneas en relieve. El grosor es quizá un poquito excesivo en los planos superiores y hay algo en el relieve que no acaba de convencerme. Los alerones están bien marcados y sólo muestran actuadores algo gruesos en los planos inferiores. Sobre el plano superior hay un generador con hélice de fotograbado. Los soportes tienen perfil correcto, si bien alguno en mi maqueta viene ligeramente deformado. Bajo las alas podemos colocar dos soportes y dos bombas provistas de aletas y espoleta de fotograbado.
Los estabilizadores son piezas separadas con grosor razonable a la escala y muestran idénticas líneas en relieve para la estructura. Llevan lengüetas para pegarlos en las ranuras de la cola, pero son demasiado cortas y no proporcionan buena sujeción.
El flotador principal viene en dos piezas, con el fondo separado. El detalle de la parte superior está en relieve y tiene bien marcadas las posiciones de los soportes. Al igual que con las alas, el montaje no será un paseo porque las instrucciones no señalan con mucha claridad la posición de los cuatro soportes separados en el fuselaje. Los flotadores auxiliares vienen en mitades con soportes moldeados en una de ellas y otros dos de refuerzo por separado. A cola hay también un pequeño patín de fotograbado.
La pequeña lámina de acetato incluye cuatro piezas para recortar: los dos parabrisas y dos paneles de instrumentos. La hoja es fina, pero requiere buena precisión en el corte porque no hay repuestos.
La plancha de fotograbado contiene, además de los cinturones, diversas piezas ya descritas para realzar el motor, la carlinga, las bombas y algunas otras partes del hidroavión.
Las calcas están bien impresas y su aspecto es muy fino y mate. Los colores parecen bastante saturados. Contiene escarapelas japonesas y británicas, líneas para las alas, fuselaje y cola, matrículas, códigos japoneses de unidad, numerales y dos paneles de instrumentos adicionales.
Las instrucciones se han impreso en una hoja A4 doblada formando cuatro páginas. Contienen un párrafo de referencia histórica, un diagrama numerado de piezas, 13 secciones de ensamblaje, no todas muy claras y con alguna omisión ya indicada arriba, y una página que nos guía para situar las riostras. Como es costumbre en RS Models, la cara trasera de la caja nos muestra cuatro variopintas y atractivas opciones de pintura y las referencias de color, que en esta ocasión son genéricas. Una de las versiones es un hidro alemán con colores y marcas británicos simulados que llevó el crucero auxiliar alemán Orión, toda una rareza.
Esta ha sido una descripción de la única maqueta a la escala de este avión hoy día. Como edición limitada, abunda en los pros y contras de cualquiera de su cuño: detalle multimedia añadido y algunas señaladas dificultades en el montaje que no asustarán a los que ya tengan experiencia. Los novatos y menos diestros acaso deberían hacerse con la de Hasegawa. Seguro que les dará más satisfacciones.◊


The Nakajima E8N has not been a very lucky topic in the modelling field. Hasegawa has a nice 1/48 kit, the best of this floatplane at any scale, but fans of 1/72 scale have not still left the “short-run age” behind. Some time ago, RS Models released both variants (N1 and N2) of this type bringing it to the XXI century. These editions are short-run kits too, however they are much better than the old and rare Aviation USK kit.
The box contains two plastic sprues, a decal sheet, a PE fret, an acetate sheet and the instructions. All this comes inside a self-sealing bag with no protection for PE parts or the decals, as it is usual in the manufacturer.
Plastic is well molded, a bit on the soft side and detail, not being outstanding, is overall good for a short run. There is no flash or marks on visible spots. Raised marks on both ends of the cockpit will not be seen once the fuselage halves are attached. The wing edges need a bit of sanding to clean slight seam lines.
The cockpit is provided with a floor with some raised detail, two different seats, a control column, a bar without pedals (it seems RS forgot to include them), two instrument panels with PE and acetate parts to enhance them (you also have decals for the gadgets) and a nice machine-gun with PE sight and crosshair. The belts are also PE parts. The cockpit walls show the internal structure with some raised instruments in both stations. Unfortunately, there is no guide to align the floor inside the fuselage.
The same happens with the fuselage attachment. The left half is molded without the tail, which comes rendered on the opposite part to get a more realistic look. Exterior surfaces have thin engraved lines at the front and raised structure at the back. Wing roots are molded with the fuselage pieces, maybe because of their shape, so the fitting of the lower wing can be a bit difficult. There are some more pieces to include, such as the gunsight and a tiny rod representing the front machine-gun barrel. The windshields are acetate pieces that are mistakenly identified as PE parts in the instructions.
It is a pity that the finely detailed engine will not be visible as it is hidden behind the front cooling apertures. The cowling ring comes in halves and the engine is one piece that is quite clean from flash. To enhance it, there is a PE tappet ring and a second one simulating electric wire. The exhaust manifolds are separate pieces with nice shape and not hollowed ends. Finally, at the front there is the cooling vents and a nicely shaped propeller though the axle is too short. The instructions skip the nose-engine joining, but fortunately there is a ring with an indent that helps position the engine correctly.
Building the wings does not seem that easy because the position of struts is not as clearly marked on wing surfaces as on the fuselage. Wings are complete pieces and their internal structure is rendered by means of thin raised lines. Lower wings are perhaps a bit too thick for the scale and there is something in raised lines that does not fully convince me. Ailerons are well engraved, and they only have tiny thick actuators on the lower wings. There is a small generator with a small PE propeller on the upper wing. Struts have correct profiles, not being too rounded, but one of them is slightly distorted in my kit. Underwing armament consists of a couple of racks and two nice bombs with PE fins and nose fuse.
Stabilizers are separate pieces with reasonable thickness for the scale having the same raised detail we find on wings. They also have insertion tabs into tail slots but being too short, they are useless.
The main float comes in two pieces, with a separate bottom. Detail on the upper section is raised and looks fine, having marks to attach the struts. As in the wings, assembly will not be easier either because instructions are not very helpful about the placement of the rear struts. Wing floats come in halves with two struts molded with each piece and another two in separate parts. There is also a small PE skid under the tail.
The small acetate sheet includes four parts to cut out: two windshields and two instrument panels. The sheet is quite thin but cutting must be accurate as there are no spares.
The PE fret includes, apart from the belts, several parts to enhance the engine, cockpit, bombs and other sections of the model, as I have described above.
Decals are nicely printed and look very thin and matt. Colors seem quite saturated. The sheet shows Japanese and British roundels, lines for the wings, fuselage and tail, numbers, Japanese tail codes and two instrument panels.
The instructions are printed in a folded A4 sheet comprising four pages. They have a brief paragraph with an introduction to the aircraft, a parts plan, 13 assembly steps, not all of them very clear and with the omission mentioned above, and a final page showing a rigging guide. As usual with RS Models, the back of the box is printed in color and shows four attractive and colourful choices with generic paint references. One of the versions is a German floatplane sporting British colors and markings which was a scout plane on board the auxiliary cruiser Orion, quite an oddity.
This has been my review of the only kit at the scale nowadays. Being a short run, it has all the pros and cons of this type of kits: nice multimedia extras added coupled with some more difficult stages in the build, but this will not discourage the experienced modeller, by the way. Newbies and less skilled modellers should try the Hasegawa offer. They will enjoy it more.◊
Actualizado – Updated: 4 / 2022
Publicado – Published: 5 / 2020
©www.jmodels.net


Debe estar conectado para enviar un comentario.