

De un vistazo – Quick look
MATERIAL Y PIEZAS
MEDIA & PARTS:
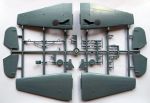
- Plástico inyectado (65 piezas), plástico transparente (6 piezas).
- Injected molded styrene (65 parts), clear plastic (6 parts).
CALCAS – DECALS:
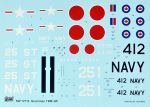
- Una hoja que contiene marcas norteamericanas, canadienses y japonesas, numerales, rótulos y algunos estenciles. Bien impresas, colores nítidos, aparentemente finas.
- One sheet with Canadian and Japanese roundels and U.S. Navy markings, codes and stencils. Well printed in saturated colors, apparently thin.
OPCIONES – OPTIONS:
- TBM-3W Nº de Fabricación 89471. Marina Norteamericana. Escuadrilla Antisubmarina VS-892.
- TBM-3W Nº de Fabricación 91537. Real Marina Canadiense. Escuadrilla VS 881, aparato «412».
- TBM-3W Nº de Serie 2251. Fuerzas de Autodefensa de la Marina Japonesa. Kaijo Jietai, años 50.
- TBM-3W Bu. No. 89471. U.S. Navy. Anti-submarine Squadron VS-89
- TBM-3W Bu. No. 91537. Royal Canadian Navy. VS 881, aircraft «412».
- TBM-3W Serial No. 2251. J.M.S.D.F., region Kaijo Jietai, 1950s.
INSTRUCCIONES – INSTRUCTIONS:
- Folleto doblado de 8 páginas impreso a color. Contiene resumen histórico sobre el avión, plano numerado de piezas, 12 secuencias de montaje y 3 páginas con perfiles a color como guía de pintura y calcas. Colores en códigos Federal Standard y ANA.
- 8-page folded leaflet printed in color. Shows a short historical summary about the aircraft, parts plan, 12 assembly steps and 3 additional pages with color profiles as a guide to paint and set decals. Color reference in Federal Standard and ANA codes.
LO MEJOR – THE BEST:
- Carlinga medianamente detallada.
- Some cockpit detail.
LO PEOR – THE WORST:
- Cubierta de una pieza. Marcas de eyector. No incluye mejoras.
- One-part canopy. Ejector marks. No aftermarkets included.
VALORACIÓN – CONCLUSION:
- Requiere trabajo incluso para hacerla de caja. La ausencia de mejoras, al menos para la carlinga, le hacen perder aliciente. Para modelistas con experiencia.
- It needs an extra effort even to build it out of the box. Lack of aftermarkets, at least for the cockpit, makes it a bit disappointing. For experienced modellers.

Pese a lo indicado en el resumen de arriba, no me gustaría dejar la impresión al lector de que esta maqueta es tremendamente difícil de hacer u horriblemente mala porque faltaría a la verdad. Tiene su lista de cosas por mejorar y el detalle no está al mismo nivel que el de otras marcas de tirada limitada, pero el simple hecho de que una maqueta requiera un trabajo extra no indica automáticamente que sea mala por sí. De hecho, muchas maquetas de otras marcas muy conocidas no son muy diferentes a esta y han pasado (y lo siguen haciendo) por clásicos modelísticos.
A los que ya conocen a Sword no les estoy descubriendo nada porque ya saben de qué les hablo. A los que no les guste trabajarse una maqueta y prefieren que se les dé todo hecho, ya se pueden ir olvidando de esta maqueta y de la marca.
De cuando en cuando, sin sistema ni norma, a Sword le da por incluir algunas mejoras en sus maquetas, sobre todo para el interior. Lo mismo se encuentra uno con un motor o ruedas en resina, un panel y cinturones de fotograbado o no encuentra nada de esto, como es el caso de este Guppy. La caja lleva dos bastidores de plástico, un bastidor de piezas transparentes, las calcas y las instrucciones. El plástico está bien elaborado, es fino pero duro y rígido en las piezas más grandes, como fuselaje y alas. En las pequeñas se nota más la naturaleza del molde y la inyección a poca presión. Los bastidores están limpios de rebabas, aunque hay algunas líneas de unión que rematar. Hay marcas del expulsor invisibles que afectan al cierre de alas, superficies de cola y algo también al fuselaje que retrasarán el montaje más de lo debido puesto que la mayoría son positivas. Hay dos especialmente horrendas en negativo que han desgraciado el entramado de la estructura interior del pozo de la rueda de cola. No se verá gran cosa de ellas, pero lo cierto es que da pena ver el esfuerzo desperdiciado. Las líneas de paneles están en general bien grabadas en el plástico y son casi todas de igual anchura y profundidad excepto las que representan superficies móviles en alas y cola. También las hay en relieve en los timones para representar la estructura de estos y son más tenues en los de profundidad.
La carlinga es la zona mejor detallada de la maqueta, sin ser una maravilla de detalle. Podríamos darle un aceptable a secas. Contiene un suelo, un mamparo trasero que incluye el reposacabezas del piloto, un asiento sencillo, una palanca de control, un buen panel de instrumentos con indicadores en negativo y algún instrumento en relieve, suplementado por otra pieza separada con más instrumento pegados a unos pedales verticales que casi ni lo parecen. A ambos lados del fuselaje hay algunos instrumentos moldeados en cada mitad.
El motor viene de una pieza, moldeado con su mamparo posterior. Es una pena porque no es mala pieza y tal vez hubiese quedado mejor separado de él. En cualquier caso, no creo que esto se aprecie mucho debido a la forma de óvalo del morro del Avenger. La hélice y el buje son piezas separadas, aquella muestra un perfil de sus palas aparentemente correcto.
En la zona posterior interna del fuselaje Sword se ha molestado en detallar el pozo de la rueda de cola. Ya he mencionado las dos marcas de eyector que arruinan la estructura simulada en relieve. El pozo está detallado también con un mamparo y el sistema de plegado, compuesto de tres piezas. Salvando las marras de las marcas, a esta zona de la maqueta también podemos darle un aprobado. Del interior sólo queda por destacar las ventanillas, que se pegan desde dentro y una de ellas va destinada a la puerta de acceso al compartimiento de radar, que viene cerrada.
El fuselaje viene en dos mitades sin guías de alineación, como era de esperar. A cola cabe resaltar el gancho de apontaje (correcto), los escapes separados en la parte delantera, sin horadar y que pasan sin pena ni gloria, y un buen puñado de pequeñas piezas para colocar en la parte trasera del fuselaje. No sé muy bien qué representan, por su forma puede que pequeñas aletas del radar y diminutas tomas de aire. Sean lo que fueren, hay que manipularlas con cuidado y guiarse por las instrucciones, que las sitúan claramente en las diferentes posiciones que se encuentran marcadas sobre el fuselaje.
Las alas están realizadas en mitades, igualmente sin guías de alineación, y van unidas al fuselaje mediante lengüetas. La estructura del fondo de los pozos está grabada en las caras superiores y hay cuatro piezas para cerrarlos por sus lados, de modo que el hueco del ala no pueda verse. Otra cosa es si encajará todo en altura al cerrar las alas. Contemplando la posible maniobra «a ojímetro», me da que no. Los planos de cola también vienen en mitades. Las características aletas verticales de esta versión van por separado con la base moldeada en la superficie de cada plano.
El tren de aterrizaje principal se compone a cada lado de una pata, un brazo hidráulico separado, tapa y rueda de una pieza con banda de rodadura tenuemente marcada. Una de las tapas muestra un par de ligeros y desagradables rechupes, aunque no son difíciles de eliminar.
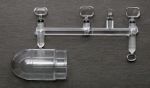
La mayor parte de las piezas transparentes son ventanillas para el fuselaje. La cubierta de la carlinga viene de una pieza. Si queremos ser un poco benignos con el fabricante, se puede alegar a su favor que los abultamientos del fuselaje situados tras la carlinga impiden colocar la mitad trasera de la cubierta en posición abierta. Puede que sea ese el motivo de no haberla fabricado en dos piezas. Las piezas transparentes pasan mi control de calidad sin resultar deslumbrantes.
La hoja de calcas, grande y de vivos colores, muestra marcas de la Marina norteamericana, la canadiense y la japonesa, numerales, rótulos y algunos estenciles. Están bien impresas, los colores son nítidos y los círculos parecen bien centrados. También parecen finas.
Las instrucciones están impresas a color en un folleto plegable de 8 páginas. El folleto muestra en sus primeras páginas la habitual sinopsis histórica sobre el avión, un plano de piezas numerado y 12 pasos de construcción muy claros. Las tres últimas páginas contienen perfiles a color de las tres versiones propuestas con referencias de color en los códigos Federal Standard y ANA.
A esta maqueta le hubiesen venido como anillo al dedo algunas mejoras, como por ejemplo unos cinturones y un panel de instrumentos en la carlinga y unas ruedas con más fundamento. Siendo así la recomendaría sin dudas, pero de la manera que ha sido tratada y considerando lo poco agraciado de este Avenger barrigón al que no le saldrán muchos novios modelistas, la encomendaré sólo a los muy interesados y que ya posean experiencia con maquetas de este tipo.◊


Despite what is indicated in the summary above, I would not like to disappoint the reader about this kit. Saying it is way too difficult to build or simply a bad rendition of a «Guppy» would be untrue. It has its handful of things to improve and the detail do not seem on the same level as in other short runs, but the fact that a kit needs some improvement or work to build does not make it only suitable for the dustbin. In fact, more than one kit from other well-known companies is similar to this one and they have always been reputed as classics.
Those who have already built Sword kits will not discover anything new here because they already know what I mean. Those who fancy having everything made and do not spend time improving a kit can simply forget this «Guppy» and the manufacturer.
From time to time, with no system or norm, Sword either include something else in their kits in the form of PE parts for the cockpit or a resin engine or wheels or they do not add anything else but the plastic parts. This last is the case here. The box content comprises two plastic sprues, a clear parts sprue, the decals and the instructions. Plastic is well moulded, thin but a bit hard and stiff on the largest parts, such as fuselage and wings. Smaller parts show the essence of the tooling and the low-pressure injection. Sprues are clear from flash, although there are a few slight seam lines to clean. There are ejector marks on invisible surfaces affecting the fitting of wings, tailplanes and also the fuselage which will surely delay the build since most are positive. There are two horrid sink marks on the internal structure of the tailwheel well. Most probably they will not be seen but watching such a good intention wasted really is a shame. Panel lines are well engraved overall and most have the same depth and width, except those representing movable control surfaces on wings and tailplanes. There are raised lines to show the structure inside the rudders, which are thinner on the elevators.
The cockpit is the best detailed part of the kit but it is not remarkable. We could give it just a pass. It has a rear bulkhead with the pilot’s headrest molded on, a simple seat, a control stick, a nice panel with engraved gadgets, but also with some raised instruments, supplemented by a separate part which contains part of the bottom pane, and a couple of vertical pedals molded on both sides. Pedals do not really look the part. Both fuselage sides also have some instruments molded on.
The engine comes molded with a rear bulkhead. It is a pity because the part looks nice, but it would have been nicer with two different parts. It will not probably be noticed due to the oval shape of the Avenger nose. The propeller and the hub are also separate parts, the first having apparently the correct shape for the blades.
Inside the fuselage and behind the cockpit Sword have bothered to detail the tailwheel well. I have already said something about the sink marks which spoil raised panels in the frame. The well also has a bulkhead and the folding system comprises three parts. Leaving the flaw in the marks aside, this area could get a pass. Having all this said, we only have the small windows left, which are affixed into the frames from the inside, one of them is provided for the radar compartment’s door, which comes closed.
Fuselage comes in halves without alignment pins, as expected. I can stand out the arrester hook (quite nice) in the tail, but the exhausts at the front are separate parts and are not hollowed out, looking plain-vanilla. There is a handful of little parts to place on the rear fuselage which I don’t really know what they are, maybe small tab-shaped radar sensors and little air intakes. Whatever they are, they all need careful handling and let oneself be guided by the instructions, which fortunately show their correct placement very clearly. You also have slight marks on the fuselage indicating the precise spots.
Wings come in halves too and similarly with no alignment pins. They fit into the fuselage by means of tabs. The internal structure at the bottom of the wells comes engraved on the upper halves with four parts to close the space inside the wings, this way the empty side opening in the wings cannot be seen. A rough calculation tells you that wing halves might not be closed when the moment comes. Tailplanes are molded in halves as well. The distinctive fins of this version are separate parts and have their base molded on each plane.
The main undercarriage on each wing comprises a leg, a separate hydraulic arm, a cover and a wheel with thinly engraved tread. One of the covers in my kit shows a couple of unpleasant sink marks, although they are not difficult to eliminate.
Most of the transparent parts are windows for the fuselage. The cockpit canopy is a single part. If we want to be kind to the manufacturer, we could say that the fuselage bulges behind the cockpit prevent placing the rear half of the canopy in the open position. That may be the reason why it was not made in two parts. The transparent parts pass my quality control without being dazzling.
The decal sheet, large and brightly colored, shows U.S Navy, Canadian and Japanese roundels, codes, signs and some stencils. They are well printed, colors are sharp and the circles seem well centered.
Instructions are printed in color on an 8-page folding leaflet. They show the usual historical synopsis about the airplane, a plan of numbered parts and 12 very clear build steps. The last three pages contain color profiles of the three versions with color references in the Federal Standard and ANA codes.
A few aftermarkets (PE belts and instrument panel and resin seat, engine or wheels) would have fitted as a glove in the kit. In that case I would recommend it without hesitation, but the way it is and considering how unattractive this paunchy Avenger is, I can only recommend it to those really interested in the variant and who already have some experience with short-runs.◊
Actualizado – Updated: 4 / 2022
Publicado – Published: 1 / 2019
©www.jmodels.net


Debe estar conectado para enviar un comentario.