
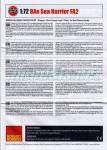
De un vistazo – Quick look
MATERIAL Y PIEZAS
MEDIA & PARTS:
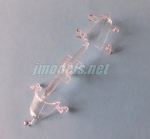
- Plástico inyectado (112 piezas), plástico transparente (2 piezas).
- Injected plastic (112 parts), clear plastic (2 pieces).
CALCAS – DECALS:
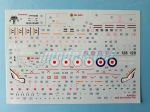
- Una hoja que contiene insignias británicas, panel de instrumentos, consolas de la carlinga, insignias de cola y multitud de estarcidos. Bien impresas.
- A sheet containing Royal Navy roundels, instrument panel, cockpit side consoles, tail markings and plenty of stencils. Well printed.
OPCIONES – OPTIONS:
- BAe Sea Harrier FA2. Escuadrilla Naval Nº 800, Fleet Air Arm. HMS Invincible. Operación Deliberate Force. Mar Mediterráneo, julio de 1995.
- BAe Sea Harrier FA2 “Admiral´s Barge”. Escuadrilla Naval Nº 899, Fleet Air Arm. Estación Naval de Yeovilton (Somerset, Inglaterra), 2004.
- BAe Sea Harrier FA2. No. 800 Naval Air Squadron, Fleet Air Arm. HMS Invincible. Operation Deliberate Force. Mediterranean Sea, July 1995.
- BAe Sea Harrier FA2 “Admiral´s Barge”. No. 899 Naval Air Squadron, Fleet Air Arm. Royal Naval Air Station Yeovilton (Somerset, England), 2004.
INSTRUCCIONES – INSTRUCTIONS:
- Folleto A4 de 12 páginas impreso a color. Contiene resumen histórico y técnico sobre el avión, 17 secuencias de montaje, dos páginas a color con perfiles para pintar y colocar calcas y otras dos para situar los estarcidos. Bien impresas y claras.
- 12-page A4 brochure printed in color. It shows a historical and technical summary about the aircraft, 17 assembly steps, two color pages as a guide to paint and set decals and two pages to set the stencils. Well printed and very clear.
LO MEJOR – THE BEST:
- Opciones de montaje. Armamento.
- Assembly choices. Armament.
LO PEOR – THE WORST:
- Panelado (según gustos).
- Panel lines (depending on each modeller´s taste).
VALORACIÓN – CONCLUSION:
- En general, es una buena réplica del FA2 que no parece difícil de montar y las opciones de pintura son variadas.
- Overall, a nice kit of the FA2 which does not seem difficult to build and has varied painting options.

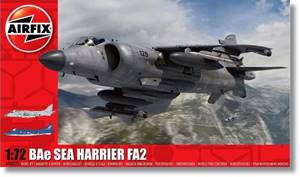
Airfix lanzó al mercado su nuevo molde del Sea Harrier en 2010 con un FRS.1. Le siguió la maqueta del FA2, que representa un modelo más avanzado con actualizaciones en su radar y armamento. Esta caja es una reedición de este modelo y fue puesta a la venta en 2018. Desde su primer FRS.1, Airfix ha ido alternando ambos modelos en sus lanzamientos y creo que aún veremos aumentar la serie durante algún tiempo en el futuro.
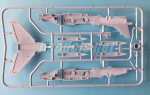
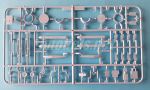
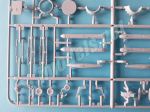
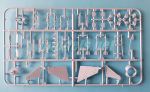
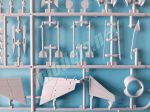
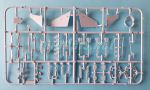
La caja trae cuatro bastidores, uno de ellos transparente, la hoja de calcas y las instrucciones. El molde muestra gran nitidez en la definición de las piezas y, especialmente, gran limpieza. Sólo encuentro marcas de eyector positivas en el lado interno de la mitad superior de las alas y en la pieza de soporte del ventilador del motor que pueden afectar al ajuste, aunque no son muy groseras ni elevadas. En cualquier caso, no se verán ninguna de ellas. Aunque bien moldeadas y finas, las piezas me parecen fabricadas con mayor rigidez en el plástico que en otras maquetas de la marca.
La carlinga del FA2 ha sido decentemente replicada en la maqueta, aunque el detalle más difícil de reproducir, como los instrumentos del panel y las consolas laterales se ha despachado con calcas. El asiento tiene tres piezas y se parece al real. Como de costumbre, Airfix ha incluido la figura de un piloto, si bien su traje de vuelo se parece más a los usados en la Segunda Guerra Mundial. Con todo, y por esta vez, el respaldo del asiento lleva grabados los cinturones. La carlinga dispone, además, de una palanca de mandos y un panel de instrumentos.
Si la carlinga es en apariencia sencilla de montar, lo poco que puede verse del motor no lo es menos. Un cilindro cortado en V en su parte delantera sirve para unir los conductos de las tomas, también fabricados en V, con el ventilador y el tope redondeado situado tras este. El ventilador es fino y las palas muestran buena definición, aunque poco o nada se va a ver de él una vez terminada la maqueta. Las bocas de las tomas de aire vienen por separado con opción de mostrar las puertas de alivio abiertas o cerradas.
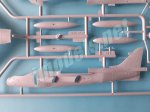
La disposición del fuselaje es convencional al estar dividido en mitades con la aleta moldeada en la parte izquierda. Los paneles me parecen bien grabados, sin exceso de anchura ni profundidad, aunque puede que a algunos modelistas no les convenzan del todo. Los lados poseen huecos para las alas, las toberas giratorias y los pozos del tren de aterrizaje, además de la cúpula protectora de la antena del radar de proa.
En la cara interna del fuselaje las únicas marcas que merecen mención son dos tenues círculos negativos a los lados de la carlinga que son fáciles de eliminar y que serán tapados por las consolas laterales. Tanto los pozos de las ruedas como los del freno ventral vienen de una pieza con cierto detalle interno y hay que pegarlos antes de cerrar el fuselaje.
El lado externo del fuselaje posee piezas separadas para los escudos de protección de las toberas traseras, la cúpula del radar y el extremo de la antena de radar trasera. Las toberas vienen por separado en mitades y pueden colocarse orientadas hacia detrás o hacia abajo. El freno ventral dispone de tapa y brazo hidráulico separados. El fuselaje se completa con piezas menores como aletas de antenas UHF y TACAN, el aspa de bandazo por delante de la carlinga, una sonda de repostaje en vuelo fina y bien perfilada, más algunas piezas que no identifico. La cúpula de la carlinga viene en dos secciones transparentes y puede colocarse abierta. Las piezas tienen un grosor medio-fino, pero traen varios puntos de salida del expulsor por limpiar que se podrían haber evitado.
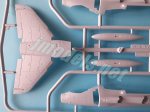
Las alas están divididas en mitades no simétricas. La mitad superior ha sido moldeada con los bordes de ataque y las superficies de control, mientras que las caras inferiores corresponden a las superficies centrales de las alas. Los paneles parecen marcados con mayor profundidad que en el fuselaje, si bien las líneas son igual de finas. Lo mismo ocurre con los estabilizadores horizontales, que vienen por separado. Las luces de navegación de las puntas están ligeramente retrasadas respecto a las reales. Ambas vienen grabadas y sin piezas transparentes para representarlas.
La carga subalar se compone de dos depósitos de combustible externos, dos misiles AIM-120 AMRAAM y cuatro AIM-9 Sidewinder. Los misiles son opcionales, así como los contenedores de los cañones ADEN. Cada carga lleva su correspondiente punto de anclaje separado bajo las alas. Los depósitos están fabricados en mitades, los Sidewinder de una pieza con dos aletas aparte y los AIM-120 están fabricados de una pieza. Todo el armamento me parece más que aprovechable en la maqueta.
La maqueta permite tres opciones en el montaje del tren de aterrizaje: en vuelo (pozos cerrados y ruedas de balancín plegadas), en tierra (todos los pozos abiertos y las ruedas desplegadas), o bien con el tren bajado y parte de los pozos cerrados. El tren de aterrizaje delantero muestra un brazo moldeado con la rueda de buena definición. El brazo dispone también de la luz de correteo, pero sin pieza transparente. El tren trasero dispone de un brazo con doble rueda. Estas ruedas son piezas por separado de buena factura y están moldeadas simulando el peso de la aeronave. Las ruedas de balancín tienen dos opciones y se pueden pegar plegadas o desplegadas.
La hoja de calcas contiene insignias británicas, el panel de instrumentos, las consolas de la carlinga, insignias de unidad para la cola y multitud de estarcidos. Los motivos están bien impresos y las calcas parecen finas. Destaco las insignias de baja visibilidad para el avión del HMS Invincible.
Las instrucciones se han impreso a color en un folleto A4 de 12 páginas. Contiene el habitual resumen histórico y técnico sobre el avión, 17 pasos de montaje, dos páginas a color con perfiles para pintar y colocar calcas y otras dos para los estarcidos. Las secuencias de montaje, así como las opciones están claramente señaladas. Como de costumbre en Airfix, las referencias de pintura pertenecen a la gama de Humbrol esmaltes. Las opciones de pintura son variadas e incluyen un avión del HMS Invincible presente en la operación Deliberate Force en los Balcanes pintado en un clásico gris naval y otro avión de la Escuadrilla 899 en azul más intenso y blanco.
La maqueta me parece en general bien detallada, destacando las opciones de montaje, el armamento y las opciones de pintura como ventajas. Por el contrario, principalmente el panelado de las alas no convencerá a algunos y eso tiene más difícil solución porque va en gustos.◊


Airfix first launched their new tool Sea Harrier (a FRS.1) in 2010. This was followed by a FA2 kit, this variant being a developed model with radar and armament upgrades. The kit I review here is a rebox of the FA2 released in 2018. From their first FRS.1 Airfix have been releasing both kits alternatively and I think we will still see more of these for some time in the future.
The box includes four sprues, one of them containing the clear parts, the decal sheet and the instructions. The tooling shows nice sharp parts definition and is especially clean. There are a few raised marks on the interior side of wings and on the rounded piece holding the engine fan which affect fitting, though they are not high or harsh. Anyway, none of them will be seen. Parts seem a bit stiffer than in other Airfix kits, though they are clearly well moulded and thin.
The FA2 cockpit has been decently rendered in this kit, but the most difficult detail to convey, such as the instrument panel gadgets and the side consoles, has been dispatched with decals. The seat comprises three pieces and certainly looks the part. As usual, Airfix have included a pilot figure with a flight suit resembling those worn in WWII, but for once the seat back has been provided with a couple of raised belts. The cockpit also includes pieces for the instrument panel and the stick.
If the cockpit is apparently an easy build, the same happens with the scarce engine. There is a cylinder with a V-shape at the front to attach the intake ducts. The piece has a rounded piece behind that includes a separate engine fan. The fan is thin and the blades show good definition, though little or nothing will be seen of it once the model is finished. The air intakes come separately with the option of displaying the supplementary intake doors open or closed.
The fuselage layout is conventional as it is divided into halves with the fin molded on the left side. Panels seem well engraved to me, without excess width or depth, although some modelers may not be completely convinced. The sides have gaps for the wings, nozzles and landing gear wells, as well as the front radome.
The only ejector marks worth mentioning on the inside of the fuselage are two faint negative circles next to the cockpit that are easy to remove and will be covered by the side consoles. Both the wheel wells and the ventral brake well come as separate pieces with some internal detail and must be attached before closing the fuselage.
The outer side of the fuselage has separate pieces for the nozzle blast shields, the radar dome, and the tip of the aft radar warning receiver. Nozzles come separately in halves and can be posed rearward or downward facing. The ventral brake has a separate cover and a hydraulic arm. There are a few minor bits to attach on the fuselage, such as UHF and TACAN antenna fins, the yaw vane ahead of the cockpit, a thin and nice in-flight refueling probe, plus some other small pieces that I can´t identify. The canopy comes in two transparent sections and can be shown open. The pieces are not too thick but have several ejector pins that could have been avoided.
Wings are divided into non-symmetrical halves. The upper half has been molded with the leading edges and control surfaces, while the lower sides correspond to the central surfaces of wings. Panel lines look a bit deeper than on the fuselage, though the lines are just as fine. The same goes for horizontal stabilizers, which come separately. The wingtip navigation lights are slightly backwards comparing with their real counterparts. They are engraved and the kit doesn´t include clear pieces for them.
The armament payload consists of two external fuel tanks, two AIM-120 AMRAAM missiles and four AIM-9 Sidewinders. The missiles are optional, as well as the ADEN cannon packs. Each load has its corresponding separate hardpoint under the wings. The tanks are made in halves, Sidewinders are in one piece with two separate fins and AIM-120s are made in one piece. All the weapons seem quite usable in the kit and need no replacement in my view.
The model caters for three assembly options: in flight (with wells closed and outrigger wheels folded), on the ground (all the undercarriage unfolded), or with the gear lowered and part of the wells closed. The front landing gear shows a leg moulded with a nice wheel. The leg also has a taxying light, but again there is no clear piece for it. The rear leg has fine separate twin weighted wheels and outrigger wheels have two options and can be glued folded or unfolded.
The decal sheet contains British roundels, the instrument panel, the cockpit consoles, unit badges for the tail and lots of stencils. Motifs are well printed and the decals look thin, the low visibility roundels for the aircraft from the HMS Invincible being most remarkable.
Instructions are printed in color on a 12-page A4 brochure. It contains the usual historical and technical summary about the aircraft, 17 assembly steps, two color pages with profiles to paint and place decals and another two for the stencils. The assembly sequences as well as the options are clearly marked. As usual with Airfix, paint references belong to the Humbrol enamel range. Paint options are varied and include an HMS Invincible aircraft from Operation Deliberate Force in the Balkans painted a classic naval gray and another Sea Harrier from 899th Squadron painted in an attractive blue and white scheme.
I think this kit is overall decently detailed, with the assembly choices, armament and paint choice being its major assets. On the other side, panel lines will not convince some and that has a more difficult solution because it depends on taste.◊
Actualizado – Updated: 5 / 2022
Publicado – Published: 2 / 2021
©www.jmodels.net


Debe estar conectado para enviar un comentario.