
De un vistazo – Quick look
MATERIAL Y PIEZAS
MEDIA & PARTS:
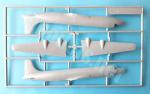
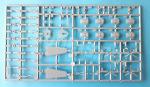
- Plástico inyectado (61 piezas), plástico transparente (2 piezas).
- Injected plastic (61 parts), clear plastic (2 parts).
CALCAS – DECALS:
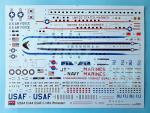
- Insignias norteamericanas, coreanas y chinas nacionalistas, ventanillas, líneas del fuselaje, matrículas, banderas, marcas de cola y de las hélices. Bien impresas, sin exceso de soporte.
- US, Korean and Chinese Nationalist markings, windows, fuselage stripes, registers, flags, tail and propellers markings. Well printed with no excess carrier film.
OPCIONES – OPTIONS:
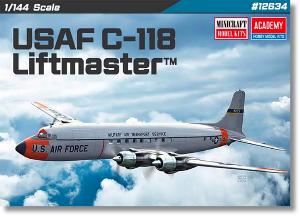
- Douglas C-118A Liftmaster. Servicio de Transporte Aéreo Militar (MATS). Primeros años 60.
- Douglas R6D Liftmaster. US Navy. Escuadrilla Naval de la Reserva de Apoyo Logístico 52(VR-52). Washigton D.C.
- Douglas C-118B Liftmaster. N.º de Fabricación 128426/7. Avión del Comandante del Cuerpo de Marines de EE. UU. desde finales de los años 70.
- Douglas VC-118 Liftmaster. Avión del Presidente de la República de Corea de 1970 a 1974.
- Douglas VC-118 Liftmaster. Servicio de Transporte Aéreo Militar (MATS). 1966.
- Douglas VC-118 Liftmaster 53-3303. Avión del Comandante Supremo Aliado en Europa (SACEUR). Años 70.
- Douglas DC-6B 43536. Avión del Presidente Chiang Kai-shek. República de China. 1967.
- Douglas C-118A Liftmaster. Military Air Transport Service (MATS). Early 1960s.
- Douglas R6D Liftmaster. US Navy. Fleet Logistics Support Reserve Squadron 52(VR-52). Washigton D.C.
- Douglas C-118B Liftmaster. Bu.No. 128426/7. US Marine Commander’s mount since late 1970s.
- Douglas VC-118 Liftmaster. Mount of the President of Republic of Korea from 1970 to 1974.
- Douglas VC-118 Liftmaster. Military Air Transport Service (MATS). 1966.
- Douglas VC-118 Liftmaster 53-3303. Mount of Supreme Allied Commander Europe (SACEUR). 1970s.
- Douglas DC-6B 43536. Mount of President Chiang Kai-shek. Republic of China. 1967.
INSTRUCCIONES – INSTRUCTIONS:
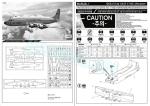
- Folleto doblado de 8 páginas impreso en blanco y negro. Contiene un plano numerado de piezas, una tabla de colores con pinturas equivalentes de varios fabricantes, 9 pasos de montaje y perfiles. Una hoja separada impresa en blanco y negro muestra dos versiones de acabado añadidas. Claras y bien impresas.
- 8-page folded leaflet printed in black and white. It shows a numbered parts plan, a color chart with matches in several paint brands, 9 assembly steps and profiles. A separate sheet printed in black and white contains two further finishing options. Clear and well printed.
LO MEJOR – THE BEST:
- Molde limpio. Múltiples versiones y acabados para escoger. Amplia hoja de calcas.
- Clean tooling Multiple versions and finishing options to choose from. Extensive decal sheet.
LO PEOR – THE WORST:
- Ausencia de paneles en alas y fuselaje. Motores. Pozo delantero.
- Lack of engraved panels on fuselage and wings. Engines. Front wheel well.
VALORACIÓN – CONCLUSION:
- El molde no está plenamente al nivel que se estila hoy, pero con poco de esfuerzo extra se puede conseguir un buen modelo de este avión del que será difícil escoger la versión final por la variedad de acabados y calcas.
- The tooling is a bit behind today’s standards, but with a little extra work it will build into a nice model with a variety of finishing choices and decals.

La maqueta
Academy parece haber tomado las riendas de las maquetas de Minicraft en la escala 1/144 y por primera vez ha reeditado con su marbete el veterano C-118 Liftmaster. La edición incluye las mismas piezas de plástico, pero ha sido renovada con unas nuevas instrucciones y especialmente una extensa hoja de calcas que nos permiten acabar la maqueta alternativamente en las variantes DC-6B, C-118A, VC-118, VC-118B y R6D. No parece sorprendente esta cantidad de terminaciones, ya que posiblemente Academy ha querido abarcar en una sola edición varias de las que Minicraft ha ido lanzando a lo largo del tiempo.
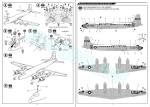
La caja trae tres sencillos bastidores de plástico, un bastidor transparente, las calcas y las instrucciones. Es singular el hecho de que encontremos en el bastidor transparente el parabrisas del Constellation de Minicraft cuya reedición también ha sido anunciada por Academy.
El moldeado de las piezas es correcto y estas no presentan rebabas ni marcas de eyector evidentes. Algunas piezas están muy próximas a sus bebederos y deberemos sacarlas con cuidado, especialmente si son pequeñas y frágiles. Aunque esta maqueta no es de serie limitada, el moldeo del plástico muestra una blanda apariencia similar.
Aunque los paneles del DC-6 y derivados no son muy evidentes a cierta distancia, y menos si el avión no tiene superficies de color aluminio, la maqueta los obvia casi por completo, Solo están grabadas las superficies de control de las alas y el empenaje, así como los accesos a la cabina en el fuselaje. Sin embargo, los estabilizadores muestran tanto los timones como los paneles grabados con finas líneas. Supongo que a este tamaño se puede pasar sin ellos, pero yo los echo de menos.
Entre las opciones de montaje encontramos dos carenas de antenas en la zona ventral y los bujes de las hélices. Las versiones apropiadas para llevar las carenas no están indicadas en las instrucciones, mientras que los bujes aparecen en todos los perfiles de posibles acabados, de modo que no tienen nada de opcionales.
Interior y fuselaje
Minicraft se molestó en hacer un suelo con las bases de los asientos y una consola intermedia además de un mamparo con acceso abierto para la carlinga, pero no añadió nada más. Lo cierto es que la carlinga es una manera nada acertada de tapar parcialmente el pozo de la rueda delantera, ya que este viene sin fondo.
Las mitades del fuselaje están moldeadas con las superficies verticales de cola y parte de las raíces alares. Las dos piezas cuentan con puntos de alineación en los bordes. En el interior de la aleta de cola hay grandes marcas de eyector positivas que habrá que limpiar para unirlas. Los paneles no están grabados excepto en las puertas y algunos accesos laterales. Las ventanillas están reproducidas mediante calcas. Antes de unir las mitades, hay que incluir la pata del tren delantero entre ambas y añadir contrapeso tras la carlinga.
Los único detalles sobre o bajo el fuselaje son varias antenas, dos de ellas opcionales como he dicho, y un toma ventral alargada. Las ventanillas de la carlinga y parte del techo están representadas en una pieza transparente fina y bien detallada, aunque la maqueta incluye calcas negras para simularlas. Dado que hay al menos un panel dentro de la carlinga, se puede prescindir de las calcas si nos parece conveniente.
Alas, motores y cola
Las alas están despiezadas a la manera tradicional en dos superficies superiores y una inferior, ajustando bajo el fuselaje. También tienen algunos puntos de unión para ayudar a alinearlas. No hay paneles, pero las superficies de control están bien grabadas por ambas caras.
Las góndolas de los motores están moldeadas con cada mitad de las alas con los capós en piezas separadas. Los capós están divididos en dos piezas y tienen las aletas de refrigeración bien marcadas, así como las salidas de los escapes. Las tomas poseen buen perfil, pero no están abiertas. Los motores no me parecen nada buenos. Vienen como piezas circulares simulando los cilindros grabados en su interior. Sin embargo, las hélices son bastante mejores, con una finura y detalle suficiente para el tamaño. Los bujes son piezas aparte, pero al parecer no opcionales como indican las instrucciones.
Los estabilizadores son de una pieza y cuentan con lengüetas para unirlos al fuselaje. Están panelados con finas líneas grabadas tanto sobre los timones como en el resto de las superficies. Los timones están bien marcados.
Tren de aterrizaje
Es delicado de montar, ya que incluye algunas piezas finas y pequeñas. El tren delantero comprende una pata moldeada con la horquilla sobre la que hay que ajustar la rueda a presión, más un fino brazo de plegado. Las tapas son finas y muestran buen detalle en las bisagras. La rueda es pasable para la escala. La llanta radial está bien definida, aunque no tiene detalle en el borde, por lo cual el neumático no queda bien marcado.
Los pozos del tren principal carecen de detalle interno, pero a cambio las tapas dobles sí muestran alguno en sus lados internos. Las patas son finas y poseen ruedas dobles. Hay diversas piezas en forma de brazos de torsión y de plegado que añadir a cada pata, cuyo montaje es algo más entretenido que en el tren delantero. En este caso las ruedas son mucho mejores. Las llantas están bien detalladas en ambas caras, la interior incluso muestra el sistema de frenado, y los neumáticos están bien señalados.
Calcas
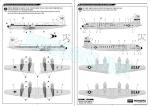
La hoja que Academy nos ofrece en esta edición es realmente amplia y no alcanza por escaso margen un tamaño A4. Contiene insignias norteamericanas, coreanas y chinas nacionalistas, las ventanillas, líneas del fuselaje, matrículas, banderas, marcas de cola y de las hélices. Todos los motivos aparecen bien impresos sin exceso de soporte.
Instrucciones
Se presentan en un folleto doblado de 8 páginas impreso en blanco y negro. Contiene un plano numerado de piezas, una tabla de colores con pinturas equivalentes de varios fabricantes (Humbrol, Gunze Sangyo, Lifecolor, Testors/Modelmaster, Revel, Vallejo y AK Interactive), 9 pasos de montaje y perfiles. Una hoja separada impresa en blanco y negro muestra dos versiones de acabado añadidas. Las vistas explosionadas son claras.
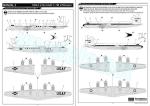
Los perfiles muestran hasta siete aviones con libreas distintas, algunos de ellos aparatos presidenciales o de altos prebostes militares, y otros con matrículas alternativas para la misma versión Aunque las instrucciones indican distintas variantes del DC-6, como he mencionado arriba, a fin de cuentas el resultado de todas ellas es idéntico, salvo por la presencia de los radares ventrales que no se ven en los perfiles, por lo que el modelista habrá de investigar a qué variante podrían pertenecer.
Valoración
El molde me parece algo desfasado y por debajo de los estándares de hoy en detalle y despiece. La maqueta necesita claramente un poco de mejora en algunas zonas para sacarle todo el partido que puede dar y, pese a su aparente sencillez, no la recomendaría con entusiasmo a los modelistas con muy poca experiencia.
Creo que Academy ha sido consciente de esto y ha intentado mejorar la edición con una extensa hoja de calcas de buena apariencia y ampliando los posibles acabados, que lógicamente tienen más variedad que los de cada una de las ediciones originales de Minicraft.◊


The kit
Academy seems to have taken charge of Minicraft 1/144 kits and has reissued the veteran C-118 Liftmaster with their own label for the first time. The release includes the same plastic parts, but has been refreshed with new instructions and especially an extensive decal sheet that allows to finish the model alternatively in the variants DC-6B, C-118A, VC-118, VC-118B and R6D. This number of options does not seem surprising as Academy possibly wanted to cover in a single boxing several of the kits that Minicraft has been releasing over time.
The box comes with three plastic sprues, a clear sprue, the decals and the instructions. It is uncommon that we also find the windshield of the Minicraft Constellation in the clear frame. This rebox has also been announced by Academy.
Parts moulding is correct and they do not have obvious flash or ejector pin marks. Some pieces are placed very close to the gates and some care is needed, especially when they are small and fragile. Although this kit is not a short run, plastic shows a similar soft appearance.
Although the panels in a DC-6 and derivatives are not very evident from a distance, and even less so if the aircraft does not sport aluminum surfaces, this kit overlooks them almost completely. Only the control surfaces on the wings and empennage are engraved as well as the cabin doors on the fuselage. However, the stabilizers show both the rudders and panels engraved with fine lines. I guess you can do without them at this size, but I really miss them.
Assembly options include two antenna fairings in the ventral area and the propeller hubs. The appropriate versions to apply the fairings are not indicated in the instructions, while the spinners appear in all the aircraft shown in the brochure, so there is nothing optional about them.
Interior and fuselage
Minicraft took the trouble of making a floor with seat bases and a mid console plus a bulkhead with open access for the cockpit, but didn’t add anything else. The truth is that the cockpit is an unsuccessful way to partially cover the front wheel well as it comes without a bottom.
The fuselage halves are molded with the vertical tail surfaces and part of the wing roots. Both pieces have attachment pins on the edges. The inner tail fin sides have large positive ejector marks that will need to be cleaned up to join the parts. Panels are not engraved except on the doors and some side panels. The windows are rendered by means of decals. Before joining the halves, the front leg strut is glued in between them and some ballast is also necessary behind the cockpit.
The only details on or under the fuselage are several antennas, two of them optional as said, and a long ventral intake. The cockpit windows and part of the roof are represented in a thin and well-detailed transparent piece, although the kit includes black decals to simulate them. Since there is at least a panel that could be seen inside the cockpit, the decals can be left out if you wish.
Wings, engines and tail
The wings are broken down in the traditional way with two upper and one lower surface, all the sub-assembly fitting under the fuselage. They also have some attachment pins to help alignment. There are no panels, but control surfaces are well engraved on both sides.
The engine nacelles are molded with each half of the wings with the cowlings in separate pieces. The cowlings are divided into two pieces and have well-marked cooling fins, as well as the exhaust outlets. The intakes have a good profile, but are not hollowed out. The engines are rather bad. They come as round pieces with the cylinders molded on. However, the propellers are much better, with enough finesse and detail for the size. The spinners are separate pieces, but apparently not optional as the instructions point out.
Stabilizers are one piece and have tabs to attach them to the fuselage. They are engraved with fine lines both on the rudders and the rest of the surfaces. The rudders are correctly defined.
Undercarriage
It is delicate to assemble, as it includes some thin and small parts. The front axle comprises a leg with the fork to set the wheel in between plus a thin folding jack. The covers are thin and show good detail on the hinges. The wheel is passable for the scale. The radial rim is well defined, although it does not have detail on the edge, which is the reason why the tire is not clearly marked.
The main undercarriage wells lack internal detail, but in exchange the double covers do show some on their internal sides. The legs are thin and have double wheels. There are various pieces in the form of torsion and folding arms to add to each leg, which has a busier assembly than on the front undercarriage. In this case the wheels are much better and well detailed on both sides with the interior side showing the brakes and the tires are nicely represented.
Decals
The sheet Academy offers in this boxing is really large and barely reaches A4 size. It contains American, Korean and Chinese nationalist markings, the windows, fuselage lines, registers, flags as well as tail and propeller markings. All the decals look well printed without excess support.
Instructions
They come in an 8-page folded booklet printed in black and white containing a numbered parts plan, a color chart with equivalent paints from various manufacturers (Humbrol, Gunze Sangyo, Lifecolor, Testors/Modelmaster, Revel, Vallejo and AK Interactive), nine assembly steps and profiles. A separate sheet printed in black and white shows two further finishing options. The exploded views are clear.
Profiles show seven aircraft with different liveries, some of them presidential or top brass mounts, and others with alternative registrations for the same finish. Although the instructions indicate different variants of the DC-6, at the end of the day the kit is the same for all of them except for the ventral radars that are not in the profiles. The modeller will have to reserch which variant they could belong to.
Conclusion
The tooling is a bit below today’s standards in detail and parts breakdown. The kit clearly needs a little improvement in some areas to get the most out of it and, despite the apparent simplicity, I would not enthusiastically recommend it to modellers with very little experience.
I think Academy has been aware of this and tried to improve the reissue by including a nice and extensive decal sheet and expanding the possible finishes, which logically have more variety in just one kit than Minicraft’s single boxings.◊
Publicado – Published: 4 / 2024
©www.jmodels.net


Debe estar conectado para enviar un comentario.