

De un vistazo – Quick look
MATERIAL Y PIEZAS
MEDIA & PARTS:
- Excavadora: plástico inyectado (60 piezas). Complementos: plástico inyectado (13 piezas).
- Excavator: injected plastic (60 parts). Complements: injected plastic (13 parts).
CALCAS – DECALS:
- No tiene.
- Not included.
INSTRUCCIONES – INSTRUCTIONS:
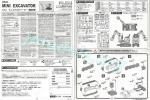
- Folleto de 4 páginas impreso en blanco y negro. Contiene una tabla de colores con equivalencias de Gunze Sangyo y 22 secuencias de montaje. Claras.
- 4-page leaflet printed in black and white. It shows a table of paints with matches in Gunze Sangyo paints and 22 assembly sequences. Easy to follow.
LO MEJOR – THE BEST:
- Tema inusual. Montaje en apariencia sencillo. Incluye complementos para ambientación.
- Unusual topic. Apparently easy assembly. Complements for a scene included.
LO PEOR – THE WORST:
- No incluye figuras. Cuchilla de empuje fija.
- Figures not included. Non moveable dozer blade.
VALORACIÓN – CONCLUSION:
- Un vehículo inusual para quienes buscan algo muy diferente y sin complicaciones. Un par de figuras la hubieran redondeado plenamente.
- An unusual vehicle for those seeking for something quite different and easy to build. A couple of figures would have come in handy.

La maqueta
Me he tomado la molestia de hacer un repaso de las maquetas de excavadoras que se han hecho hasta hoy consultando ese pozo sin fondo que es la web de Scalemates y he encontrado varias desde la escala 1/87 a 1/24. Curiosamente no hay muchas editadas antes del siglo XXI y casi ninguna antes de 1970 más o menos, lo que parece indicar que el interés, siempre minoritario, por este tipo de máquinas ha ido creciendo más conforme nos acercamos a la actualidad. Quiero pensar que si mi pequeña cata se hubiese ampliado a buldóceres y tractores, los resultados no serían muy dispares.
La maqueta de Fujimi tuvo su primera edición en 2010, aunque hay otra reedición de 2018. Es lógico que el fabricante la hiciese en esta escala mayor, ya que el vehículo no es grande en la realidad y a un tamaño menor perdería detalle. También hacerlo articulado sería más difícil.
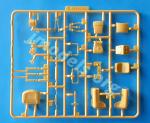
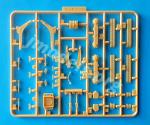
La caja contiene el folleto de instrucciones, dos bastidores de plástico amarillo con las piezas de la excavadora y un bastidor blanco que incluye los complementos para ambientarla en plena obra. No hay calcas. El plástico está muy bien moldeado y las piezas son finas. No hay rebabas ni marcas visibles salvo en la parte interna de las cadenas, pero son muy pequeñas, escasamente profundas y creo que se pueden disimular con facilidad. Algunas piezas muestran cilindros de salida del expulsor que pueden eliminarse fácilmente. La maqueta aparenta sencillez de montaje, pero no es simplona ya que hay que poner atención en el montaje de las diferentes partes del brazo articulado.
Aunque en principio pensé que Fujimi se había sacado del magín esta maqueta, dicen en Scalemates que en realidad se trata de una excavadora japonesa Kubota 008. Este vehículo tiene un peso de 850 kg. y lleva un motor diésel de 3 cilindros enfriado por agua Kubota D722-BH-3 de 719 cm³ (7,4 kW) con un depósito de 12 litros. Sólo alcanza una velocidad de unos 2 km/h pero puede subir pendientes de hasta el 27%.
Tren de rodaje, base y cuchilla de empuje
El montaje de la maqueta empieza con el tren de rodaje. Tanto la rueda dentada como la tractora están parcialmente representadas y unidas en una sola pieza a un larguero, que también muestra en su parte inferior dos rodillos de soporte de las cadenas sin detalle y en su cara externa la boquilla de engrase de las orugas. Los dientes de las ruedas están bien definidos y las tractoras muestran los mandos finales bastante simplificados. Las únicas piezas separadas son las cubiertas de los diferenciales que van unidas a las ruedas tractoras por su lado interno.
Las cadenas están divididas en cuatro tramos a cada lado, dos tramos largos en la parte superior e inferior y dos más cortos en los extremos delantero y trasero. Los tramos situados alrededor de cada rueda están moldeados con forma redondeada para facilitar el ajuste. El detalle externo de las zapatas de goma está bien replicado, así como los pequeños dientes que sólo están representados en el lado externo. Los huecos de las guías de los dientes de las ruedas dentadas parecen lo bastante grandes y no deben dar problemas al ajustar las cadenas.
Las cadenas van insertadas en un bastidor cuadrado que muestra a los lados lo que deberían ser las guías telescópicas del tren de rodaje, que se han simulado en forma cuadrada en lugar de redonda. Sobre esta base hay un asa o conducto separado y la corona de giro en forma de cilindro. El cilindro posee una muesca en la que van insertadas las dos mitades laterales del compartimento del motor, de esta manera la superestructura puede girar.
La cuchilla de empuje está moldeada junto con los bastidores de soporte. Es fina y está bien representada, aunque carece de los agujeros que permiten instalar grilletes para izar la excavadora. Tanto el cilindro que permite subir o bajar la cuchilla como los latiguillos vienen en piezas aparte. Los brazos van pegados a la base, por ello la cuchilla es fija y no puede moverse.
Superestructura
En el vehículo real, el motor está situado bajo el asiento del operador. En la maqueta Fujimi lo ha obviado y ha separado la superestructura en cuatro piezas: dos mitades laterales, una pieza posterior y otra superior. Como he descrito antes, las piezas laterales poseen un hueco semicircular que hay que hacer coincidir con la muesca del cilindro que les servirá de guía para girar. Dos cilindros separados en su interior permiten alinear las mitades y dar consistencia a la superestructura. Las caras externas muestran las molduras y refuerzos bien representados.
El asiento está separado en dos piezas y está adecuadamente reproducido. La base parece algo más simple que la original y además carece de la pequeña palanca de ajuste de la posición.
La consola de los controles está dividida en dos mitades, delantera y trasera. La mitad interna muestra cierto detalle, incluidos los pequeños testigos de la batería, de la presión de aceite del motor y del combustible. Bajo ellos también aparece el indicador de horas de trabajo con el que cuenta esta excavadora en lugar del cuentakilómetros habitual en otros vehículos.
En medio de ambas mitades van colocadas las palancas de admisión de gases y la del ajuste de la anchura del tren de rodaje que están unidas mediante una varilla de plástico para insertarlas entre las mitades de la consola. La misma forma tienen también las palancas de bloqueo del brazo y de la cuchilla. Las palancas de control de los dispositivos frontales (brazo articulado, cuchara y cuchilla de empuje), así como las de dirección están representadas en una pieza colocada sobre la consola.
El suelo del operador viene separado y texturizado. Está moldeado con los pedales y con una pequeña palanca que permite tanto seleccionar la anchura de las orugas como la cuchilla de empuje. Una vez unidos la consola y el suelo, el conjunto va pegado a la parte anterior del compartimento del motor.
Brazo articulado
Como he señalado, conviene estudiar bien el montaje, especialmente si pretendemos hacer un modelo articulable. El brazo muestra en su base un acoplamiento sujeto por un perno y un pasador entre ambos. El perno va pegado en la parte anterior de la superestructura justo antes de unir el suelo y la consola de la cabina. Este perno asegura el movimiento lateral del brazo.
El equipo de trabajo está compuesto por la pluma, el brazo y la cuchara. La pluma y el brazo cuentan con sus respectivos cilindros hidráulicos que permiten plegarlos o elevarlos. Todas las articulaciones cuentan con pasadores de distinto tamaño y longitud que no deben pegarse. La cuchara está bien reproducida y muestra dientes finos y molduras en su cara externa.
Complementos
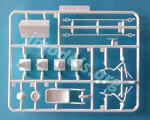
Para ambientar la excavadora, Fujimi ha incluido algunos complementos en un bastidor blanco extra que contiene conos y barreras de protección de obra, un casco y un carrillo de mano que trae la rueda, los soportes y la cubeta por separado. Hay también un cartel de desvío con una flecha blanca, que al parecer puede copiarse o recortarse de las instrucciones.
Lástima que no se hayan incluido al menos un par de figuras que hubiesen redondeado este pequeño ajuar. Tal como se ofrece, y suponiendo que queramos hacer una escena con lo que hay, parece que los operarios se han ido a tomarse el inevitable bocadillo de calamares.
Instrucciones
El folleto de cuatro páginas impreso en blanco y negro contiene una tabla de colores con equivalencias de Gunze Sangyo y 22 secuencias de montaje. Los pasos de construcción son bastante claros pese a que las indicaciones están sólo en japonés.
Las sugerencias para el color de la excavadora sólo incluyen el color amarillo, pero también puede pintarse de rojo, naranja e incluso azul claro, según he podido ver en internet.
Valoración
Esta es una maqueta de un vehículo no tan corriente en el modelismo como pudiera parecer. Pese a la escala, su tamaño no le hará ocupar mucho espacio en la vitrina incluso si queremos usar los complementos que Fujimi le ha puesto. El montaje no tiene aparente dificultad, salvo en el brazo articulado. A este respecto, las instrucciones son de gran ayuda por su claridad.
Quienes busquen algo muy diferente y sin complicaciones para su próximo proyecto, aquí tienen algo para considerar. Creo que no les va a decepcionar.◊


The kit
I have taken the trouble to check the excavator kits released so far on the bottomless pit of the Scalemates website and have found a few of them ranging from 1/87 to 1/24 scale. Curiously, there were not many released before the 21st century and almost none before 1970 or so, which seems to indicate that the interest for this type of machines has been growing with time. I want to suppose that if my little search had been extended to bulldozers and tractors, the results would not have been very different.
This kit was first released in 2010, although there is another rebox from 2018. It seems logical that the manufacturer made it at this large scale, as the vehicle is quite small and a smaller scale would make it lose detail. Also, moveable parts would have been a bit more complicated to make.
The box contains the instruction booklet, two yellow plastic sprues with the excavator parts and a white sprue including some accessories for a scene. Decals are not included. Plastic is very well molded and pieces are thin. There are no blemishes on parts or visible marks except on the inside of the tracks, but they are very small, shallow and I think they can be easily hidden. Some parts also show ejector pips that can be easily removed. The kit looks easy to buid, but it is not a toy and attention must be paid to the assembly of the different parts in the moveable arm.
Though I first thought the kit had no real counterpart, after checking the Scalemates site I could learn it is actually a Japanese Kubota 008 excavator. This vehicle has a weight of 850 kg. and is powered by a 719 cm³ (7.4 kW) Kubota D722-BH-3 water-cooled 3-cylinder diesel engine with a 12-litre tank. It only reaches a speed of about 2 km/h but can climb a gradient of up to 27%.
Undercarriage, base and dozer
The kit assembly starts with the running gear. Both the sprockets and the idlers are partially rendered and joined in a single piece to the track adjuster, which also shows two bottom rollers without detail and the track lubrication nozzle on the outer side. The wheel teeth are well defined and the final drives on the sprockets look quite simplified. The only separate parts are the differential covers that are attached to the drive wheels on their inner side.
The tracks are divided into four lengths on each side, two long sections at the top and bottom, and two shorter ones at the front and rear ends. The lengths located around each wheel are molded with a rounded shape to ease fitting. Detail on the rubber pads is nice, as well as the small teeth that are only represented on the external side. The gaps for the sprocket teeth seem big enough and should not be a problem when attaching the tracks.
The tracks are inserted in a square frame showing the udercarriage telescopic guides, which have been molded square instead of round. On this base there is a separate handle or duct and the cylindrical turning ring. The cylinder has a notch to insert the halves of the engine compartment so that the superstructure can rotate.
The dozer blade is molded with the push frames. The blade is thin and well rendered, though it lacks the holes to install the shackles to lift the excavator. Both the cylinder and the hydraulic hoses come in separate pieces. After attaching the frames to the base, the blade cannot be raised or lowered.
Superstructure
In the real excavator, the engine is located under the operator’s seat. Fujimi have overlooked this and separated the superstructure into four pieces: two side halves, a rear piece and an upper section. As described before, the side pieces have a semicircular hole to match the cylinder notch that allows the superstructure to rotate. Two separate cylinders inside the engine compartment give it some consistency. The external faces show nicely rendered detail.
The seat is separated in two pieces and looks nice. The seat base looks a bit simpler than the original and also lacks the small position adjustment lever.
The control console is divided in a front and a rear half. The inside half shows the small battery, engine oil pressure, and fuel gauges. There is also a tiny working hours indicator instead of the usual odometer in other vehicles.
The throttle levers are attached in between the console halves as well as those to adjust the width of the running gear, which are molded with a plastic rod. The arm and blade locking levers also have the same shape. The control levers of the working device (arm, bucket and dozer blade), and the shorter steering levers come in a separate piece and are attached on the console.
The cabin floor is separate and molded with texture. It includes the pedals and a small lever that allows to select the track width and the dozer blade. Once the console and floor are attached, the assembly is glued to the front of the engine compartment.
Working device
As said, it is convenient to study assembly well, especially if we wish to make the kit moveable. The arm base shows a coupling held by a bolt and a pin between them. The bolt is glued to the front of the superstructure just before joining the floor and the cockpit console. The bolt ensures the arm side movement.
The working device comprises the boom, the stick and the bucket. The boom and stick have their own hydraulic cylinders to be folded or raised. All joints have different pins that are not be glued. The bucket is nicely molded and shows fine teeth and raised detail on the outside.
Complements
To spice up a scene, Fujimi have included some accessories in an extra sprue containing cones and protection barriers, a helmet and a wheelbarrow with separate bucket, wheel and legs. There is also a detour sign showing a white arrow that presumably should be copied or cut from the instructions.
One misses a couple of figures to round off all this. Supposing we want to make a scene with what we have in the box, our construction site will always be empty as the workers are gone for lunch.
Instructions
They come in a 4-page leaflet printed in black and white. It shows a table of colors with matches in Gunze Sangyo paints and 22 assembly sequences. The exploded views are easy to follow.
Suggestions to paint the excavator only include yellow, but it can also be painted red, orange, and even light blue as I have checked on the Internet.
Conclusion
This is a kit of a not so common vehicle in modeling as one might think. Despite the scale, the size will not take up much space on the shelf even if we want to use the accessories Fujimi have included. Assembly should not be difficult, with only the arm needing a bit more attention. In this regard, the instructions are very helpful as they are quite clear.
For those looking for something very different and uncomplicated for their next project, here’s a kit to consider. I think you will not be disappointed.◊
Revisado – Revised: 9 / 2023
Publicado – Published: 3 / 2023
©www.jmodels.net


Debe estar conectado para enviar un comentario.