
De un vistazo – Quick look
MATERIAL Y PIEZAS
MEDIA & PARTS:
- Plástico inyectado (62 piezas), plástico transparente (5 piezas), resina (8 piezas), acetato (1 pieza), fotograbado 31 piezas).
- Injected plastic (62 parts), cler plastic (5 parts), resin (8 parts), acetate (1 part), PE (31 parts).
CALCAS – DECALS:
- Insignias y matrículas sudafricanas, de la Luftwaffe, civiles y republicanas españolas. Buen registro y saturación de color. Sin exceso de soporte.
- South African, Luftwaffe, civil and Spanish Republican markings and registers. Good register and color saturation. Not too much carrier film.
OPCIONES – OPTIONS:
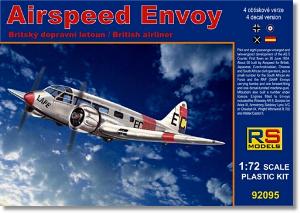
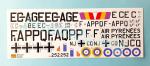
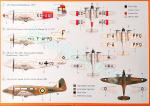
- Airspeed Envoy AS.6J. EC-AGE. Líneas Aéreas Postales Españolas. República Española. 1938.
- Airspeed Envoy AS.6J. F-APPQ. Air-Pyrénées. Aparato derribado sobre el País Vasco el 26 de mayo de 1937.
- Airspeed Envoy AS.6J. NJ+CQ (ex PH-ARK). Escuela de Instructores de Vuelo. Brandenburgo-Briest (Alemania). 1931.
- Airspeed Envoy AS.6J. Fuerza Aérea Sudafricana. 60ª Escuadrilla. África Oriental. 1940.
- Airspeed Envoy AS.6J. EC-AGE. Spanish Airmail Lines. Spanish Republic. 1938.
- Airspeed Envoy AS.6J. F-APPQ. Air-Pyrénées. Aircraft shot down over the Basque Country on 26 May 1937.
- Airspeed Envoy AS.6J. NJ+CQ (ex PH-ARK). Flugzeuglehrer-Schule. Brandenburg-Briest. 1931.
- Airspeed Envoy AS.6J. SAAF. 60Th Squadron. East Africa. 1940.
INSTRUCCIONES – INSTRUCTIONS:
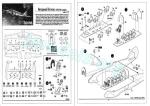
- Hoja A4 doblada formando 4 páginas impresa en blanco y negro. Contiene un plano numerado de piezas, referencias de color genéricas y 11 secuencias de montaje. La cara trasera de la caja muestra perfiles a color e identificaciones de las 4 versiones. Claras aunque se echan de menos perfiles del modelo terminado.
- A4 folded sheet comprising 4 pages printed in black and white. It contains a numbered parts plan, generic color references and 11 construction steps. The back side of the box shows profiles in color identifying the 4 versions. Clear but one misses profiles of the finished model.
LO MEJOR – THE BEST:
- Interior bien detallado. Motores.
- Nice interior detail. Engines.
LO PEOR – THE WORST:
- Montaje complicado en algunas zonas. Sólo adecuada para modelistas muy expertos.
- Difficult assembly in some steps. Only suitable for very experienced modellers.
VALORACIÓN – CONCLUSION:
- No es coser y cantar ni la recomiendo a quien no esté muy dispuesto a trabajarla. RS ha complicado el montaje demasiado incluso para una maqueta de serie limitada.
- Not exactly a weekend kit that I do not recommend it unless you are ready to spend tons of patience with t. Assembly is complicated even for a short-run kit.

La maqueta
Hace en torno a una década RS Models rescató al Airspeed Envoy del casi olvido en el que estaba para el modelismo. Esta caja fue la primera de una serie que el fabricante ha seguido lanzando con otros modelos y usuarios de este avión.
La maqueta es multimedia y la caja contiene dos bastidores de piezas grises, un bastidor de piezas transparentes, una plancha de fotograbados, una pieza de acetato, varias piezas de resina, las calcas y las instrucciones. El contenido viene bien envuelto por separado.
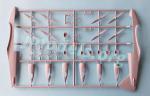
El plástico tiende a ser un poco duro, aunque las piezas están bien moldeadas y en gran parte limpias. Plástico sobrante en forma de rebabas y líneas de molde sólo encontraremos en los huecos de los faros de aterrizaje y las ruedas, así como en los huecos de los pozos. También hay marcas de eyector positivas de las que daré cuenta en su apartado correspondiente. Al terminar la maqueta nos quedarán bastantes piezas en los bastidores, entre ellas varias hélices, tubos de escape y mitades de las góndolas que no son aplicables al modelo AS.6J.
La maqueta representa un Envoy con motores Siddeley Cheetah IX en cuatro versiones de los años 30. Como muchos otros aviones, el Envoy fue diseñado como avión civil, pero se empleó como aparato militar ya durante la Guerra Civil Española.
Interior
La carlinga y la zona de pasaje disponen de un único suelo para ambos espacios. En la carlinga tenemos un asiento detallado con cinturones y rueda de trimado de fotograbado, dos palancas del mismo material, la columna de control y el panel de instrumentos, detallado con pedales y los instrumentos impresos en una lámina de acetato. Aunque los lados de la carlinga están lisos, hay una pequeña palanca de gases en el lado izquierdo. La carlinga está delimitada por un mamparo liso con acceso abierto.
La cabina de pasaje lleva siete asientos idénticos asentados sobre pequeñas bases moldeadas sobre el suelo. Los asientos presentan buena factura, pero la mayoría tienen marcas positivas en la base que deben eliminarse. En la zona trasera hay un par de mamparos, uno de ellos detallado con una puerta, que simulan el compartimento de equipaje.
Los lados internos del fuselaje viene lisos y sin marcas para instalar el suelo. Hay un par de marcas positivas por lado que habrá que limpiar.
Fuselaje
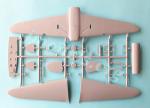
Las mitades del fuselaje están moldeadas con las raíces alares, además de la deriva y el timón en el lado derecho, mientras que el techo de la cabina de pasaje y los lados de esta son piezas separadas. Las superficies aparecen lisas y sólo algunas líneas muy finas marcadas a proa. A los lados hay sendas puertas de acceso, pero la del lado izquierdo sólo está marcada en su mitad inferior. De la mitad superior, que debería contener una ventanilla, no hay ni rastro.
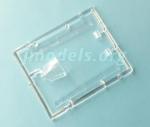
RS Models ha tirado por lo fácil y ha moldeado todas las ventanillas en una única pieza transparente, en lugar de hacer las ventanillas separadas. Esto no sólo complica el montaje, sino que obliga a enmascarar las dos caras de las ventanillas para pintar tanto el interior como el exterior. Además, contrariamente a lo que indican las instrucciones, parece mucho mejor pegar los laterales transparentes al fuselaje antes de añadir el suelo y todo lo que contiene.
La pieza del techo de la cabina es de plástico opaco y muestra dos marcas positivas en el lado interior. Aunque no sean evidentes, parece mejor eliminarlas por simple estética. Es obvio que el montaje de toda esta zona debe ser cuidadoso y que necesitará de tiempo y paciencia para ir tapando las líneas de unión.
La cubierta de la carlinga viene en una sola pieza muy transparente con los paneles bien marcados, aunque la pieza es algo gruesa.
Alas y cola
Las alas están despiezadas en dos mitades superiores y una inferior. Las líneas que representan los paneles, registros y accesos están bien trazadas y son finas. Algunos paneles de la mitad inferior están incluso finamente remachados. Las líneas de las superficies móviles parecen adecuadas en grosor, y lo mismo pasa con el relieve de las superficies enteladas. Los huecos de los faros de aterrizaje están abiertos en ambas mitades, pero la mitad inferior contiene la parte interior de los mismos. Los faros son muy transparentes pero algo gruesos.
La mitad inferior de las alas no está del todo bien moldeada y tiene un exceso de plástico de varios milímetros en la parte delantera que debe cortarse para encajar la pieza en el fuselaje. También contiene dos huecos que simulan el espacio donde encajan las ruedas al plegar el tren de aterrizaje.
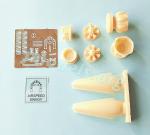
Las góndolas son problemáticas porque RS Models no especifica claramente las piezas que debemos emplear. La mitad superior de cada góndola es de resina y posee paneles grabados con líneas finas. Sin embargo, las mitades inferiores tienen tres opciones de diferente diámetro según el motor que se instale. Desgraciadamente, las instrucciones no indican cuál de ellas procede usar en esta maqueta. Estas piezas también muestran líneas finas grabadas, los huecos de la rueda y los brazos de plegado.
Los motores Cheetah son de resina, así como el colector trasero que incluye un pequeño escape. Las piezas tienen muy buena definición y llevan diminutos fotograbados representando los alzaválvulas. Los capós también son de resina moldeados muy finos con los carenados de los cilindros bien representados. La maqueta incluye hasta cuatro pares de hélices diferentes, aunque en este caso las instrucciones sí indican cuáles usar. Las palas y el buje tienen definición correcta, aunque las primeras parecen un poco gruesas para esta escala. Los ejes de las hélices deben sustituirse al ser demasiado cortos.
Las alas se completan con un pequeño tubo Venturi situado bajo el ala de estribor. La pieza no está mal moldeada, pero no viene hueca y presenta finas líneas de molde.
El timón y la deriva están moldeadas en una de las mitades del fuselaje, como ya he señalado. Muestran buen detalle en el relieve de la estructura interna, así como en la separación del timón. Los planos horizontales de cola están grabados con limpieza y muestran el relieve de los timones de profundidad. Las lengüetas que se insertan en el fuselaje son demasiado cortas y deberían sustituirse por algo que diese más firmeza a la unión.
Tren de aterrizaje
La rueda de cola viene unida a su pata en una pieza que presenta buen aspecto. Sin embargo, la instalación del tren principal debe estudiarse con atención especial. Cada pata posee dos brazos de plegado muy delgados y un soporte con amortiguador. Las marcas para pegar el soporte y los brazos quedan en el interior de los pozos, por ello es muy importante pegar correctamente la mitad inferior de cada góndola y evitar desajustes al colocar el tren de aterrizaje.
Las ruedas no son del todo malas pero me parecen un poco decepcionantes. Los neumáticos están adecuadamente marcados y muestran las habituales líneas de molde, pero las llantas, sobre todo en la cara externa, no están muy bien perfiladas.
Calcas
La hoja está impresa por el propio fabricante y contiene insignias y matrículas sudafricanas, de la Luftwaffe, civiles y republicanas españolas. Las calcas muestran buen registro y saturación de color y no poseen exceso de película de soporte.
Instrucciones
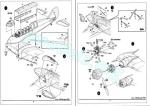
Consisten en una hoja A4 doblada formando 4 páginas que están impresas en blanco y negro. El folleto contiene un plano numerado de piezas, referencias de color genéricas y once secuencias de montaje. La cara trasera de la caja muestra perfiles a color e identifica cuatro aparatos de diferentes nacionalidades y usos. Los pasos de montaje son claros pero omiten información importante, como hemos visto en el caso de las góndolas de los motores, y también se echa de menos perfiles del avión terminado que hubiesen sido de gran ayuda en esta maqueta.
Valoración
Es una pena que RS haya complicado tanto el montaje de este bonito avión. Siendo honestos, sólo cabe recomendarla al modelista muy experto que sepa sortear las dificultades que se presentarán casi a cada paso de la construcción del modelo. No es tanto una cuestión de habilidad al emplear piezas de distintos materiales, sino que el fabricante no ha acertado al meter en un único molde las diferentes versiones del avión y lo ha complicado casi todo menos el interior. Por otro lado, las instrucciones, que deberían ayudarnos a solventar las dificultades en ciertos pasajes de la construcción, resultan inútiles al carecer de la información necesaria. De poco sirve incluir muchas opciones si luego el modelista debe buscarse la vida simplemente para identificar las piezas necesarias.
Pese a todo, la maqueta es factible y puede convertirse en una buena pieza de colección en manos de un modelista paciente y dispuesto a trabajar más de lo que hubiese sido necesario.◊

The kit
About a decade ago RS Models rescued the Airspeed Envoy from the almost oblivion it was for modelling. This box was the first in a series that the manufacturer has been releasing with other variants and users of this aircraft.
The kit is multimedia and the box contains two grey sprues, a clear frame, a photo-etched fret, an acetate piece, several resin pieces, the decals and the instructions. The content is cleanly bagged separately.
Plastic tends to be a bit hard, though the parts are well molded and largely clean. Excess plastic in the form of flash and seam lines is only found in the landing lights openings and wheels, as well as in the wells. There are also positive ejector marks that I will give an account of in their corresponding section. When the kit is finished we will have quite a few parts left on the sprues, including several propellers, exhaust pipes and nacelle halves that are not applicable to the AS.6J variant.
The kit represents an Envoy with Siddeley Cheetah IX engines in four versions from the 1930s. Like many other aircraft, the Envoy was designed as a civil airliner, but it was used as a military aircraft during the Spanish Civil War and in later years.
Cockpit and cabin
The cockpit and the passenger area have a single floor for both spaces. In the cockpit we have a detailed seat with PE seat belts and trim wheel, two levers made of the same material, the control stick and the instrument panel, detailed with pedals and the gadgets printed on an acetate sheet. Although the cockpit sides are flat, there is still a small throttle on the left side. The cockpit is limited by a flat bulkhead with open access.
The passenger cabin has seven identical seats set on small bases molded on the floor. The seats are well made, but most have positive marks on their bases that need to be removed. In the rear area there are a pair of bulkheads, one of them detailed with a door, which simulate the luggage compartment.
The internal fuselage sides come smooth and without marks to help install the floor. There are a couple of positive marks per side that will need to be cleaned up.
Fuselage
The fuselage halves are molded with the wing roots, plus the fin and rudder on the starboard half, while the passenger cabin roof and sides are separate pieces. The surfaces appear mostly flat with only some very thin lines engraved on the nose. On the sides there are two access doors, but the one on the left side is only marked in its lower half. The upper half, which should contain a window, is simply missing.
RS Models has made things too easy and molded all the windows on a single clear piece, instead of making the windows separate. This not only complicates assembly, but also makes it necessary to mask both sides of the windows in order to paint both the interior and exterior. Contrary to the instructions, it seems much better to attach the clear sides to the fuselage before adding the floor and everything on it.
The cab roof is made of opaque plastic and shows two positive marks on the inside. Although they are not obvious, it seems better to sand them off for mere aesthetics. It is obvious that the assembly of this area should be careful and that it will take time and patience to gradually fill and sand the seam lines.
The canopy comes in a very transparent piece with nice raised frames but the piece is rather thick.
Wings and tail
The wings are broken into two upper halves and one lower half. The lines showing the panels, registers and accesses are nicely engraved drawn and thin. Some lower half panels are even finely riveted. The lines of the moveable surfaces seem adequate in width, and the same happens with the raised detail on the flaps. The landing lights are open on both halves, but the lower wing half contains the inside of the light wells. The clear pieces are very transparent but somewhat thick.
The lower wing half have some millimeters of excess plastic at the front that needs to be trimmed to fit the piece into the fuselage. It also contains two openings where the wheels fit when folding the landing gear.
The engine necelles are problematic because RS Models does not clearly specify the parts that we must use. The upper nacelle halves are resin pieces showing thinly engraved panels. However, the bottom halves have three options with a different diameter depending on which engine is installed. Unfortunately, the instructions do not indicate which lower nacelle half should be used in this kit. These pieces also have fine etched lines with gaps for the wheel wells and folding arms.
The Cheetah engines are made of resin, as well as the rear manifold that includes a small exhaust. The pieces have very good definition and are provided with tiny photo-etched parts rendering the tappets. The cowlings are also very finely cast resin with the cylinder fairings nicely represented. The kit includes up to four different pairs of propellers, although in this case the instructions do indicate which ones to use. The blades and the hub have correct definition, although the first ones seem a bit thick for this scale. The propeller shafts should be replaced as they are too short.
The wings are completed with a small Venturi tube located under the starboard wing. The piece is not badly molded, but it is not hollow and has thin seam lines.
The fin and rudder are molded in one half of the fuselage, as mentioned. They show nice raised detail for the internal structure, as well as the rudder. The horizontal tailplanes are neatly engraved and show tapered surfaces on the elevators. The tabs to join the pieces are too short and should be replaced with something better to get a good join.
Landing gear
The tailwheel is attached to its leg in one piece that looks good. However, the installation of the main landing gear should be studied with special attention. Each leg has two very thin folding arms and a shock absorber bracket. The marks for gluing the support and the arms are inside the wells, so it is very important to correctly glue the lower half of each nacelle and avoid misalignments when placing the landing gear.
The wheels are not all bad but I find them a bit disappointing. The tires are properly marked and show the usual seam lines, but the rims, especially on the outside, are not very well rendered.
Decals
The sheet is printed by the manufacturer itself and contains South African, Luftwaffe, civilian and Spanish Republican markings and registrations. The decals show good registration and color saturation and do not have excess carrier film.
Instructions
They consist of an A4 sheet folded into 4 pages that are printed in black and white. The leaflet contains a numbered parts plan, generic color references and eleven assembly sequences. The back of the box shows color profiles and identifies four aircraft from different countries. The assembly steps are clear but they omit important information, as we have seen in the case of the engine nacelles, and profiles of the finished plane are also missing, which would have been of great help in this kit.
Conclusion
It’s a shame that RS made the assembly of this nice aircraft so difficult. Being honest, it can only be recommended to the very expert modeller who knows how to overcome the difficulties that will arise at almost every step of the kit’s construction. It is not so much a question of skill when using parts made of different materials, but rather that the manufacturer has not been successful when they decided to use a single tool for all the version. This has complicated almost everything except the interior. On the other hand, some important information is missing on the instructions in the case of the engine nacelles. It is no use including assembly choices if the modeller is not provided with the necessary information to choose the correct one.
Despite everything, the kit is quite buildable and can become a nice collector’s item in the hands of a patient modeller willing to work more than would have been necessary.◊
Publicado – Published: 11 / 2022
©www.jmodels.net


Debe estar conectado para enviar un comentario.