
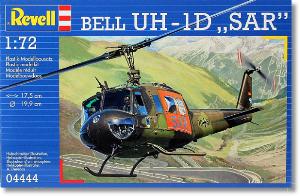
De un vistazo – Quick look
MATERIAL Y PIEZAS
MEDIA & PARTS:
- Plástico inyectado (93 piezas), plástico transparente (18 piezas).
-
Injected plastic (93 parts), clear plastic (18 parts).
CALCAS – DECALS:
- Insignias alemanas, numerales e insignias de unidad, líneas y algunos estarcidos. Bien impresas con buenos colores y registro.
- German crosses, unit codes and badges, lines and some stencils. Finely printed with nice colors and in register.
OPCIONES – OPTIONS:
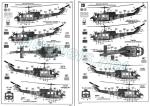
- Bell-Dornier UH-1D. Lufttransportgeschwader 62 (Escuadrilla de Transporte Aéreo 62). Schönewalde/Holzdorf (Alemania).
- Bell-Dornier UH-1D. Heeresfliegerregiment 30. (Regimiento Aéreo del Ejército 30). Niederstetten (Alemania).
- Bell-Dornier UH-1D. Lufttransportgeschwader LTG 61. (Escuadrilla de Transporte Aéreo 61). Penzing (Alemania).
- Bell-Dornier UH-1D. Lufttransportgeschwader 63. (Escuadrilla de Transporte Aéreo 63). Hohn (Alemania).
- Bell-Dornier UH-1D. Lufttransportgeschwader 62. (62 Air Transport Squadron) Schönewalde/Holzdorf (Germany).
- Bell-Dornier UH-1D. Heeresfliegerregiment 30. (30 Army Air Regiment) Niederstetten (Germany).
- Bell-Dornier UH-1D. Lufttransportgeschwader LTG 61. (61 Air Transport Squadron). Penzing (Germany).
- Bell-Dornier UH-1D. Lufttransportgeschwader 63. (63 Air Transport Squadron). Hohn (Germany).
INSTRUCCIONES – INSTRUCTIONS:
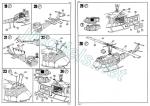
- Folleto A4 de 12 páginas impreso en blanco y negro. Muestra un sumario histórico sobre el helicóptero, una lista de colores en varios idiomas, un diagrama de localización de piezas, 26 pasos de montaje y perfiles. Muy claras.
- A4 12-page brochure printed in black and white. It shows a historical summary about the helicopter, a list of colors in several languages, a parts location diagram, 26 assembly chapters and profiles. Very clear.
LO MEJOR – THE BEST:
- Configuración opcional. Interior bien detallado. Piezas transparentes.
- Optional configuration. Detailed interior. Clear pieces.
LO PEOR – THE WORST:
- Palas de las hélices algo gruesas. Escasa variedad de pintura.
- A bit thick propeller blades. Lack of variety in paint finish.
VALORACIÓN – CONCLUSION:
- No debe ser difícil de montar y además el interior es muy completo. Pese a ser un molde antiguo, sigue siendo una opción que considerar en esta escala.
- It should not be hard to build and the interior is quite well stuffed. Despite being an old tool kit, it is still a good choice to consider at the scale.

La maqueta
Revell ha editado esta maqueta en varias ocasiones. Dicen que el molde original es uno antiguo de Hasegawa y ciertamente tiene toda la pinta. A la maqueta se le notan los años en varios detalles, aunque no por ello deja de ser una opción interesante y competitiva de este conocido helicóptero aún hoy día.
En la caja hay 4 bastidores de un inusual color verde oscuro, un bastidor transparente, las calcas y las instrucciones. El plástico está bien moldeado y las piezas no tienen rebabas. Hay unas cuantas marcas negativas en varias piezas, que llegan incluso a arruinar un poco el detalle en alguna de ellas, aunque el detalle externo está bien cuidado. Hay varias piezas sobrantes para el armamento (ametralladoras y lanzacohetes) de la versión norteamericana, que tal vez venga del molde original y que Revell también sacó hace años.
Como en la mayoría de reediciones anteriores, la maqueta representa un UH-1D fabricado en Alemania por Dornier y empleado por unidades de transporte y rescate del Ejército (Heersflieger). A decir verdad, las versiones son atractivas pero carecen de variedad en la pintura.
Carlinga y zona de carga
Desde el principio del montaje el modelista ha de decidirse por la configuración de rescate o de transporte, ya que, además de emplear piezas distintas, hay que abrir agujeros en el suelo en lugares diferentes según la versión.
El suelo es de una pieza para ambas zonas interiores y muestra gran realismo en la textura antideslizante moldeada en la pieza. Por delante de la carlinga hay que añadir dos refuerzos de la estructura de proa que son visibles a través de los paneles de observación laterales del morro. Tras ellos encontramos la consola intermedia que muestra la instrumentación en relieve y que está moldeada con el suelo. El panel lleva los instrumentos también en relieve y es una pieza muy bien conseguida. Los asientos están provistos de cinturones en fino relieve y también de sus respectivos armazones separados. Hay también dobles palancas de control para cada puesto.
En la zona de carga la configuración de transporte lleva dos asientos, también provistos de cinturones y bastidores, orientados en sentidos opuestos y cuatro asientos de tropa bien representados con bastidor, patas, respaldos y soportes a los lados hasta el techo. La versión SAR lleva en el lugar de los asientos 6 camillas dispuestas en literas a los lados de la zona de carga. Las camillas están igualmente muy bien representadas y son de una pieza cada una. Van unidas a cuatro soportes en las esquinas. Entre ambas literas hay una pieza en forma de caja que parece simular algún tipo de instrumental médico.
En ambas versiones la zona posterior del habitáculo la cierra una pieza en forma de U cuadrada que muestra paneles forrados de tejido con patrón romboidal excelentemente replicado. En el panel central hay cuatro marcas negativas que afectan a las esquinas y que afean la pieza. La parte superior de la pieza está cubierta por un rectángulo horadado donde pegaremos las piezas del rotor principal.
Fuselaje y cola
El fuselaje está dividido en mitades hasta la cola con huecos para las ventanillas, el rotor y las puertas de la zona de carga. Las puertas de los pilotos se han moldeado cerradas. Las superficies interiores parecen denotar la antigüedad del molde y el plástico es ligeramente irregular, por ello conviene repasarlas con lija antes de nada. Hay una marca negativa a cada lado en la carlinga de las que ocuparse, pero el resto del interior está limpio.
Las puertas correderas de la zona de carga son piezas aparte muy bien texturizadas en las caras internas, que también tienen un par de marcas que no afectan al detalle. Ambas puertas pueden mostrarse abiertas.
Antes de cerrar el fuselaje hay que pegar no sólo la carlinga y el rotor, sino también añadir un poco de peso al morro, aunque no parece que el modelo se asiente de cola si no lo hacemos.
Las superficies exteriores están bien moldeadas y contienen una combinación de finas líneas en relieve y grabadas. Los detalles externos están, en general bien conseguidos, como los capotajes de las salidas de ventilación del motor, distintos paneles sobre los lados traseros del fuselaje, las luces de navegación y la finura del estabilizador vertical. Sin embargo, otros están más simplificados, como la tobera de salida, que muestra un hueco abierto sin más detalle.
Una de las ventajas que algunos encontrarán en esta maqueta es el hecho de que las ventanillas y los paneles acristalados del techo y morro se pegan desde el exterior. Todas las piezas transparentes son convenientemente finas y están bien moldeadas en acertados contornos, destacando en este aspecto los paneles de observación de proa y las ventanillas de burbuja de las puertas. Los limpiaparabrisas se han representado en relieve sobre las piezas correspondientes.
Sobre la carlinga y bajo el fuselaje y la cola hay diversas antenas, sensores y tomas de aire en piezas sueltas. El gancho de carga en la panza está bien replicado pero carece del panel abierto que puede verse en las imágenes de este helicóptero. Los patines de aterrizaje son de una pieza y parecen del grosor adecuado. Van unidos al fuselaje mediante ranuras practicadas en la panza.
El cono de cola está detallado con el soporte de la antena UHF, que no todos los aparatos llevan, según las fotos que he visto, los estabilizadores horizontales, la luz de cola y el fino patín separados.
Rotores y hélices
El rotor principal está compuesto de 4 piezas además de la hélice. La base del rotor está dividida en mitades. Encajada en medio hay otra pieza que simula la cabeza del rotor. El mástil está moldeado con las varas de control. La hélice está bien representada pero la veo un poco gruesa aunque es flexible. El detalle externo está bien representado, por ejemplo en las barras estabilizadoras y las láminas superpuestas de soporte rígido.
El rotor de cola es un poco simple por mucho que en el helicóptero real no es especialmente complejo. La hélice también es simple y las palas algo gruesas, por ello la pieza necesita ser refinada.
Calcas
La hoja está bien impresa y los motivos parecen finos mostrando buen registro y saturación de color. Consta de insignias alemanas y del SAR, numerales e insignias de unidad, líneas y algunos estarcidos.
Instrucciones
Están impresas en un folleto tamaño A4 de 12 páginas impresas en blanco y negro. Contienen un sumario histórico sobre el helicóptero, una lista de colores en varios idiomas, un diagrama de localización de piezas, 26 pasos de montaje y perfiles. El folleto es útil y las indicaciones, especialmente en las piezas opcionales, son muy claras.
Las opciones para terminar el modelo son poco variadas y pertenecen todas a unidades del Heersflieger con idéntico camuflaje tricolor. Sólo el aparato del Heeresfliegerregiment 30 no lleva las puertas de color anaranjado ni los rótulos del SAR, ya que parece un aparato de transporte y no de rescate.
Valoración
Pese a que el molde original tiene ya sus años, creo que la maqueta sigue siendo todavía una opción competitiva que podrá contentar a la mayoría de modelistas interesados en este helicóptero, aunque es cierto que puede mejorarse en algunas zonas. Tal vez su detallado interior y su aparente escasa dificultad de montaje la siguen avalando en comparación con otras opciones más modernas en esta escala.◊


The kit
Revell has released this kit several times. They say that the original tooling is an old one from Hasegawa and it certainly looks like it. The kit shows the years in several details, although it still is an interesting and competitive choice to build this well-known helicopter even today.
In the box are 4 sprues in an unusual dark green colour, a clear sprue, the decals and the instructions. Plastic is well molded and parts have no flash. There are a few negative marks on several pieces, which even ruin the detail a bit on some of them, though external detail is mostly well rendered. There are several pieces we will not use, consisting of machine guns and rocket launchers for an US version, perhaps coming from the original tooling and also released by Revell years ago.
As in most previous Revell reboxes, the kit represents a UH-1D manufactured in Germany by Dornier and used by the German Army transport and rescue units (Heersflieger). To be honest, the versions are attractive but they lack variety in the paint finish.
Cockpit and cargo compartment
From the beginning of assembly, the modeler has to decide on the rescue or transport configuration, since, in addition to using different parts, holes must be drilled in the floor in different places depending on the version.
The floor is one piece for both interior areas and shows great realism in the non-slip texture molded on the piece. Forward of the cockpit are two structural frames that are visible through the nose side observation panels. Behind them we find a console with raised instruments molded on the floor. The instrument panel also shows very nice raised instruments. The seats are provided with thin raised belts and also with separate frames. There are also double control sticks for each crew seat.
In the cargo area, the transport configuration has two seats, also provided with belts and frames, placed in opposite directions, and four well-rendered troop seats with frames, legs, backrests and supports on the sides up to the ceiling. The SAR version has 6 stretchers arranged in bunks on the sides of the cargo area instead of the seats. The stretchers are also very well represented and are one piece each. They are attached to four supports at the corners. Between both bunks there is a box-shaped piece that seems some kind of medical instrument.
In both versions, the rear area of the passenger compartment is closed by a square U-shaped piece that shows fabric-lined panels with an excellently replicated diamond pattern. In the central panel there are four negative marks that affect the corners and certainly need to be cleaned up. A rectangle on top of the rear bulkhead is drilled to attach the main rotor pieces.
Fuselage and tail boom
The fuselage is split in halves all the way to the tail with openings for the windows, rotor and cargo area doors. The crew doors are molded closed. The interior surfaces seem to show the age of the tooling and plastic is slightly irregular, so it is advisable to sand the interior surfaces prior to attach anything else. There’s a negative mark on each cockpit wall to take care of, but the rest of the interior is clean.
The sliding doors of the cargo area are separate pieces that show a nice texture on the internal faces. They also have a couple of marks that do not affect detail. Both doors can be shown open.
Before closing the fuselage we need to glue not only the cockpit and rotor, but also add a little weight to the nose, although the kit does not seem to sit on its tail if we do not do so.
The outer surfaces are well molded and contain a combination of thin raised and recessed lines. The external details are, in general, nicely rendered, such as the hoods of the engine ventilation outlets, different panels on the rear fuselage sides, the navigation lights and the fineness of the vertical stabilizer. However, others are more simplified, such as the exhaust nozzle, which shows an open hole without detail.
One of the advantages that some will find in this kit is the fact that the windows and the roof and nose glazed panels are glued from the outside. All clear parts are suitably thin and well molded with neat contours, with the bow observation panels and the door bubble windows being outstanding. The windshield wipers are molded raised on the pieces.
On the cockpit roof and under the fuselage and tail are a bunch of antennas, sensors and air intakes in separate pieces. The cargo hook on the belly is well replicated but lacks the open panel that can be seen in pics of this helicopter. The landing skids are one piece and look the part. They are attached on slots molded on the fuselage belly.
The tail boom is detailed with a towel-rack HF radio antenna, which not all the helicopters have according to the photos I have seen, the horizontal stabilizers, the tail light and a thin skid.
Rotors and propellers
The main rotor is made up of 4 parts in addition to the propeller. The rotor base is divided in halves. Fitted in the middle is another piece that simulates the rotor head. The mast is molded with the control rods. The propeller is well represented but it looks a bit thick though it is flexible. External detail is well represented, for example in the stabilizer bars and laminated joint stiffeners.
The tail rotor is a bit simplified although in the real helicopter it is not particularly complex. The propeller is also simple and the blades are somewhat thick, so the piece needs to be refined.
Decals
The sheet is well printed and decals seem thin showing good register and color saturation. The sheet provides German and SAR markings, codes, unit badges, lines and some stencils.
Instructions
They are printed on a 12-page A4 size booklet printed in black and white. They contain a historical summary of the helicopter, a multilingual color list, a parts location diagram, 26 assembly steps, and profiles. The brochure is helpful and directions, especially in optional assembly steps, are very clear.
Paint finishes are not very varied and all belong to Heersflieger units with identical tricolor camouflage. Only the Heeresfliegerregiment 30 helicopter does not have the orange doors or the SAR signs. Maybe because it is not a SAR, but a a transport aircraft.
Conclusion
Despite the kit still shows the old tooling, I think it is still a competitive choice that will satisfy most modellers interested in this helicopter. It is also true that it can be improved in some areas. The detailed interior and ease of assembly are the main advantages compared to other more modern kits at the scale.◊
Actualizado – Updated: 4 / 2022
Publicado – Published: 4 / 2022
©www.jmodels.net


Debe estar conectado para enviar un comentario.