

De un vistazo – Quick look
MATERIAL Y PIEZAS
MEDIA & PARTS:
- Plástico inyectado (63 piezas), plástico transparente (3 piezas). Incluye una figura.
- Injected plastic (63 parts), clear plastic (3 parts). One figure included.
CALCAS – DECALS:
- Cruces alemanas de dos tipos, marcas del fuselaje, panel de instrumentos, insignias de unidad y alrededor de 40 estarcidos. No se incluyen las esvásticas. Finas, bien impresas y con colores saturados.
- German crosses in two types, fuselage markings, unit badges, instrument panel and around 40 stencils. Swastikas are not included. Thin, well printed with saturated colors.
OPCIONES – OPTIONS:
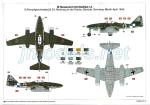
- Messerschmitt Me262A-1A. 9./Kampfgeschwader (J) 54. Neuburg an der Donau (Bavaria, Alemania), marzo-abril de 1945.
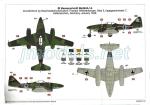
- Messerschmitt Me262A-1A. Stab II/Jadgeschwader 7. Kaltenkirchen (Alemania), enero de 1945. Aparato pilotado por el Geschwaderkommodore Theodor Weissenberg.
- Messerschmitt Me262A-1A. 9./Kampfgeschwader (J) 54. Neuburg an der Donau (Bavaria, Germany), March-April 1945.
- Messerschmitt Me262A-1A. Stab II/Jadgeschwader 7. Kaltenkirchen (Germany), January 1945. Aircraft flown by Geschwaderkommodore Theodor Weissenberg.
INSTRUCCIONES – INSTRUCTIONS:
- Folleto A4 de 8 páginas impreso a color. Contiene un breve sumario histórico sobre el avión, 38 secciones de montaje y perfiles para colocar los estarcidos. Una hoja separada impresa a color muestra perfiles para pintar. Claras y bien impresas.
- 8-page A4 brochure printed in color. It shows a historical summary about the aircraft, 38 assembly chapters and profiles to set the stencils. A separate sheet printed in color on satin paper shows profiles to paint the model. Clear and well printed.
LO MEJOR – THE BEST:
- Montaje sencillo. Buen detalle en general.
- Easy build. Overall good detail.
LO PEOR – THE WORST:
- Panelado de las alas y motores. Ausencia de calcas para las esvásticas.
- Panel lines on wings and engines. Lack of decals for the swastikas.
VALORACIÓN – CONCLUSION:
- Con escasos detalles mejorables, es una buena opción para el modelista de nivel básico y medio.
- With a few details to improve, it is a good choice both for the newbie and the average modeler.

La maqueta
Al tiempo de aparecer este nuevo molde de Airfix hubo cierto revuelo entre los seguidores del fabricante, que son casi todos los aficionados a los aviones, lo confiesen o no. Y no era para menos porque la maqueta une un buen nivel de detalle con un despiece sensato que hace el montaje asequible para cualquier modelista.
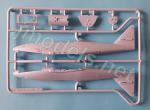
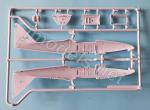
La caja trae tres bastidores de diferente tamaño, un bastidor de piezas transparentes, una hoja de calcas y las instrucciones. El molde muestra gran limpieza, sin rebabas y sólo un par de marcas en las tapas del tren principal que serán disimuladas por las patas de las ruedas. Las piezas están bien moldeadas y son finas. Las líneas de paneles en el fuselaje y los estabilizadores me parecen correctas para esta escala, pero no tanto en las alas y los motores, donde algunas están más marcadas de lo necesario, aunque sin la exageración que Airfix perpetró en otras maquetas.
Esta maqueta es la primera editada con el nuevo molde y representa el modelo inicial de caza sin depósitos adicionales, aunque la maqueta los incluye porque anuncia el siguiente lanzamiento, que fue precisamente la versión biplaza de caza nocturno que sí los llevaba. Más recientemente, Airfix ha puesto a la venta la versión de bombardero Me 262A-2A.
Carlinga
Airfix la ha diseñado exenta del fuselaje y formada por un cilindro dividido en mitades con el lado posterior separado. En la mitad inferior van dispuestos el suelo, moldeado con los pedales, la palanca de control y dos consolas laterales con algunos instrumentos en relieve. El panel trasero incluye los soportes del asiento. La mitad superior de la carlinga lleva incluida la barra y la mira Revi. Antes de unir las mitades, hay que pegar el panel de instrumentos, representados con una calca, en la parte superior. Como acostumbra, Airfix ha incluido la figura del piloto, que muestra mejores proporciones que los zancudos patilargos de otras maquetas.
El cilindro de la carlinga va unido, mediante vástagos situados en su lado trasero, a una pieza vertical colocada tras los pozos, en la mitad inferior de las alas.
Fuselaje
Está fabricado en mitades que incluyen el plano vertical de cola sin el timón. También viene separada una sección bajo el morro que incluye el pozo de la rueda delantera. El perfil tan característico del fuselaje lo veo bien conseguido y el detalle en general es bueno. Sin embargo, las salidas de los cañones aparecen poco ahuecadas y faltan las bocachas de dichas armas. También se podría haber simulado la mirilla de la cámara en el morro.
En el interior aparece un costillaje en relieve a la altura de la carlinga y sólo hay que pegar un panel vertical situado por delante de esta. La sección separada bajo el morro nos permite incluir peso para evitar que el modelo se asiente de cola.
En el exterior sólo hay que añadir la antena IFF, que viene separada de su montaje dorsal, y la cubierta de la carlinga, dividida en tres secciones que permiten mostrarla abierta. Las piezas son finas y transparentes, pero muestran demasiado relieve en los montantes de los paneles acristalados.
Alas y empenaje
Las alas están divididas en tres piezas. Las superficies superiores muestran rebajes en los encastres de los motores e incluyen los flaps completos y las puntas, así que seguramente habrá líneas que rellenar al unir las alas. A los pozos se les ha dado suficiente profundidad y tenemos la opción de mostrarlos también cerrados.
A cambio de la sencillez de montar el fuselaje, al pegar las alas hay que cuidar el ajuste de la carlinga en su interior. El tubo pitot viene extrañamente unido a la luz de navegación del ala izquierda. El modelista con más recursos puede sustituir las luces de las puntas por plástico transparente y pegar el tubo por separado.
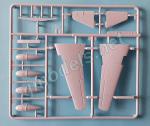
Los estabilizadores vienen de una pieza. Aunque no son posicionables, los timones de profundidad están bien marcados y llevan las servoaletas correctamente representadas para esta escala. El timón de dirección va insertado en el plano vertical mediante vástagos, pero con un poco de cirugía puede ponerse doblado.
Motores
Vienen separados en mitades. En el exterior las líneas de paneles son gruesas, detalle que se hace más evidente sobre superficies más pequeñas.
Las tomas delanteras son piezas separadas a las que hay que introducir el motor de arranque. La tobera de salida se ha simulado con un panel vertical que posee los álabes de la turbina en relieve y un eje cuya punta está dividida en mitades.
Tren de aterrizaje
El pozo delantero está moldeado en una sección del fuselaje ventral y está bien detallado por dentro. En el exterior hay un par de paneles remachados con acierto. El detalle del pozo incluye tres tapas, una delantera y dos laterales. Tanto la pata como el brazo de plegado muestran un detalle muy bueno, destacando el amortiguador de torsión. La rueda viene en una sola pieza y posee buen detalle tanto en las llantas como en el neumático, cuya banda de rodadura se ha texturizado acanalada y contiene un pequeño tramo plano para simular el peso.
El tren principal contiene dos tapas externas finas además de las dos tapas internas, ambas en una sola pieza. Las patas también disponen de brazos de plegado separados. Los neumáticos y llantas se han moldeado aparte. El detalle en ambos casos es bueno, si bien la banda de rodadura de los neumáticos es un poco tenue.
Calcas
La hoja, que muestra motivos bien impresos con saturación y nitidez, contiene cruces alemanas de dos tipos, insignias de unidad, el panel de instrumentos, bandas identificativas del fuselaje, numerales y varias decenas de estarcidos para el fuselaje, las alas, los motores e incluso las ruedas. Lástima que entre tanta cosa Airfix no haya querido incluir las esvásticas de cola. El lector ya puede imaginar el hipersensible motivo.
Instrucciones
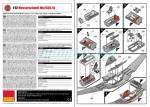
Están impresas a color en un folleto de tamaño A4 de 8 páginas que muestra un resumen histórico y especificaciones técnicas sobre el avión, 38 secciones de ensamblado con llamadas frecuentes sobre la posición u orientación de determinadas piezas y una página final con perfiles para colocar los estarcidos. Las pinturas de referencia son, como siempre, de la gama Humbrol esmaltes.
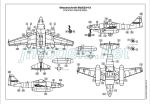
El folleto se complementa con una hoja separada impresa a color en el mismo tamaño que contiene perfiles de las dos opciones de pintura. Airfix ha buscado cierta variedad en los colores de camuflaje sin llegar a proponer los camuflajes de manchas irregulares, ya que son más difíciles de realizar por el modelista medio. La primera versión, un aparato de la escuadrilla (J) 54 usaba un camuflaje compuesto de RLM 83 sobre RLM 76, mientras que la segunda, de la famosa JG. 7, lo llevaba de RLM 81 / RLM 82 sobre RLM 76. Este avión perteneció al as Theodor Wissenberger, que obtuvo un total de 208 victorias, 8 de ellas pilotando un Me 262.
Valoración
No sé si esta maqueta es la mejor del avión a la escala, lo que sí parece cierto es que es una opción que debiera considerarse. Todo es mejorable y algunos detalles se han pasado por alto. También hay otros claramente omitidos, como las esvásticas, pero en general la maqueta es decente y parece poder montarse casi del tirón gracias a su despiece, lo cual es siempre un aliciente para el modelista del común, ese que tan vivo mantiene el negocio de las casas comerciales y tan lejos está de los galácticos másteres de las revistas, concursos y demás saraos modelísticos.◊


The kit
At the time this new Airfix tooling appeared, there was a certain hubbub among the manufacturer’s followers, who are most aircraft fans, whether they admit it or not. And it was not for less because the kit matches a good level of detail with a sensible parts breakup that makes assembly suitable for any modeller.
The box contains three sprues of different size, a clear sprue, a decal sheet and the instructions. The tooling is clean, with no flash and only a couple of sink marks on the main gear covers that will be hidden by the wheel legs. Pieces are well molded and thin. Panel lines on the fuselage and stabilizers seem correct for this scale, but not so much on the wings and engines, where some are too heavy, but far from the trenches Airfix grooved in other kits.
This kit is the first release from the new tooling and represents the initial fighter variant without additional tanks, although they are included in this kit as a hint of the next release, which was in fact the two-seater night fighter variant that did have them. More recently, Airfix has put up the Me 262A-2A bomber version for sale.
Cockpit
Airfix has designed it free from the fuselage in a tub divided in halves with the rear side molded separately. In the lower half, there is a floor molded with the pedals, the control lever and two side consoles with some raised instruments. The rear panel includes the seat supports. The upper half of the cockpit includes the bar and the Revi sight. The instrument panel, rendered in a decal, is attached before joining the tub halves. As usual, Airfix has included a pilot figure which shows better proportions than the long-legged guys present in other kits.
The cockpit tub is attached, by means of rods located on its rear side, to a vertical piece placed behind the wells on the lower wing half.
Fuselage
It is made in halves that include the vertical tail plane without the rudder. There is also a separate section under the nose that includes the front wheel well. I think the characteristic profile of the fuselage is well captured and overall detail is good. However, the cannons ducts look poorly drilled and the gun muzzles are missing. The combat camera opening on the nose could also have been rendered.
On the inside there is some raised ribbing on the cockpit sides and you only need to attach a vertical panel located in front of it. The separate section under the nose allows us to add weight to prevent the model from sitting on its tail.
On the outside, you just have to add the IFF antenna, which comes separate from its dorsal base, and the cockpit cover, divided in three sections that allow it to be displayed open. The pieces are thin enough and transparent, but the frames are a bit thick and raised.
Wings and empennage
The wings are divided in three pieces. The upper surfaces show recesses at the engine mounts and include full flaps and tips, so there will certainly be lines to be filled after attaching the wings. The wells are deep enough and we have the option to show them closed as well.
In exchange for the ease of the fuselage assembly, you need some care to fit the cockpit into the fuselage when joining the wings. The pitot tube comes strangely molded with the left wingtip light. The handy modeler will replace the tip lights with clear plastic and glue the pitot tube separately.
Stabilizers come in one piece. Although not posable, the elevators are well marked and have the servo tabs correctly rendered for this scale. The rudder is attached to the tail by means of pegs, but with some care it can be shown bent.
Engines
They come separated in halves. On the outside, panel lines are thick, a detail that becomes more evident on smaller surfaces.
The front intakes are separate parts with separate starter motor housings inside. The nozzle has been rendered with a vertical panel that includes a raised turbine fan and a shaft with a tip molded in halves.
Landing gear
As said, the front well is molded with a section of the ventral fuselage and comes nicely detailed inside. Outside there are a couple of accurate riveted panels and the three covers, one front and two sides. Both the leg and the folding arm show very good detail, especially the torsion arm. The wheel comes in one piece and has good detail on both the rims and the tire. The tread is textured and has a small flat section to simulate weight.
The main gear contains two thin external covers in addition to the two internal covers, both molded in one piece. The legs also have separate folding arms. The tires and rims have been molded separately. Detail in both cases is good, though definition on the tread is a bit faint.
Decals
The sheet, which is well-printed and shows good color saturation and sharpness, contains German crosses of two types, unit badges, the instrument panel, fuselage identification stripes, numerals and tens of stencils for the fuselage, wings, engines and even the wheels. Too bad that among so much stuff Airfix did not want to include the tail swastikas. The reader can imagine the reason.
Instructions
They are printed in color on an 8-page A4 booklet showing a historical summary and technical specifications on the aircraft, 38 assembly sections with frequent callouts on the correct position of some parts, and a final page with profiles for stencil placement. Paint reference belongs, as usual, to Humbrol enamel range.
The brochure is complemented by a separate sheet printed in color in the same size containing profiles of the two paint options. Airfix has selected a certain variety in camo schemes with no choice for spotted camouflages, as they are more difficult for the average modeler. The first version, an aircraft of the (J) 54 squadron, used a scheme of RLM 83 over RLM 76, while the second, belonging to the famous JG. 7, sported a scheme including RLM 81 / RLM 82 over RLM 76. This aircraft belonged to ace Theodor Wissenberger, who achieved a total of 208 victories, 8 of them flying an Me 262.
Conclusion
I don’t know if this kit is the best at the scale, but the truth is it is an option to consider if you want to build an Me 262. As with any kit, it has room for improvement and some details have been overlooked. There are also others clearly omitted, such as the swastikas, but in general this is a decent kit that can be built fast just out of the box, which is always an incentive for the average modeler, the one who really keeps the business running and is usually far from the galactic masters shown on magazines, contests and other modeling soirees.◊
Publicado – Published: 5 / 2022
©www.jmodels.net


Debe estar conectado para enviar un comentario.