

De un vistazo – Quick look
MATERIAL Y PIEZAS
MEDIA & PARTS:
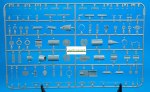
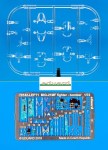
- Plástico inyectado (187 piezas), plástico transparente (15 piezas), fotograbado (48 piezas), máscara adhesiva (21 máscaras).
- Injected plastic (187 parts), clear plastic (15 parts), PE (48 parts), adhesive masks (21 pieces).
CALCAS – DECALS:
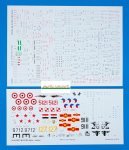
- Dos hojas impresas por Eduard. La primera incluye insignias y matrículas norvietnamitas, rusas, egipcias, checoeslovacas y polacas, panel de instrumentos, consolas laterales, marcas de unidad y estarcidos. La segunda es de mayor tamaño y sólo tiene cientos de estarcidos para las alas, el fuselaje, las alas, los depósitos de combustible, el armamento, los puntos de anclaje, etc. Muy bien impresas y de apariencia fina.
- Two sheets printed by Eduard. The first includes North Vietnamese, Russian, Czechoslovak, Egyptian and Polish markings and numbers, instrument panel, side consoles, cockpit gadgets, unit badges and stencils. The second sheet is larger and only has hundreds of stencils for fuselage and wings, fuel tanks, armament, hardpoints, etc. Very well printed and apparently thin.
OPCIONES – OPTIONS:
- MiG-21MF. Fuerza Aérea de Vietnam del Norte, 921º Regimiento de Cazas, aparato 5121 rojo pilotado por Pham Tuan. Base de Noi Bai (Vietnam) diciembre de 1972.
- MiG-21MF. Fuerza Aérea Egipcia, Escuadrilla 46ª, aparato 8447. Egipto, 1973-
- MiG-21MF. Fuerza Aérea Soviética, 812º Regimiento Aéreo de Entrenamiento, aparato 127. Escuela Superior de Pilotos de Járkov, Aeródromo de Kupyansk. URSS, agosto de 1991.
- MiG-21MF. Fuerza Aérea Polaca, 3ª Escuadrilla Táctica de Aviación. Base de Poznań – Krzesiny, Polonia, 2002.
- MiG-21MF. Fuerza Aérea Checoslovaca, 9º Regimiento de Cazas, aparato 9712. Bechyně, Checoslovaquia, 1989-1993.
- MiG-21MF red 5121, flown by Pham Tuan, 921st Fighter Regiment, Noi Bai AB, Democratic Republic of Vietnam, December 1972.
- MiG-21MF 8447, No. 46 Squadron, Egypt, 1973.
- MiG-21MF No. 127, 812th Training Air Regiment, Kharkov Higher Military Aviation School of Pilots, Kupyansk Airfield, Soviet Union, August 1991.
- MiG-21MF 9111, 3. Eskadrą Lotnictwa Taktycznego, Poznań – Krzesiny, Poland, 2002.
- MiG-21MF 9712, 9th Fighter Regiment, Bechyně, Czechoslovakia, 1989 – 1993.
INSTRUCCIONES – INSTRUCTIONS:
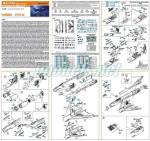
- Folleto de 24 páginas en papel satinado. Contiene introducción histórica, plano de piezas, una tabla de pinturas, alrededor de 30 secuencias de montaje sin numerar, perfiles para colocar mascarillas y estarcidos y guía para pintar y colocar las calcas. Muy bien impresas y claras.
- 24-page brochure printed in color on good satin paper. It contains a historical summary, a parts plan, a table of paints, around 30 assembly sequences, profiles to set the masks and stencils and a guide for painting and setting the decals. Very well printed and clear.
LO MEJOR – THE BEST:
- Molde. Detalle interno y externo. Opciones de montaje y pintura. Incluye mascarillas.
- New tooling. Internal and external detail. Assembly and painting options. Includes masks.
LO PEOR – THE WORST:
- Restos de expulsor en muchas piezas, fáciles pero tediosos de eliminar. Tapas del tren principal (ver texto). Fotograbados diminutos. Estarcidos para aburrir.
- Ejector pins on many parts, easy but annoying to clean. Main landing gear covers (see text). A myriad of stencils to set.
VALORACIÓN – CONCLUSION:
- Sobresaliente maqueta por calidad y contenido. Recomendable a modelistas de nivel medio y avanzado.
- Quality and content make it an outstanding kit. Recommendable to modellers with medium and advanced modelling skills.

Desconozco otras maquetas del MiG-21 a cualquier escala, por eso lo único que puedo decir de esta es que, si no es la mejor a la escala actualmente, debe andar bastante cerca. El nuevo molde de Eduard lleva aún pocos años en circulación, pero en este tiempo a la casa le ha dado ocasión de editarlo de variada forma, ya sea como edición Profipack, Weekend o Royal Class, además de complementarlo con una variedad de mejoras que se venden por separado.
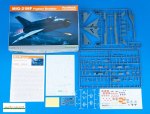
Esta caja Profipack del modelo MF (Fishbed-J para la OTAN) contiene tres bastidores de piezas de plástico, un bastidor transparente, una plancha de fotograbados, dos hojas de calcas, una hoja de mascarillas y las instrucciones. Todo está envuelto y protegido por separado, como suele ser habitual en Eduard.
El moldeado de las piezas muestra gran calidad tanto en la forma como en la definición del detalle. El plástico está libre de rebabas, pero muchas piezas contienen puntos de salida del eyector que son tediosos de limpiar. No encuentro marcas en zonas importantes. Del total de piezas nos van a sobrar hasta 42 de ellas en esta maqueta.
Como cabe imaginar por la edición, la carlinga está muy bien detallada. La pieza que hace las veces de suelo comprende también el pozo de la rueda delantera. El interior del pozo está compuesto por dos piezas de plástico con detalle en relieve situadas a ambos lados. Girando la pieza del pozo podemos montar la carlinga, que comprende los pedales, detallados con fotograbados, la palanca de mandos, el panel de instrumentos (que tiene doble pieza de plástico opaco o transparente y la opción de representarlo con calcas o fotograbados), las consolas laterales (con iguales opciones que el panel), un mamparo anterior situado tras el panel de instrumentos y un panel trasero tras el asiento detallado en fino relieve. El asiento tiene nueve piezas y, según las instrucciones, debe añadirse al final. Está muy bien detallado con fotograbados para los arneses, cinturones y algunas palancas, entre las que destaca el tirador del tren de aterrizaje, y calcas. Los lados de la carlinga también tienen opciones de fotograbado o calcas para representar el instrumental.
En el interior del fuselaje quedan por introducir dos elementos: el tanque de combustible principal y el tubo de postcombustión. El motor no está incluido como tal. El depósito comprende cuatro piezas bien detalladas y va situado sobre la sección del fuselaje que une las alas. La cámara de postcombustión la forman siete piezas con detalle externo en la tobera de salida y del compresor a cada extremo.
Las mitades del fuselaje son muy finas y están fabricadas con espacios para incluir el pozo delantero, una sección de la panza, una sección del morro que incluye la toma cónica y el escape de salida. La espina dorsal, que incluye la aleta vertical, también viene por separado y se pega directamente sobre el fuselaje. El grabado de los paneles, registros y accesos es fino y limpio, así como el relieve de los conductos externos de la tobera y el sensor de altitud en el lado izquierdo.
La toma frontal va pegada sobre un anillo interno, que habremos incluido antes de cerrar el fuselaje, y otro externo. La espina y la aleta tienen un panelado de igual calidad que en el fuselaje. La aleta es especialmente fina e incluye detalles como las antenas IFF de fotograbado, el radar de alerta y la luz de navegación. En la misma pieza también podemos distinguir el carenado del almacén del paracaídas de frenado. El extremo de la tobera de salida es una pieza cilíndrica sin detalle interno, pero con los conductos externos bien marcados en relieve.
Hasta donde estoy describiendo, el fuselaje se completa con el añadido de otra pequeña antena IFF de fotograbado bajo el morro, la sonda de presión y el brazo del indicador de velocidad en la parte frontal del morro, la aleta ventral y dos dispositivos de ayuda al despegue opcionales moldeados en mitades. Olvido conscientemente otras piezas menores que se añaden al fuselaje.
La sección de la panza a la altura de las alas viene separada y fabricada junto con estas. La pieza posee un hueco central para cerrarlo con la superficie interna del aerofreno. Esta pieza es opcional según situemos el dispositivo en posición abierta o cerrada. Para el primer caso hay otra pieza más (el aerofreno mismo) que viene perfectamente horadada y detallada con su brazo de apertura por separado. Por delante del aerofreno hay que situar la góndola del cañón GSh-23, que viene aparte.
Los pozos del tren de aterrizaje principal se han incluido en la sección de la panza que une las alas. Las superficies superiores de las alas llevan grabado cierto detalle de los pozos e incluyen las luces de aterrizaje en piezas transparentes. Cada pozo dispone de una tapa bien detallada por dentro con brazo de apertura por separado. El tren principal ha sido detallado al máximo, a mi entender. Las patas tienen las tijeras de torsión y las tapas separadas. El inconveniente de las tapas es que Eduard nos pide que las doblemos ligeramente para darles la forma correcta y siendo de fino plástico podemos partirlas de no tener cuidado. Las ruedas se han fabricado con los neumáticos y las llantas por separado. Las llantas vienen en mitades con detalle distinto a cada lado. Además, se ha incluido una pieza muy fina para simular los conductos hidráulicos, un detalle de nota.
El pozo delantero dispone también de tapas aparte y el brazo de una pieza con unos de los soportes de la horquilla en pieza separada para mejorar la definición de la rueda. Esta viene igualmente separada en neumático y llanta.
La carga bajo las alas se compone de tanques de combustible y armamento. Los puntos de anclaje vienen separados y son de tres tipos. Hay uno ventral más grande para un depósito y otros dos modelos para armamento o depósito auxiliar. Los depósitos incluidos son uno de 800 litros y dos de 490 litros, todos ellos divididos en mitades. El armamento es variado y consiste en lanzadores de cohetes UB-16 formados por tres piezas cada uno, y misiles R-13, R-35 y RS-2US dotados de sus respectivos raíles de lanzamiento.
La plancha de fotograbados incluye algunas piezas ya pintadas, como el panel, las consolas y el instrumental de los lados de la carlinga. Algunas piezas son extremadamente pequeñas y requieren cuidado al manipularlas. La hoja de máscaras incluye no sólo las de la cubierta de la carlinga, sino también las de las luces de aterrizaje y las antenas VHF/UHF de la cola.
Hay dos hojas de calcas impresas por el propio fabricante. La primera incluye insignias y matrículas norvietnamitas, rusas, egipcias, checoeslovacas y polacas, el panel de instrumentos y las consolas laterales, marcas de unidad y un buen puñado de estarcidos. La segunda hoja es de mayor tamaño y sólo tiene cientos de estarcidos para las alas y el fuselaje, los depósitos de combustible, el armamento, los puntos de anclaje, etc. Las calcas están muy bien impresas y su apariencia es muy fina. Los estarcidos son diminutos y hay que tener cuidado tanto con el corte de la hoja como con su manipulación.
Las instrucciones están impresas a color en un folleto de 24 páginas en buen papel satinado. Contienen una introducción histórica sobre el avión, un plano de piezas más bien pequeño, una tabla de pinturas con referencias de Gunze Sangyo y Mission Models, alrededor de 30 secuencias de montaje sin numerar pero muy claras, perfiles para colocar las mascarillas, una página que muestra las combinaciones de depósitos y armamento, cuatro páginas para colocar los estarcidos y otras cuatro con perfiles para pintar y colocar las calcas. Las opciones de pintura son variadas y muestran aparatos en metal o con distintos camuflajes.
Tras repasar lo escrito, ya no me quedan tantas dudas para afirmar que este debe ser el mejor MiG-21 a la fecha. Claramente, esta es otra edición Profipack de Eduard que sobresale por su calidad y contenido. La maqueta se puede recomendar sin reservas a modelistas de nivel medio y avanzado.◊


I don´t know other MiG-21 kits at any scale, so the only thing I can say about this one is that, if it is not the best at the scale, it must be quite close. Eduard’s new tool kit has been around for a couple of years and in this time the company have released it as a Profipack, Weekend and Royal Class edition, in addition to complementing it with a variety of aftermarkets that are sold separately.
This Profipack box of the MF variant (Fishbed-J in NATO code) contains three grey sprues, a clear sprue, a PE fret, two decal sheets, a sheet of masks and the instructions. The content is neatly packed and protected separately, as usual in Eduard.
Moulding of parts shows great quality, both in shape as in detail definition. Plastic is free from flash, but many parts have ejector pins that will be a bit boring to clean. I can´t find marks on critical spots. No less than 42 pieces will be left out during assembly.
Judging from the edition, the cockpit is supposed to be thoroughly stuffed. And so it is. There is a part that includes both the cockpit floor and the front well. This is detailed with two pieces on the sides showing raised detail. You can start building the cockpit by just flipping the part and this comprises the pedals, detailed with PE parts, the stick, the instrument panel, with optional plastic parts provided with decals and also a PE alternative), the side consoles, with the same choice as the panel, a front bulkhead placed before the instrument panel and a rear bulkhead that shows some thin raised detail. The seat comprises nine pieces and, according to the instructions, it should be attached at the end of the build. It is quite well detailed with photoetched belts, decals and some levers, among which I can identify one to unfold the undercarriage. The cockpit sides have a choice for plastic or PE pieces to represent the instruments.
Two elements are still to be inserted inside the fuselage: the main fuel tank and the afterburner. The engine is not included as such in the kit. The tank comprises four well-detailed pieces and is attached on the belly section moulded with the wings. The afterburner duct is made up of seven pieces with external detail on the outlet nozzle and the compressor at each end.
Fuselage halves are very thin and made with gaps to include the forward well, a belly section, a nose section that includes the intake conical center-body and the exhaust nozzle fairing. The spine, which includes the vertical fin, also comes separately and is glued directly onto the fuselage. Lines of panels, registers and accesses are thin and clean, as well as the raised external nozzle ducts and the pressure probe on the left side.
The front air intake is glued on an internal ring, which we will have included before closing the fuselage. Panelling on the spine and fin have the same quality as in the fuselage. The fin is especially thin and includes details such as photoetched IFF antennas, the warning radar and the navigation light. In the same piece we can also distinguish the conical fairing of the parachute. The afterburner nozzle is a cylindrical piece without internal detail, but with the external raised ducts correctly represented.
As far as I am describing, the fuselage is completed with the addition of another small PE IFF antenna under the nose, the air data boom, the pressure probe, the ventral fin and two jettisonable take-off rockets molded in halves. I consciously leave out other minor pieces that are added to the fuselage.
The belly section is moulded with the wings. The piece has a central gap to close it with the inner surface of the airbrake. This piece is optional depending on whether we place the device in the open or closed position. For the first case there is another piece (the airbrake itself) that is perfectly drilled and detailed with a separate opening arm. The gondola of the GSh-23 gun comes separately and is attached ahead of the airbrake.
The main landing gear wells have been included in the belly section made with the wings. The wing upper surfaces have some raised detail of the wells and include the landing lights in clear parts. Each well has a well-detailed door with a separate hydraulic arm. The main undercarriage has been detailed to the maximum, in my view. Struts have separate torque scissors links and covers. Instructions show that the modeller needs to bend the covers to give them the correct shape and this may be a trouble as the part is made of thin plastic and you can break it if you are not careful. The wheels are manufactured with the tyres and hubs separately. The tyres come in halves with different detail on each side. In addition, a very thin piece has been included to simulate the hydraulic system, which adds more detail to each strut.
The front wheel well also has separate doors, a one-piece strut with half of the wheel yoke molded apart to get more definition. The wheel similarly has separate tyre and hub.
The underwing load consists of fuel tanks and weapons. The hardpoints are separate pieces and are different for the external tanks and the armament. You are provided with a centerline 800-litre and two smaller 490-liter tanks, all of them in halves. The armament is varied and consists of UB-16 rocket launchers made up of three pieces each, and R-13, R-35 and RS-2US missiles provided with their own launch rails.
The PE set contains some pieces already painted, such as the panel, consoles and other cockpit gadgets. Some pieces are really small and need a careful handling. The mask sheet provides items not only for the canopy, but also for the landing lights and the VHF/UHF antennas located on the fin.
There are two decal sheets, both printed by Eduard. The first includes North Vietnamese, Russian, Egyptian, Czechoslovak and Polish markings and codes, the instrument panel and side consoles, unit markings and a handful of stencils. The second sheet is larger and only has hundreds of stencils for the wings and fuselage, fuel tanks, armament, hardpoints, etc. Decals look very well printed and thin, but stencils are tiny and the modeller should be careful with cutting and handling.
Instructions are printed in colour in a 24-page brochure that has good satin paper. They show a summary about the aircraft history, a parts plan which is a bit small to find anything at a glance, a table of paints with references from Gunze Sangyo and Mission Models ranges, around 30 unnumbered but clear assembly steps, profiles to set the masks, a page showing combinations of both fuel tanks and armament, four pages to place the stencils and another four to paint and set the decals. Paint choices are diverse and show aircraft in unpainted metal or painted in different camo schemes.
After revising this text, I no longer have so many doubts to state that this kit must be the best MiG-21 to date. Clearly, for its quality and content this is another outstanding Profipack edition from Eduard. The kit can be eagerly recommended to intermediate and advanced level modelers.◊
Actualizado – Updated: 4 / 2022
Publicado – Published: 2 / 2021
©www.jmodels.net


Debe estar conectado para enviar un comentario.