
De un vistazo – Quick look
MATERIAL Y PIEZAS
MEDIA & PARTS:
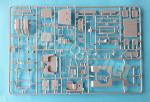
- Plástico inyectado (163 piezas), plástico transparente (21 piezas).
- Injected plastic (163 parts), clear plastic (21 parts).
CALCAS – DECALS:
- Impresas por Cartograf. Marcas identificativas de TV, matrículas, insignias de unidad e instrumentos del salpicadero. Aspecto brillante y fino. Buena saturación de color y ningún exceso de soporte.
- Printed by Cartograf. TV markings, number plates, unit badges and some dashboard gauges. Shiny and thin appearance. Good color saturation and no excess of carrier film.
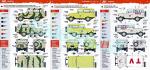
OPCIONES – OPTIONS:
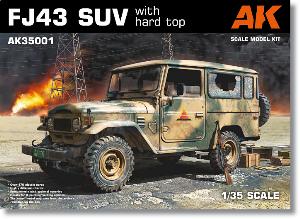
- FJ43. 18ª Brigada Mecanizada. Guardia Republicana Iraquí. Guerra del Golfo, 1991.
- FJ43. 3ª División Acorazada “Saladino”. Ejérciro Iraquí. Guerra del Golfo, 1991.
- FJ43. Vehículo de TV/Prensa, años 80.
- FJ43. 18th Mechanized Brigade. Iraqi Republican Guard. Guf War, 1991.
- FJ43. 3rd Armored Division “Saladin”. Iraqi Army. Gulf War, 1991.
- FJ43. TV/Press vehicle, 1980s.
INSTRUCCIONES – INSTRUCTIONS:
- Folleto de tamaño A4 de 20 páginas impresas a color en papel satinado. Contiene un plano de piezas numerado, una lista de colores con equivalencias de pintura, 28 secuencias de montaje y tres páginas de perfiles. Se añade una hoja separada con las mismas características para corregir varias erratas del folleto. Claras y muy bien impresas.
- A4 20-page booklet printed in color on satin paper. It contains a numbered parts plan, a list of colors with matches in modelling paints, 28 assembly sequences and three pages of profiles. A separate sheet with the same features has been included to correct some mistakes in the booklet. Clear and very well printed.
LO MEJOR – THE BEST:
- Montaje bien diseñado y con opciones. Instrucciones muy útiles.
- Sensible and well engineered assembly. Assembly choices. Helpful instructions.
LO PEOR – THE WORST:
- Ausencia de motor.
- No engine included.
VALORACIÓN – CONCLUSION:
- La avalan un excelente detalle unido a un montaje compacto, sensato y bien explicado en las instrucciones. Encarecidamente recomendable a los seguidores de esta escala.
- This kit is supported by excellent detail combined with a compact, sensible and well-explained assembly in a helpful booklet. Highly recommended to scale fans.

La maqueta
Hasta el momento AK nos ha traído cuatro versiones de su nuevo molde del Toyota FJ43. Esta caja fue la primera de ellas y salió hace cosa de un año, estrenando la línea de maquetas de la marca. Ha sido buena idea traer a la palestra este vehículo, del que tantos modelos y versiones pasados y actuales pueden hacerse, ya que sigue rodando en muchos países. Los aficionados a los vehículos modernos, y no sólo militares, están de enhorabuena, ya que dos de estas maquetas incluyen versiones civiles.
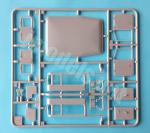
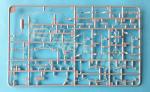
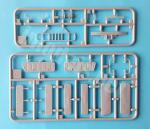
La caja contiene seis bastidores de piezas grises, dos bastidores transparentes, las calcas y las instrucciones. Hay un bastidor añadido que no emplearemos en esta versión porque está destinado al modelo Pickup con cañón sin retroceso (AK35003).
Los bastidores están limpios de rebabas y muy pocas piezas muestran cilindros del eyector. La mayor parte de marcas son invisibles, aunque hay algunas negativas en el techo (muy leves) y sobre los lados del habitáculo trasero que me parece necesario tapar. Las piezas están bien moldeadas y hay que manipular algunas con extremo cuidado por su finura.
Uno de los bastidores contiene puertas con ventanillas triangulares que no son aplicables a ninguna de las maquetas que AK ha hecho hasta la fecha, lo que lleva a pensar que la marca está aún por sacar otras versiones del todoterreno.
Esta maqueta representa un Toyota Land Cruiser modelo FJ40 producido por la firma japonesa entre los años 60 y 1984. Se trata de un modelo con bastidor de longitud media y dos puertas que empleaba tanto motores de gasolina como diésel. El techo duro o blando también era opcional. La designación BJ o FJ de estos vehículos lleva a veces a confusión. La letra J empleada por Toyota se refiere al tipo de vehículo (Jeep en este caso) y las letras B o F designan el tipo de motor. Los vehículos de este tipo se hicieron muy populares en los conflictos de África y Oriente Medio a partir de los años 70 y 80, y muchos ejércitos y fuerzas irregulares aún continúan empleándolos.
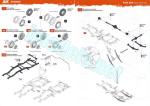
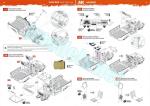
Chasis, suspensión y transmisión
El bastidor del chasis es una pieza completa a la que sólo hay que añadir un travesaño de refuerzo en la parte trasera. A diferencia de otras maquetas, el tubo de escape se pega al inicio del montaje. Viene completo con el silenciador, que consta de dos piezas encajadas entre sí, lo que evita líneas de unión.
La suspensión consta de cuatro ballestas bien detalladas con las abrazaderas, bridas y ojos bien marcados. Las dos traseras hay que montarlas a la vez que la transmisión. El eje trasero es una pieza moldeada con el diferencial, cuya mitad delantera viene separada para unirla al eje de la transmisión. El eje es de una pieza unido a la caja de cambios auxiliar, que sólo está reproducida en su mitad inferior. La otra mitad viene unida a una pieza diferente que contiene toda la zona inferior del motor desde el cárter a la caja de cambios, y es todo lo que tenemos de él. Por delante del eje nos queda la mitad del diferencial delantero en una pieza suelta que se pega antes de instalar el eje delantero.
Los amortiguadores traseros se añaden en un paso posterior, según las instrucciones, pero también se pueden incluir al terminar de instalar el eje trasero. Uno de los travesaños del chasis tiene huecos para insertarlos y el otro extremo va unido a la abrazadera central de las ballestas.
El eje delantero es un poco más complejo de montar, pero las instrucciones son de gran ayuda. Está moldeado de una pieza con los extremos separados, donde apreciamos los vástagos para unir los tambores de freno de las ruedas. AK ha tenido la feliz idea de permitir que el eje delantero sea direccionable y así la barra estabilizadora viene representada en tres piezas que nos permitirán colocar las ruedas giradas a la derecha, izquierda o en posición neutra respectivamente. Las barras son muy delicadas de manipular por su finura. Colocado el eje delantero sólo resta añadir las ballestas, que son similares a las traseras.
El montaje sigue ahora con la suspensión delantera, que comienza en la etapa 8 de las instrucciones. Este paso está reproducido en la hoja de corrección de errores anexa a las instrucciones porque hay dos piezas cambiadas de número que se aprecian claramente en la hoja. En la parte delantera hay un travesaño añadido al bastidor y dos ganchos de remolque pegados sobre el extremo de los largueros. Los amortiguadores van unidos mediante un pequeño vástago a los soportes separados. Para facilitar esto, hay que pegar antes la pieza que representa el engranaje de la columna de dirección que está moldeada con la biela.
Considerando toda la base del vehículo y salvo que el ajuste indique lo opuesto, tenemos una muy buena representación de sus distintas partes, por eso es una pena que AK no haya incluido el motor y nos deje sin la posibilidad de mostrar el capó abierto.
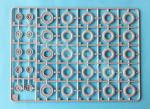
Ruedas
Las ruedas tienen las llantas y neumáticos separados. La maqueta incluye dos tipos de neumáticos opcionales según las instrucciones, pero las versiones de pintura sólo muestran uno de ellos. El primer tipo está dividido en dos mitades iguales y parece un modelo todoterreno, mientras que el segundo es algo más ancho al llevar un anillo entre las dos mitades y es más parecido a uno de carretera. El dibujo de la banda de rodadura es diferente en ambos, más complejo y fino en el segundo caso. La definición del detalle es muy buena en ambos y los lados muestran el fabricante y los datos técnicos en relieve.
Las mitades de las llantas van introducidas en los neumáticos. Muestran detalle diferente según sean las de las ruedas delanteras, traseras o la de repuesto. El buje está horadado por detrás y es más pronunciado en las delanteras, mientras que las demás carecen de buje y muestran huecos de diferente diámetro para insertarlas en los ejes. Las tuercas y estampado de las llantas están muy bien reproducidos.
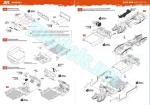
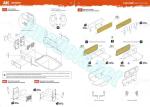
Cabina
Al igual que ocurre con la suspensión y transmisión, el montaje de la cabina incluye piezas de la zona de carga, en concreto el suelo, que debemos pegar antes de centrarnos en la parte trasera. El suelo de la cabina y el de la zona de carga ajustan mediante una fina pestaña central. Las dos piezas tienen excelente detalle en las molduras de las superficies.
El panel delantero también viene en una pieza detallada mínimamente por la cara del motor y en la interior muestra molduras sencillas y el hueco de la columna de dirección. Además de los pedales, el detalle incluye el salpicadero, que está detallado con la guantera, los indicadores y algunos botones en relieve. Los indicadores están representados con calcas y hay otra adicional para la guantera. El volante viene separado de la columna de dirección, que hay que pegar en la parte inferior a la caja de engranajes. Ambas piezas presentan buena factura.
El suelo está moldeado con un hueco central para pegar la base de las palancas. Hay dos además del freno de mano. Los asientos tienen bastidores separados y consisten en una base más un respaldo dividido en dos piezas, la de atrás muestra molduras, mientras la de delante está ligeramente texturizada, lo mismo que la base.
Debajo del suelo hay que añadir el depósito de combustible y la pieza que representa el motor ya descrita anteriormente antes de unir el suelo de la cabina / caja de carga al chasis.
El parabrisas es de una sola pieza muy transparente y fina. La parte externa lleva limpiaparabrisas de plástico y la interna tiene dos tapas en la base de la pieza, el retrovisor y los parasoles. AK ha incluido una plantilla para recortar las mascarillas de todas las ventanas del vehículo e incluso las marcas de los retrovisores sobre el parabrisas. Todo un detalle.
Las puertas están reproducidas con un gran detalle. El lado exterior posee detalles bien definidos en las manijas, bisagras, molduras y retrovisores. En la cara interna hay un magnífico panel separado que muestra la manija interior y el elevalunas. Las ventanillas son piezas finas.
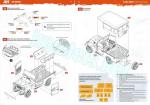
Carrocería
Los lados de la carrocería abarcan desde la parrilla al extremo redondeado de la parte trasera. El detalle externo no es mucho, sólo la tapa del depósito de combustible, un panel pequeño a cada lado y rejillas de ventilación del motor. El perfil de los lados muestra el hueco de acceso a la carlinga, el de las ruedas traseras y el perfil de los guardabarros delanteros. Los estribos, añadidos a los lados de la cabina, muestran textura antideslizante en la parte superior.
Pegados los lados, queda cerrar la parte delantera con la calandra. Los faros tienen las lentes rayadas en piezas transparentes. El entramado de la calandra está bastante bien, pero carece del logotipo del fabricante, supongo que para evitar problemas con los derechos de propiedad.
El capó me parece excelente. Las molduras, las bisagras y la pequeña rejilla frontal están muy bien reproducidas. La pieza tiene marcas por dentro, pero no importa ya que no hay motor.
Los guardabarros son de una pieza con soportes internos aparte. Los focos delanteros situados sobre ellos son piezas transparentes opcionales, normales y de conducción nocturna. Las lámparas traseras son también transparentes al igual que los marcadores laterales.
La parte trasera lleva el paragolpes en una pieza con los característicos abultamientos de este modelo. También hay un par de diminutas bisagras donde situar el bastidor de soporte de la rueda de repuesto. La numeración de las piezas es errónea en las instrucciones, pero está corregida en la hoja separada. El soporte de la rueda viene en una pieza, que también está mal identificada y corregida.
Caja de transporte
El suelo está complementado por las bases laterales de los asientos, que muestran molduras con buena definición. Constan de respaldos grabados con molduras y asientos suavemente texturizados. El soporte es una barra fina que permite pegar los asientos traseros en posición plegada o bajada. Esta es otra opción de las varias que ofrece la maqueta.
Techo rígido
Consta de un techo, dos lados y las puertas traseras separadas. Las ventanillas son finas y merecen una mención especial las redondas de las esquinas porque no muestran distorsión. El techo y los lados tienen algunas marcas de eyector negativas pero no profundas.
Las puertas poseen buen detalle por ambos lados aunque la cara interna tiene ligeras marcas que cubrir. El panel interior está separado y detallado con finura.
Las instrucciones, que realmente están en todo, nos explican un método sencillo para pintar el techo rígido detallando también las molduras de goma que son tan evidentes en este todoterreno.
Calcas
La hoja está impresa por Cartograf y eso ya es decir mucho. Contiene marcas identificativas de TV, matrículas, insignias de unidad e instrumentos del salpicadero. Las calcas tienen aspecto brillante y fino, buena saturación de color y carecen de exceso de soporte.
Instrucciones
Las instrucciones son un modelo de claridad, información y ayuda, por ello las incluyo entre lo mejor de esta maqueta. El folleto de tamaño A4 y 20 páginas a color en papel satinado muestra un plano de piezas numerado, una lista de colores con equivalencias de pinturas de AK Interactive, 28 secuencias de montaje y tres páginas de perfiles. Como he descrito, una hoja separada corrige algunos errores mínimos en el folleto que pueden confundir al modelista.
La ayuda suplementaria ofrecida en cada paso de montaje es realmente notable. Esta ayuda se concreta en las vistas detalladas en zonas difíciles, la identificación clara de cada etapa, la información sobre los colores y pinturas que emplear en cada pieza, extendida también a productos auxiliares de acabado como lavados y pigmentos en los perfiles de las últimas páginas y, por último, las plantillas con las que realizar mascarillas para las ventanas o el método para pintar el techo rígido. No creo exagerar mucho si afirmo que estas son de las mejores instrucciones que he visto en una maqueta, y he visto unas cuantas.
Las opciones de pintura incluyen dos vehículos iraquíes de la Primera Guerra del Golfo con y sin camuflaje y un vehículo de prensa de los años 80, aportando variedad a los que prefieran un vehículo civil.
Valoración
AK le ha dado un magnífico estreno a su nueva serie de maquetas con este FJ43, un producto con gran detalle, montaje muy bien planificado y aún mejor explicado.
La elección de este vehículo ha sido un gran acierto de la marca porque se presta a muchas otras terminaciones además de las que figuran en esta caja, ofreciendo al modelista múltiples posibilidades tanto en su versión civil como militar.
La maqueta, como cualquier otra, no es perfecta y con el nivel de detalle que muestra, se echa de menos un motor que podría haber estado a la misma altura que el resto. Sin embargo, creo que son muchas más las virtudes que la avalan y que he intentado describir en esta reseña. Por una vez, la recomiendo encarecidamente a los aficionados a estos vehículos de menor porte pero gran abundancia.◊


The kit
So far AK have brought us four boxes of their new-tool Toyota FJ43. This one was the first to be released about a year ago. The kit launched the brand’s new line of scale models. It has been a good idea to choose this vehicle, which can be built into many models and users as it continues to roll in many countries. Fans of modern military vehicles are in luck and this includes those who prefer alternative finishes since two of these boxes offer civilian options.
The box contains six frames of gray pieces, two clear frames, the decals and a well-printed instruction booklet. There is an extra frame that we will not use because it is intended for the Pickup model with recoilless gun (AK35003).
The frames are flash-free and very few parts show plastic nodes. Most of the ejector pin marks are invisible, although there are some on the roof (very shallow) and on the hard top sides that should be filled. Pieces are well molded showing excellent detail throughout. Some need careful handling as they are very thin and brittle.
One of the frames contains doors with quarter glasses not applicable to any of the kits AK have released to date, which suggests the company is yet to release other versions of this vehicle.
This kit represents a Toyota Land Cruiser model FJ40 produced by the Japanese firm between the 1960s and 1984. It is a model with a medium wheelbase and two doors with both gasoline and diesel engines. A hard or a soft top was also an option. The BJ or FJ designation in these vehicles sometimes leads to confusion. The letter J used by Toyota refers to the type of vehicle (Jeep in this case) and the letters B or F designate the type of engine. Vehicles of this type became very popular in conflicts in Africa and the Middle East in the 1970s and 1980s, and many armies and irregular forces still continue to use them.
Chassis, suspension and transmission
The chassis frame is one piece with only a reinforcing cross member to attach at the rear. Unlike other kits, the exhaust pipe is glued at the beginning of assembly. It comes in one piece with the silencer, which consists of two pieces fitted together, which avoids joining lines in the front and rear sides.
The suspension consists of four detailed leaf springs with nice clamps, shackles and clips. The rear springs are built at the same time with the transmission. The rear axle includes the differential, with the front half separated to be attached to the transmission shaft. The shaft is attached to the auxiliary gearbox, which is only reproduced in the lower half. The other half is molded with a different piece containing the lower engine from the crankcase to the gearbox. In front of the shaft we have half of the front differential in a separate piece that is glued before installing the front axle.
Following the instructions, the rear shock absorbers are added in a later step but can also be included after installing the rear axle. One of the frame crossbars has holes to insert them and the other end is attached to the central clamps in the leaf springs.
The front axle is a little more complex to build, but the instructions come to the rescue. It is molded in one piece with the ends apart to insert the brake drums. AK have made the front axle steerable and the stabilizer bar has three optional pieces that allow to pose the wheels with a right, left or neutral turning respectively. The bars are very delicate to handle being very thin. Once the front axle is installed, it is time to attach the leaf springs, which are similar to the rear counterparts.
Assembly now continues with the front suspension, which begins in stage 8 of the instructions. This step is reproduced in the correction sheet attached to the instructions because there are two pieces with wrong numbers as can be clearly seen on the sheet. At the front there is a cross member added to the frame and two tow hooks attached on each the side member. The shock absorbers pins are inserted into separate arms, but before this the steering column gear and the connecting rod are installed in place.
As regards the chassis and unless fitting of parts indicates otherwise, we have a very nice rendition of the different parts, so it is a shame that AK did not include the engine and left no chance to show the hood open.
Wheels
The wheels have separate rims and tires. The kit includes two types of optional tires according to the instructions, but paint versions only show one of them. The first type is divided into two halves and looks like an off-road type, while the second is somewhat wider as it has a ring in between the two halves and is more similar to a road type. Tread pattern is different in both, more complex and fine in the second case. Detail definition is very good on both and the tires show the manufacturer and technical data with raised detail.
The rim halves are inserted into the tires. They show different hub details depending on whether they are the front, rear or spare wheels. The hub is drilled and longer in the front wheels, while the others lack a hub and instead have holes of different diameters to insert them into the axles. The nuts and stamping are very nicely done.
Cab
As with the suspension and transmission, cab assembly starts adding the rear tray floor, which is not properly a cab part. The cab and tray floors are joined by means of a thin middle tab. Both pieces have excellent detail in the surface moldings.
The front bulkhead barely has any detail on the front side and the inside shows simple moldings and a gap for the steering column. In addition to the pedals, detail includes the dashboard, which is detailed with the glove compartment, gauges, and some raised switches. The gauges and glove compartment are represented with decals. The steering wheel comes separate from the steering column, which is inserted into the bulkhead and glued to the gearbox. Both pieces are thin and finely rendered.
The floor is molded with a middle gap to attach the lever cover. There are two levers plus the handbrake. The seats consist of a base and a seatback molded in two pieces, the rear one showing moldings, while the front one is slightly textured, the same as the base.
With the cab almost finished, assembly focuses on the fuel tank under the floor and the engine lower half already described above before joining the cabin / cargo tray floor to the chassis.
The windshield is a single transparent and thin piece. The external side has plastic windshield wipers and the inner side has two covers at the base, a rearview mirror and sun visors. AK have included a useful template in the instructions to cut out the masks for all the vehicle windows and even the wiper markings on the windshield.
The doors are just nice. The outer side has crispy detail on the handles, hinges, moldings and mirrors. On the inside there is a wonderful separate panel showing the handle and window crank handle. The windows are again thin pieces.
Body
The sides of the bodywork span from the grille to the rounded rear quarter panels. External detail isn’t generous, just the fuel filler cap, a small engraved panel on each side and engine vents. Parts show the shapes of the cab doors, rear wheels and front fenders.
Once the sides are glued, we can attach the running boards showing non-slip texture and continue with the grille. The headlights have grooved clear lenses. The grille is quite good, but it lacks the manufacturer’s logo to avoid copyright issues, I suppose.
The hood looks excellent. The moldings, hinges and the narrow front grille are very well reproduced. The piece has a few pin marks on the inside, but it doesn’t matter since there is no engine.
The fenders are one piece with separate brace supports. The lights are clear parts with choices for standard and blackout types. The rear lamps are also transparent as are the tail markers.
The rear part has a bumper in one piece with the characteristic bulges of this model. There are also a pair of tiny hinges to attach the spare wheel holder. Parts number for the hinges is mistaken in the instructions, but corrected on the separate sheet. The wheel bracket comes in one piece, which is also misidentified and corrected.
Cargo tray
The floor is complemented by the side seat bases, which show moldings with good definition. Bench seats comprise two-piece backrests and softly textured seats. The legs are quite thin and allow the seats to be posed in the folded or lowered position. Really a nice touch.
Hard top
It consists of a roof, two sides and separate rear doors. The windows are thin and the round ones in the corners deserve special mention because they show no distortion. The roof and sides have some negative ejector pin marks. They are not deep but should be filled anyway.
The doors have good detail on both sides although the inside has shallow pin marks to clean. The interior panel is separated and finely detailed.
Decals
The sheet is printed by Cartograf and that is saying a lot. Contains identifying TV markings, license plates, unit badges and dashboard gauges. Decals have a shiny and fine appearance, good color saturation and no surplus carrier film.
Instructions
The instructions are a model of clarity, information and help, which is the reason I mention them above among the best things in the kit. The A4, 20-page booklet features a numbered parts plan, a color list with AK Interactive paint equivalents, 28 assembly sequences and three pages of profiles. As said, a separate sheet corrects some minor mistakes in the booklet that may confuse the modeller.
The help offered in each assembly step is truly remarkable. This help takes the form of detailed views in difficult areas, clear identification of each stage, information on the colors and paints to use in each piece, also extended to auxiliary finishing products such as washes and pigments in the profiles on the last pages. and, finally, the templates to make window masks as well as the directions on how to paint the hardtop easily. I don’t think I’m exaggerating too much if I say that these are some of the best instructions I’ve seen in a kit, and I’ve seen quite a few.
Paint finishes include two Iraqi vehicles from the First Gulf War with and without camouflage and a 1980s press vehicle, providing variety for those who prefer a civilian vehicle.
Conclusion
AK have had a superb debut in scale models with this FJ43, a product with great detail, a wisely engineered assembly and even better explained.
The choice of this vehicle has been a great success for the brand because it can be finished in many other versions in addition to those present in this box, offering the modeller multiple possibilities in both civil and military versions.
The kit, as any other, is not perfect but with the level of detail it shows, we miss an engine that could have been at the same level as the rest. However, I think there are many more virtues that support this release and that I have tried to describe in this review. I highly recommend it to fans of these smaller but ubiquitous vehicles.◊
Publicado – Published: 10 / 2023
©www.jmodels.net


Debe estar conectado para enviar un comentario.