
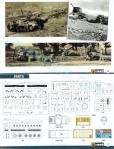
De un vistazo – Quick look
MATERIAL Y PIEZAS
MEDIA & PARTS:
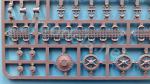
- Plástico inyectado (193 piezas), fotograbado (30 piezas), hilo de cobre trenzado (1 pieza).
- Injected plastic (193 parts), PE (30 pieces), braided copper wire (1 length).
CALCAS – DECALS:
- Una hoja con marcas nacionales (banderas con franjas de igual ancho), Cruz de Borgoña y cruces de San Andrés, símbolo de la Legión y numerales. Apariencia fina y ligero exceso de soporte.
- A sheet containing Nationalist markings (Spanish flags with three stripes of the same width), Cross of Burgundy, St. Andrew’s crosses, a Spanish Legion badge and a set of numbers. Apparently thin with slight excess of carrier film.
OPCIONES – OPTIONS:
(Ver texto – See text)
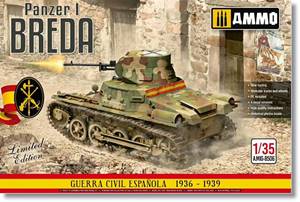
- Panzer I Breda. Bandera de Carros de Combate de la Legión. Primer Grupo, 1ª Compañía. Febrero-noviembre, 1938.
- Panzer I Breda. Bandera de Carros de Combate de la Legión. Primer Grupo, 3ª Compañía. Febrero-noviembre, 1938.
- Panzer I Breda. Bandera de Carros de Combate de la Legión. Segundo Grupo, 4ª Compañía. Febrero-noviembre, 1938.
- Panzer I Breda. Legión española. Bandera de Carros de Combate de la Legión. Segundo Grupo, 5ª Compañía. Febrero-noviembre, 1938.
- Panzer I Breda. Spanish Legion Tank Regiment. First Group, 1st Company. February-November, 1938.
- Panzer I Breda. Spanish Legion, Tank Regiment. First Group, 3rd Company. February-November, 1938.
- Panzer I Breda. Spanish Legion, Tank Regiment. First Group, 4th Company. February-November, 1938.
- Panzer I Breda. Spanish Legion, Tank Regiment. First Group, 5th Company. February-November, 1938.
INSTRUCCIONES – INSTRUCTIONS:
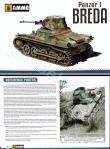
- Folleto apaisado de 22 páginas y tamaño A5 impreso a color en papel satinado. Contiene datos históricos sobre el vehículo y la Legión, fotos en blanco y negro de referencia, plano numerados de piezas, 20 secuencias de montaje y perfiles de 4 carros. Claras y bien impresas.
- A5 22-page landscape brochure printed in color on satin paper. It shows historical data about the vehicle and the Spanish Legion, black and white photos for reference, a numbered parts plan, 20 main assembly sequences and profiles of four tanks. Clear and well printed.
LO MEJOR – THE BEST:
- Tema inusual. Buen detalle general. Presumible fácil montaje.
- Unusual topic. Overall nicely detailed. Presumable straightforward build.
LO PEOR – THE WORST:
- Algunas piezas delicadas. Llantas de fotograbado. Ausencia de transparente para el faro. Marcas positivas bajo los guardabarros.
- Some tiny brittle pieces. PE wheel rims. Lack of clear piece for the headlight. Raised marks under the mudguards.
VALORACIÓN – CONCLUSION:
- Buena representación de un tema poco explorado a cualquier escala. Detalle general bien estudiado y acertado, con algunas zonas por pulir que no deben dejar rastro. Recomendable a modelistas de nivel medio en adelante y aficionados a la Guerra Civil Española.
- Nice rendering of an unusual topic in any scale. Nicely and wisely detailed with some flaws that will not affect the final result. For average modelers upwards and those interested in the Spanish Civil War.

La maqueta
Ammo Mig se ha reestrenado en esta escala con una edición con cambios del reciente molde de Takom. Es la primera variante de este carro en salir al mercado, tras la edición conjunta del Panzer I Ausf.A y B en una sola caja por parte del fabricante chino. Es previsible que Takom vuelva a darnos más variantes del prolífico Panzer I, pero eso lo dirá con certeza el tiempo.
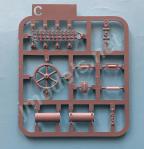
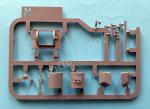
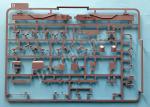
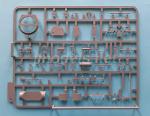
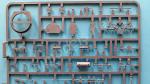
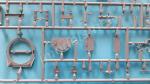
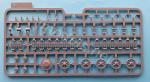
La caja contiene una pequeña hoja de calcas, el folleto de instrucciones, 7 bastidores de piezas, el casco y la parte superior de la torre separados, más dos planchas de fotograbados. Las piezas están bien presentadas en bolsas separadas y selladas. Solo echo en falta una mejor protección para los fotograbados en forma de cartón protector que evite su deformación. Los cambios introducidos en esta versión, además de las calcas y algunos detalles de las instrucciones, son la sustitución de la torre alemana por la torre modificada del modelo Breda y un bastidor añadido que contiene piezas del cañón y el mantelete.
El plástico está bien moldeado, llegando algunas piezas a un grosor que las hace muy delicadas y fácilmente rompibles si no tenemos cuidado al sacarlas de los bastidores. No hay rebabas y los defectos más evidentes son los pequeños cilindros de eyector presentes en algunas piezas así como las tremendas marcas de la cara inferior de los guardabarros. Hay otras marcas en la cara interna de las escotillas y las ruedas tractoras, pero no son profundas. La definición de algunas piezas es muy buena. Destaco las cadenas, las herramientas y el armamento, singularmente las ametralladoras, que en esta versión no se emplearán.
La maqueta carece de interior, por ello si el modelista desea poner las escotillas abiertas, debe buscar alguna forma de rellenar el hueco vacío, como colocar una figura en el interior, por ejemplo.
La maqueta representa un Panzer I Ausf.A Breda, modelo modificado con un cañón-ametralladora italiano Breda 20/65 de 20 mm. Esta conversión sólo llegó a 4 unidades, todas ellas empleadas por la Legión en la Guerra Civil Española. Es probable que ninguno de estos carros llegara a ver el final del conflicto por resultar averiado o destruido.
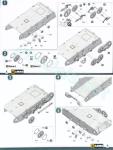
Chasis
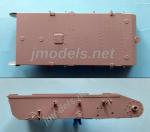
Está dividido en dos piezas principales. Una de ellas forma el casco y comprende tres lados y el fondo; la otra pieza es el frontal separado con los prominentes protectores de la transmisión de la caja de cambios. El detalle externo muestra muy buena definición en los paneles, remaches y tuercas. Los ejes de las rodillos de retorno también están moldeados a los lados. La cara posterior del chasis incluye varias piezas separadas para representar el taco de madera del gato, el piloto trasero y el enganche de remolque, entre otras.
Aunque la maqueta incluye el denominado Nebelkerzenabwurfvorrichtung, o soporte para lanzar granadas fumígeras, las instrucciones no indican su empleo, probablemente porque ninguno de los Breda dispuso de él.
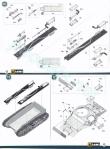
Tren de rodaje y cadenas
Todas las ruedas se han moldeado de una pieza. La banda de caucho de todas ellas no está del todo bien marcada. Los rodillos de retorno son de una pieza y van insertados en los ejes moldeados con los lados del chasis. Las tractoras son finas y están bien detalladas por fuera, aunque en el lado interno hay marcas de eyector no apreciables una vez montadas. Los dientes parecen un poco pequeños, pero no estorbarán el montaje de las cadenas, puesto que estas vienen bien ahuecadas. Las ruedas van montadas sobre las cubiertas de los ejes pegados al casco y separados en tres piezas.
La primera rueda del tren de rodaje va situada junto a un amortiguador helicoidal en pieza separada y sobre un brazo articulado independiente. Ambos muestran buena definición, sin líneas de molde. Los carretones se componen de brazos articulados en mitades con una pieza intermedia en la parte superior que ayuda a unirlos. Las ruedas van situadas entre las dos piezas de cada carretón y pueden girar libremente. El segundo carretón de cada lado incluye la rueda tensora en la parte posterior. Las planchas protectoras externas de los carretones vienen de una pieza por separado y serán las últimas en unirse al tren de rodaje.
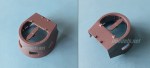
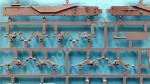
Las ruedas del tren de rodaje y las tensoras están detalladas con arandelas de fotograbado que representan las llantas planas características del Panzer I. El problema es que Takom las ha fabricado demasiado estrechas y tampoco asientan bien sobre las ruedas al estar los ejes marcados también en las llantas, por ello dejan un hueco, pequeño pero perceptible, entre la llanta y la banda de caucho. A decir verdad, el problema no es crucial y puede resolverse rebajando el exceso de plástico y repasando las líneas de separación con masilla.
Las cadenas están despiezadas en tramos y eslabones, si bien estos no vienen sueltos, sino en pares. Las piezas muestran gran detalle y no contienen rebabas ni imperfecciones. Los dientes de guía son de una pieza y no ahuecados como en los Panzer I Ausf.A iniciales, lo cual es correcto para el Breda. El tramo situado entre el último rodillo de retorno y la rueda tensora se ha moldeado con una ligera caída para simular el peso.
Guardabarros
Están separados en dos piezas que ajustan sobre los bordes del chasis. El grosor es razonable para el material. El lado superior muestra un magnífico detalle en la simulación de la superficie antideslizante. También lleva moldeado el borde inferior de la superestructura para poder asentarla sobre los guardabarros. Habrá quienes renieguen de este sistema porque dejará líneas que sellar, sin embargo para otros modelistas será una buena idea, ya que evitará pegar la superestructura sobre la superficie irregular antideslizante. Desgraciadamente, Takom ha dejado tremendos restos de plástico en forma de marcas en las caras inferiores. El defecto no es grave, puesto que una vez instaladas las piezas, no se verán las señales, pero necesitarán atención y, naturalmente, eliminar los restos alargará el montaje.
La estiba situada sobre los guardabarros también está muy bien detallada, y todos sus elementos llevan sus enganches simulados en plástico, pero con buena definición. El gato se compone de cuatro piezas y las demás herramientas (cizalla, extintor, pala, hacha, barra de ajuste de las cadenas) son de una pieza. La antena, dividida en tres piezas, es fina y delicada. El protector de la antena es de una pieza.
Los escapes se componen de silenciadores en dos mitades y el tubo completo, con buen detalle en la sección flexible de caucho, aunque las salidas, por ser muy estrechas, no están ahuecadas. Los protectores de los silenciadores son piezas de fotograbado a las que hay que dar forma curvada. También tenemos los dos pequeños faros situados sobre los guardabarros hechos de una pieza.
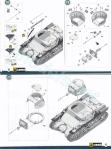
Superestructura y torre
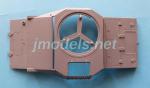
La superestructura, salvo la torre, está moldeada de una pieza que no incluye la escotilla de acceso separada, los visores laterales ni las planchas frontal y trasera. En la zona trasera las escotillas de acceso al motor y las tapas de los depósitos de combustible vienen cerradas, pero a cambio la definición de las bisagras es muy buena. La rejilla de ventilación es fina y sobre ella hay que colocar una plancha de protección provista de una base de fotograbado. También hay protectores blindados sobre las rejillas de ventilación situadas a ambos lados de la parte posterior del chasis. Estos añadidos se hicieron tras la entrega de los primeros Ausf.A y es correcta para un vehículo situado en 1938-39.
La parte delantera cuenta con enganches separados para el cable de arrastre. Este viene en hilo de cobre trenzado con los enganches de plástico separados. El faro principal está hecho en dos piezas, una de ellas es la lente opaca. Hay dos opciones para la sirena: un modelo inicial plano para el carro de la 4ª Compañía, y otro posterior dotado de tubo para los demás Breda. Ignoro por qué, pero también es alternativo el extremo inicial del tubo de salida de humos del compartimento de la transmisión. El tubo estriado tiene muy buena factura y viene ahuecado.
La zona central de la superestructura posee una plancha frontal separada con visor para el conductor, también aparte. El visor, con las dos ranuras bien marcadas pero no abiertas, puede mostrarse abierto empleando los soportes internos, que forman una pieza fina y quebradiza. Los visores perimetrales vienen igualmente separados con la posibilidad de mostrarlos abiertos con el mismo sistema. La plancha trasera derecha es opcional, con y sin visor, y ajusta en el panel rebajado de la superestructura. La correcta aquí es la que no tiene visor, ya que lo llevaron sólo los primeros 300 carros fabricados.
La escotilla del conductor está fabricada en dos piezas, Las tapas tienen buena representación del sistema interno de cierre y el pestillo en una pieza aparte. Las bisagras externas muestran buena definición.
La torre está dividida en dos piezas. La base contiene una pestaña que le permite girar en el hueco de la superestructura. La parte superior simula con mucho realismo la línea de soldadura que separaba la torre original del techo sobreelevado. Los cuatro visores pueden ponerse abiertos con los mismos soportes de la superestructura. Sólo los dos traseros están ranurados. Al igual que otros, este detalle nos indica que Takom ha estudiado bien este carro. La escotilla del artillero viene separada. Por dentro lleva el protector de la cabeza, el pestillo de cierre y la parte interna de la escotilla de señales, que está moldeada por separado en la cara externa.
La plancha frontal de la torre es de una pieza con apertura para unir el mantelete desde adentro. Dos piezas de plástico sirven para fijar los muñones del mantelete a la plancha y permitir así elevar o deprimir el cañón. El arma se compone del tubo provisto de bocacha ahuecada y la parte posterior que deja ver el sistema de recuperación. Entre ambas piezas hay una lámina de fotograbado que parece representar un protector para el visor del artillero, aunque no estoy del todo seguro de ello.
Calcas
Están impresas por Ammo Mig en una pequeña hoja que contiene marcas nacionales (banderas con franjas de igual ancho), una cruz de Borgoña y cruces de San Andrés en blanco y negro, un símbolo de la Legión, un juego de numerales y letras que identificaban unidades. Los motivos muestran apariencia fina y un ligero exceso de soporte. Los colores de las banderas no parecen bien saturados en mi hoja.
Instrucciones
Un folleto apaisado de 22 páginas y tamaño A5 impreso a color en papel satinado contiene datos históricos sobre el vehículo y la Legión, fotos en blanco y negro de referencia, un plano numerados de piezas, 20 secuencias de montaje y perfiles de los cuatro carros convertidos. El folleto es claro y está bien impreso. Las referencias de color vienen en pinturas acrílicas de Ammo Mig, pero hay algún error fácil de percibir en la numeración de las pinturas.
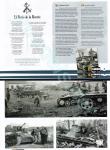
Los colores y el patrón de camuflaje de los cuatro carros Breda siguen siendo controvertidos, ya que no seguían el modelo alemán aplicado desde 1940, sino otro anterior, denominado Buntfarbenanstrich, compuesto de cuatro colores. Afortunadamente, se conservan alrededor de una treintena de fotos de estos carros, lo cual es mucho para su escaso número.
La identificación de cada carro en particular (unidad, grupo, etc.) que figura en el resumen inicial de esta revisión la he obtenido de internet, ya que las instrucciones sólo señalan la compañía a la que perteneció cada uno de ellos.
Valoración
Repasando los detalles de la maqueta, no hay duda de que Takom ha estudiado bien este carro y que lo ha sabido traducir en un buena edición pese a que carece de interior. Lástima que no haya afinado tanto como para dejar algunos detalles mejor terminados, como los señalados en las ruedas, los guardabarros o las marcas internas de las escotillas. Lo menos malo de estas deficiencias es que no representan dificultades insalvables que afecten gravemente ni al montaje ni al acabado.
Por otro lado, Ammo Mig ha jugado bien su papel en esta maqueta al traernos una variante conocida pero escasa en número, lo que a menudo supone que los fabricantes más populares no la produzcan. El último que lo hizo en esta escala, si no recuerdo mal, fue Masterbox, y desde entonces ya ha llovido.
Creo que esta edición podrá complacer a los modelistas de nivel medio para arriba y a los aficionados a los temas de la Guerra Civil Española.◊


The kit
This is the second kit Ammo Mig releases in 1/35 scale, which is a reissue with changes of the recent Panzer I new tool kit from Takom. It is the first variant of this tank to hit the market, after the edition of the Panzer I Ausf.A and B in a single box. Presumably, Takom will bring us more variants of the prolific Panzer I, but time will tell for sure.
The box contains a small decal sheet, an instruction booklet, 7 sprues, separate pieces for the hull and turret top, plus two photo-etched frets. The pieces are well packed in separate self-sealing bags. I only miss a better protection for the photoetched parts in the form of cardboard that prevents damage. The changes introduced in this version, apart from the decals and the instructions, are the replacement of the German turret with the modified turret of the Breda conversion and a new sprue containing pieces for the gun and the mantlet.
Plastic is well molded, some pieces being so thin and brittle that are easily breakable if we are not careful when removing them from the sprues. There is no flash and the most obvious flaws are the small ejector pips present on some parts and the thick marks on the underside of the fenders. There are other marks on the inside of the hatches and the sprockets, but they are not deep. Definition on most pieces is very good, with a special mention to the tracks, the tools and the weapons, especially the machine guns, which will not be used in this version.
The kit lacks an interior, so the modeler must find some way to fill the gap if hatches are to be posed open, such as placing a figure inside, for example.
The kit depicts a Panzer I Ausf.A Breda, a conversion armed with an Italian Breda 20/65 20mm gun. Only 4 vehicles were converted, all of them used by the Legion in the Spanish Civil War. It is likely that none of these tanks saw the end of the conflict due to being damaged or destroyed.
Chassis
It is divided in two main pieces. One of them forms the hull and comprises three sides and the bottom; the other is the separate front end with the prominent gearbox transmission housings. The external detail shows very good definition in the panels, rivets and nuts. The return roller shafts are also molded on the sides. The rear face of the chassis includes several separate pieces to represent the jack block, taillight, trailer hitch, among other bits.
Although the kit includes the so-called Nebelkerzenabwurfvorrichtung, or smoke grenades rack, the instructions do not indicate its use, probably because none of the Bredas were provided with it.
Running gear and tracks
All the wheels have been molded in one piece. The rubber band in all of them is not quite well marked. The return rollers are one piece and are inserted into the axles molded with the hull sides. The sprockets are thin and well detailed on the outside, although on the inside there are ejector marks that are not noticeable once assembled. The teeth seem a bit small, but they won’t hinder track assembly, since the links are well hollowed out. The wheels are mounted on the drive housing that is glued to the hull in three pieces.
The first wheel of the suspension is located next to a separate coil shock absorber and on an independent crank arm. Both show good definition, with no seam lines. The bogies are made up of crank arms in halves with an intermediate piece at the top that helps to join them. The wheels are located between the two pieces of each bogie and can rotate freely. The second bogie on each side includes the idler. The bogie external protective plates come separately and will be the last piece to be attached to the suspension on each side.
The roadwheels and idlers are detailed with photo-etched rings that represent the characteristic flat rims. The problem is that they are too narrow and they don’t fit well on the wheels, leaving a small but noticeable gap between the tire and the rubber band. They also cannot be set flat flat on the wheels because the spokes are also molded on the wheel rims. In fact, the issue is not critical and can be solved by trimming off the excess plastic on the axles and filling the gaps with putty.
The tracks are of the length and link type. The loose links are molded in pairs. Pieces show great detail and are free from flash or blemishes. Unlike the very early Panzer IAs, the guide horns are solid, which is correct for the Breda. The length between the last return roller and the idler has been molded with a slight sag to simulate the weight.
Fenders
They are separated in two pieces that fit on the chassis edges. Thickness is reasonable for the media. The upper side shows a superb rendition of the anti-slip surface. The lower edge of the superstructure is also molded to allow this to be glued on the fenders. I suppose some modelers will complain because this will leave lines to seal, however it may be a good idea for others, since it will avoid attaching the superstructure on the irregular anti-slip surface. Unfortunately, the lower sides have big raised marks that will need some attention during assembly. Fortunately, once trimmed and sanded, they will not be seen when the fenders are attached.
The stowage located on the fenders is also very well detailed, and all the items are provided with plastic clamps that look fine. The jack is made up of 4 pieces and the other tools (cable cutters, fire extinguisher, shovel, axe, chain adjustment bar) are single pieces. The antenna, divided in three pieces, is thin and delicate. The antenna rest comes in one piece.
The mufflers come in halves and the exhaust pipes are fully molded with good detail on the flexible rubber section, though the tips, being very narrow, are not hollowed out. The muffler grilles are photo-etched parts that need to be turned to shape. We also have the two small one-piece headlights located on the fenders.
Superstructure and turret
The superstructure, except for the turret, is molded in one piece that does not include the separate driver’s hatch, the visors, and the front and rear plates. On the rear deck the engine hatches and the fuel filler caps are molded closed, but in return definition in the hinges is very good. The ventilation grille is thin and provided with an armored cover attached on a photo-etched base. Armor protection is also present on the side openings located on the rear chassis wall. These modifications were added after the delivery of the first Ausf.As and is correct for a tank set in 1938-39.
The superestructure front has separate hooks for the towing cable. The cable is provided as a length of braided copper wire with separate plastic towig hooks. The main headlight is made in two pieces, with a separate opaque plastic lens. The siren is optional, with an early flat model for the 4th Company tank, and a later model with a horn carried by the other Breda tanks shown in the instructions. I don’t know why, but there are alternative pieces for the base of the transmision exhaust pipe. The accordion pipe is nicely rendered and hollowed out.
The central superstructure has a separate front plate with the driver’s visor molded apart. The visor, with the two slots well marked, can be shown open using the internal operating handles, which are brittle pieces. The other visors located around the superstructure can also be opened as they have their own handles. The right rear plate is optional, being molded with and without the visor, and fits into the recessed panel of the superstructure. The correct choice for the Breda is the one without the visor, as this was only included in the first 300 tanks produced.
The driver’s hatch is molded in two pieces, the covers have a good rendition of the internal lock system and a separate latch. The external hinges show good definition.
The turret is divided in two pieces with the base containing the usual flange that allows it to rotate. The upper part realistically simulates the welding seam line that joined the original tower from the new raised roof. The four visors can be posed open with the same handles as in the superstructure. Only the two at the rear have the correct open slits. As in other cases, this detail tells us that Takom has studied this tank well. The gunner’s hatch comes separate. The underside carries the padded protection for the gunner’s head, the closing latch and the signal port, which is molded separately on the external face.
The turret front plate is one piece with an opening to attach the mantlet from the inside. Two plastic pieces hold the mantlet trunnions and allow the gun to be raised or depressed. The weapon comprises the barrel, provided with a hollowed muzzle, and the rear section that includes the recuperator. Between both pieces there is a small PE piece that seems to be a shield for the gunner’s sight, but I am not quite sure about it.
Decals
They are printed by Ammo Mig on a small sheet containing national markings (flags with stripes of equal width), a Burgundy cross, black and white Saint Andrew’s crosses, a Legion badge, a set of numbers and letters identifying units. The items are thin with a slight excess of carrier film. Color density on the Spanish flags is a bit poor in my sheet.
Instructions
A 22-page, A5-size, landscape brochure printed in color on glossy paper contains historical data on the vehicle and the Spanish Legion, reference black-and-white photos, a numbered parts plan, 20 assembly sequences, and profiles of the 4 converted tanks. The brochure is clear and well printed. Color references are given in Ammo Mig acrylic paints, but there are mistakes in some paint numbers, for example in the silver color to be applied to the headlight.
The colors and camouflage pattern of the four Breda tanks are still a controversial matter, since they did not follow the German system created in 1940, but an earlier one, called Buntfarbenanstrich, comprising 4 colors. Fortunately, about thirty photos of these tanks are preserved, which is a lot for only 4 vehicles.
I have taken the data of each particular tank (unit, group, etc.) that appears in the summary above from the Internet. Instructions only indicate the company each tank belonged.
Conclusion
Revising the kit’s detail, there is no doubt that Takom has studied this tank quite well and has turned the kit into a good rendition despite the fact that it lacks an interior. It’s a pity that the company has left a few issues to be improved, such as those indicated for the wheels, the fenders or the internal marks on the hatches. The least bad thing about these flaws is that they should not pose difficulties that seriously affect either the assembly or the finish.
On the other hand, Ammo Mig has played a nice part in this kit by bringing us a well-known variant but few in number, which means that the main manufacturers are not interested in producing it. If I remember correctly, the last company to do it in this scale was Masterbox, and that was quite a long time ago. I think this kit will please both the standard and advanced modelers as well as Spanish Civil War fans.◊
Publicado – Published: 4 / 2022
Publicado – Published: 2 / 2022
©www.jmodels.net


Debe estar conectado para enviar un comentario.