

De un vistazo – Quick look
MATERIAL Y PIEZAS
MEDIA & PARTS:
- Plástico inyectado (140 piezas), plástico transparente (17 piezas). Incluye 1 figura.
- Injected plastic (140 parts), clear plastic (17 parts). One figure included.
CALCAS – DECALS:
- Escarapelas británicas, matrículas, números de serie, estarcidos y panel de instrumentos. Finas y bien impresas.
- RAF roundels, codes, production numbers, some stencils and an instrument panel. Thin and nicely printed.
OPCIONES – OPTIONS:
- Bristol Beaufort Mk. I. Avión operado por el Oficial de Vuelo Kenneth Campbell (Cruz Victoria) (piloto), Sargento J. P. Scott (Medalla de Vuelo Distinguido) RCAF (navegante), Sargento R. W. Hillman (operador de radio) y W. C. Mullis (artillero) contra el acorazado alemán Gneisenau. Escuadrilla Nª 22, Base de la RAF St Eval, Cornwall (Inglaterra), 6 de abril de 1941.
- Bristol Beaufort Mk. I. Avión operado por el Sargento John Bell (piloto), Sargento Thomas P. O’Byrne (navegante), Sargento William S. R. Browning (operator de radio) y el Sargento John A. Duckworth (artillero) contra el crucero alemán Admiral Hipper. Escuadrilla Nº 217, Base de la RAF St Eval, Cornwall (Inglaterra), 1 de febrero de 1941.
- Bristol Beaufort Mk. I. Aircraft flown by Flying Officer Kenneth Campbell VC (pilot), Sgt. J. P. Scott DFM RCAF (navigator), Sgt. R. W. Hillman (wireless operator) and W. C. Mullis (air gunner) against the German battleship Gneisenau. No. 22 Squadron, RAF St Eval, Cornwall (England), April 6th, 1941.
- Bristol Beaufort Mk. I. Aircraft flown by Sgt. John Bell (pilot), Sgt. Thomas P. O’Byrne (navigator), Sgt. William S. R. Browning (wireless operator) and Sgt. John A. Duckworth (air gunner) against the German cruiser Admiral Hipper. No. 217 Squadron, RAF St Eval, Cornwall (England), February 1st, 1941.
INSTRUCCIONES – INSTRUCTIONS:
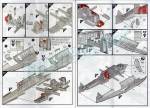
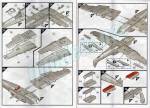
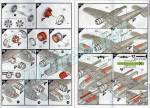
- Folleto de 20 páginas de tamaño A4 impreso a color. Contiene un resumen histórico y técnico sobre el avión, 107 secuencias de montaje y dos páginas con las opciones de pintura y calcas. Muy claras.
- 20-page A4 brochure printed in color. It contains a historical and technical summary about the aircraft, 107 assembly stages plus two final pages showing the painting and decaling choices. Very clear.
LO MEJOR – THE BEST:
- Interior detallado. Piezas transparentes. Opciones de pintura.
- Fuselage interior. Clear parts. Painting choices.
LO PEOR – THE WORST:
- Múltiples marcas de eyector en el interior de la carlinga y las góndolas. Rechupe interno a la altura del borde de salida de las raíces del ala.
- Ejector pins on the fuselage and nacelle interior. Internal sink surfaces on the trailing edge of wing roots.
VALORACIÓN – CONCLUSION:
- La mejor hasta ahora en plástico en serie no limitada. Cuenta con un buen interior y destacan las piezas transparentes. Algo mermada por las abundantes marcas internas, aunque no todas son evidentes. Para el modelista medio, una opción mejor que la de Special Hobby.
- Best Beaufort in non-limited edition so far. It has a nicely stuffed interior and clear parts are remarkable. It is also a bit disappointing due to the sink marks, though not all of them will be visible. For the standard modeller, still a better choice than the Special Hobby kits.

En los últimos años Airfix parece decidida a darle una renovación a fondo a su catálogo y así lo demuestra otra vez con este Beaufort de nuevo cuño, aparecido en la primavera de este año, aunque ya había sido anunciado tiempo antes. Básicamente, hasta ahora teníamos dos maquetas de este avión: el viejo molde de Frog, muy copiado por otros fabricantes, y la de Special Hobby, una buena opción más reciente con resinas y fotograbados, pero no fácil de montar para cualquier modelista ya que se trata de un molde de tirada limitada. La nueva oferta de Airfix amplía las posibilidades para el modelista del común y tal vez no dejará indiferente al experimentado.
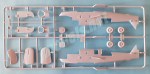
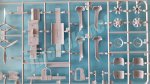
La maqueta está despiezada en cinco bastidores, más uno de piezas transparentes. Las calcas y las instrucciones completan el contenido de la caja. El plástico es marca de la casa en los últimos tiempos: no rígido, pero poco flexible y se dejará mecanizar sin grandes dificultades. Se han dejado demasiadas marcas de eyector en los lados internos del fuselaje, mamparos de la carlinga, las compuertas de la bodega y el interior de las góndolas. La mayoría de ellas no se verán, pero sí las situadas a proa en el interior, que podrán ser evidentes a través del morro acristalado. También parece que la maqueta contiene más puntos de salida del eyector que de costumbre, algunos no tan fáciles de eliminar. En este aspecto, la maqueta queda por debajo de lo esperable.
En cuanto a detalle externo, las líneas de paneles están grabadas con limpieza. No son, desde luego, las “trincheras” de otras ocasiones y creo que a la mayoría de los modelistas pueden valerles en anchura y profundidad. Para mi son un pelín anchas para la escala, pero esto va en gustos. Las superficies de control del empenaje y los alerones me parecen mejor conseguidos y muestran un entelado más realista.
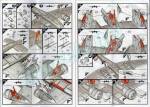
Las opciones de montaje son variadas: tren de aterrizaje plegado o desplegado; bodega abierta con el torpedo visible o cerrada; dos opciones para los flaps interiores; alerones y timón de cola orientables y puesto artillero extra en panel abierto a babor. No es poco. La secuencia de montaje sigue el orden básico de costumbre: carlinga, fuselaje, alas, motores y tren de aterrizaje. La maqueta incluye dos tipos de anillos en la base de la torreta, si bien sólo emplearemos uno de ellos. Ambos están moldeados con el panel situado tras la torre, que tiene perfil ligeramente diferente en las dos piezas. Esto indica que Airfix sacará otros modelos del Beaufort. Esperemos que alguno sea australiano para variar.
Antes de describir el interior, hay que señalar que bastantes piezas contienen marcas negativas de eyector poco profundas. Algunas de ellas serán visibles, por ejemplo, en el puesto de navegante a proa, otras no se verán y hay también algunas en el límite. Toca al modelista decidir cuánto trabajo extra se va a tomar con ellas y dónde. Por lo demás, la carlinga y el resto del interior viene bastante bien detallado, con piezas de correcta definición en general.
El fuselaje está dividido en mitades que incluyen la aleta de cola sin el timón y parte del borde de salida de las raíces alares. Este último ha causado un rechupe en el interior de la carlinga, que afea bastante la zona y se verá en uno de los lados si dejamos el puesto artillero del fuselaje abierto. Por fuera, el detalle general es bueno. En el lado de babor, por ejemplo, observamos los huecos cerrados de los reposapiés de acceso al avión. En el interior, ambas mitades muestran el costillaje de la estructura desde la proa hasta la torreta. También el pozo de la rueda de cola lleva este detalle casi en su totalidad.
El montaje interior está conformado por dos piezas que Airfix ha prolongado con listones laterales de plástico que, pasando a través del fuselaje, servirán de refuerzo al montar las alas. Uno de ellos, el trasero, sirve de soporte al asiento del operador de radio, mientras que el delantero muestra un mamparo con acceso abierto al que va pegado el panel de radio con su tablero horizontal. El panel lleva los instrumentos en relieve sin calca, aunque el tablero es un poco grueso.
Por delante del mamparo, el espacio está dividido por una estrecha consola longitudinal que muestra varias palancas e instrumentos del piloto, cuyo puesto va colocado sobre un suelo separado en el lado izquierdo, mientras que en el lado contrario va un pequeño asiento. La cabina de pilotaje se compone de un asiento, un panel blindado tras él que muestra el reposacabezas, la palanca de control y un buen panel de instrumentos en relieve para el que también hay calca. Los pedales vienen moldeados en una pieza aparte situada bajo el tablero. Completa esta zona el asiento del navegante en el extremo delantero. El medio suelo de este compartimiento proel viene separado y puede añadirse tras pegar el resto de la carlinga a un lado del fuselaje. En esta ocasión Airfix sólo ha incluido una figura de su ya habitual piloto patilargo.
Antes de cerrar el fuselaje, hay que añadir las ventanillas, el panel del puesto de babor, o en su defecto colocar el afuste de la ametralladora (el arma puede añadirse desde afuera más adelante), el cilindro de aire comprimido del sistema neumático, los dos paneles de cierre del pozo trasero, más un mamparo intermedio con acceso abierto a la torreta.
Tras pegar el fuselaje, se añade el anillo de la torre y dos paneles, bien detallados en relieve, que limitan la bodega. La torre defensiva viene bien detallada en general, aunque le falla el armamento. Consta de un anillo, un soporte con el asiento del artillero y el afuste de las ametralladoras y un bastidor externo de refuerzo. Las ametralladoras se parecen un poco a las Vickers de verdad, pero no convencen. La cúpula acristalada se compone de dos mitades muy transparentes, finas y con buena definición en los montantes en relieve. La torreta va pegada desde el exterior del fuselaje y una pieza en forma de U invertida que pegamos después tras ella, permite el giro sin que se salga.
Aunque no todos los Mk. I la llevaban, los dos aparatos elegidos por Airfix muestran la torreta eléctrica bajo el morro. El dispositivo está compuesto de una pieza transparente y una ametralladora en su afuste con mejores hechuras que las Vickers del fuselaje.
El morro acristalado de la maqueta lleva cinco piezas transparentes: una sobre la carlinga del piloto, otra lateral, otra cubre el puesto de navegante y, finalmente, hay una última en posición frontal inferior. Todas las piezas son finas y de excelente factura, con marcos bien moldeados en relieve.
La bodega puede mostrase cerrada mediante una pieza que la cubre completamente, o bien podemos mostrarla abierta, cortando su sección central y dejando tan sólo las compuertas externas. El detalle interno de la bodega viene moldeado en la cara inferior del suelo del fuselaje y es aceptable. El torpedo Mk. XII se compone de mitades, con aletas y espoleta separadas, además de unas aletas adicionales que posiblemente lo estabilizaran a poca profundidad, ya que se empleó en ataques contra buques en puerto. Otras dos piezas aparte representan el sistema de transporte y lanzamiento.
Las alas vienen divididas en dos piezas, con las mitades inferiores encajadas en las superiores para afinar las puntas. Como he mencionado, los flaps interiores y los alerones son piezas separadas, así como las luces dobles de las puntas, que son piezas transparentes. El detalle es bastante bueno en general, destacando la definición de las tomas de refrigeración de aceite en los bordes de ataque, que viene abiertos y muestran el filtro interno. Las caras inferiores llevan también los pozos de las ruedas. El fondo muestra algún detalle en relieve, pero los lados son lisos. Las luces de correteo del ala de babor se han fabricado de una pieza que ha de incluirse dentro del ala. Estos faros van cubiertos por una buena pieza transparente. Los refuerzos laterales que sobresalen del fuselaje parecen más que suficientes para dar rigidez a la unión de alas y fuselaje.
Las superficies de cola comprenden el timón separado, detallado con las luces de navegación de cola, y los estabilizadores, compuestos de dos mitades con los timones de profundidad completos en las mitades inferiores.
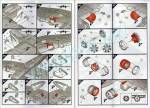
Las góndolas motoras vienen igualmente en mitades sin los capós. Por dentro, la representación de la estructura parece decente, pero está afeada por algunas marcas de eyector. Se han incluido varias piezas que representan parte de la bancada de cada motor. Hay que pegarlas a las alas antes que las góndolas. Los pozos de las góndolas están limitados delante y detrás por paneles con cierto detalle en relieve. Las compuertas vienen de una pieza y muestran buen detalle interno. Hay también piezas alternativas para ponerlas cerradas en vuelo.
Cada capó consta de dos mitades, un anillo de cierre delantero y otro trasero con las aletas de refrigeración cerradas. Cuenta también con una toma de aire superior y el escape, ambos separados. Los motores me parecen convincentes. Se ha fabricado las dos coronas de cilindros completas y el eje de la hélice va en medio. Las hélices poseen buen perfil, pero me parecen un poco grandes y algo gruesas. Los bujes son piezas aparte.
El tren de aterrizaje comprende dos patas con los soportes de plegado separados y las ruedas. Estas vienen en mitades, con neumáticos lisos y detalle aceptable en los bujes. Como en otras maquetas, Airfix las ha moldeado con una sección plana para simular el peso del avión. La rueda de cola está fabricada con la pata.
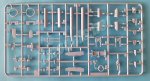
Para no aburrir, no añadiré más sobre las piezas transparentes ya mencionadas. Sólo he de señalar que en el bastidor aparecen otras dos idénticas que representan dos radares direccionales moldeados dentro de carenados en forma de lágrima, lo que certifica que Airfix tiene ya prevista la próxima edición de esta maqueta. Este dispositivo por sí solo no nos dice nada del próximo modelo del Beaufort, ya que se ve en fotos del Mk. I, Mk. II y otros modelos.
Las calcas representan escarapelas británicas, matrículas, números de serie, estarcidos y el panel de instrumentos del piloto. La hoja está bien impresa, en colores saturados y sin exceso de soporte en los motivos.
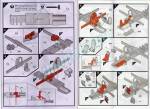
El folleto de instrucciones tiene tamaño A4 y 20 páginas impresas en color. Contiene un resumen histórico y técnico sobre el avión, que, por cierto, no dice nada sobre los Beaufort fabricados en Australia, 107 secuencias de montaje y dos páginas con las opciones de pintura y calcas. Tanto el montaje como sus diferentes alternativas están bien detallados y son claros. Las dos últimas páginas contienen perfiles de dos aviones bien conocidos por sus ataques contra buques alemanes al inicio de la Segunda Guerra Mundial. Esta elección para la primera maqueta me parece muy acertada. Las pinturas, cómo no, son de la gama de Humbrol.
Reconozco que este nuevo Beaufort no es tanto como esperaba de Airfix, pero también es verdad que la maqueta supera con creces a todo lo que había hasta el momento a esta escala en ediciones no limitadas. Sin duda, el detalle general está bien conseguido, aunque podría haber sido mejor de no haberse dejado tantas marcas en el interior. Para el modelista medio, esta es sin duda una opción mejor que la de Special Hobby, al ser más sencilla de montar. Recomendable a cualquiera, excepto a los muy inexpertos.◊


Airfix seems determined to give their catalog a thorough renovation and they prove it again with this new tool Beaufort, released last spring, although it had already been announced some time before. Basically, until now we had two kits of this aircraft: the old Frog tooling, with many reboxes in other brands, and the Special Hobby kits, a good more recent option including resin and photo-etched parts, but not easy to build since it is a short-run kit. The new Airfix offer expands the possibilities for the common modeller and may not leave the experienced indifferent.
The kit is broken up into five sprues, plus one containing the clear pieces. The decal sheet and the instructions complete the box content. Plastic is the typical from the company in recent times: not rigid, but not very flexible, which can be worked without great difficulty. There are too many ejector marks on the fuselage internal sides, cockpit bulkheads and floor, the bomb bay doors, and the interior of the nacelles. Most of them will not be seen, but the ones located on the navigator compartment walls will be visible through the glazed nose. The kit also contains more ejector pins than usual, some not so easy to remove. In this regard, the kit is below expectations.
Regarding external detail, panel lines are cleanly engraved. Of course, they are not the «trenches» seen in other releases and I think most modellers will give them an OK both in width and depth. For me they are a bit wide for the scale, but this goes in taste. Canvas-covered surfaces on the empennage and ailerons look better and more realistic.
Assembly options are varied: landing gear folded or unfolded; open bay with the torpedo visible or closed; two options for interior flaps; posable ailerons and tail rudder and extra gunner station in open hatch to port. It’s not little. The assembly sequence follows the usual basic order: cockpit, fuselage, wings, engines and landing gear. The kit includes two turret rings, though we will only use one of them. Both are molded with the panel behind the turret, which has a slightly different profile in the two pieces. This indicates that Airfix will release other kits of the Beaufort. I hope they include Australian Beauforts for a change.
Before describing the interior, it should be noted that quite a few parts contain shallow negative ejector marks. Some of them will be visible, for example, in the navigator’s position at the bow, others will not be seen and there are also some on the limit. It is up to the modeller to decide how much extra work to take with them and where. For the rest, the cockpit and the rest of the interior is quite well detailed, with parts of overall correct definition.
The fuselage is divided into halves that include the tail fin without the rudder and part of the trailing edge of the wing roots. The latter has caused sink marks on the corresponding interior surfaces, which spoils the nice interior detail and will be seen on one side if we leave the fuselage gun station open. On the outside, overall detail is good. On the port side, for example, we can see the closed gaps of the access footrests. Inside, both halves show the ribbing of the structure from bow to turret. The rear well also shows carries this detail.
The interior assembly is made up of two pieces molded with plastic side slats that, passing through the fuselage, reinforce the wing attach. The rear piece holds the radio operator’s seat, while the front piece shows an open bulkhead with the radio panel and the horizontal board attached. The instrument panel has raised gadgets but there is also a decal for them. The board is a bit thick.
Ahead of the radio compartment, the space is divided by a narrow longitudinal console that shows several levers and instruments for the pilot. The cockpit is placed on a separate floor on the left side, while on the opposite side there is a small seat. The cockpit consists of a seat, an armored panel behind with raised headrest, the control lever and a nice, raised instrument panel which also has an alternative decal. The pedals are molded in a separate piece attached under the panel. The nose also has the navigator´s seat at the front end. The half floor of this forward compartment comes apart and can be added after attaching the interior to the fuselage side. Airfix has only included a figure of their usual long-legged pilot this time.
Before closing the fuselage, the build goes on with the windows, either the port side panel, or the machine gun mount (the weapon can be added from the outside later), the compressed air cylinder of the pneumatic system, and the rear well sides, plus an intermediate bulkhead with an open access to the turret.
After joining the fuselage, attention focuses on the turret. This is nicely detailed, although the armament could be better. The turret comprises a ring, an axle supporting the gunner’s seat and the machine guns mount and an external frame. Machine guns look a bit like real Vickers, but they’re not convincing. The glass dome is made up of two very transparent, thin halves with good definition in the raised frames. The turret is attached from the outside to the fuselage and an inverted U-shaped piece that we then glue behind it, allows it to turn without coming off.
Although not all Mk. Is had one, the kit includes a chin turret. This comprises a clear part and a machine gun in its mount with looks far better the Vickers in the fuselage.
The glass nose has five clear pieces: one on the pilot’s cockpit, another on the starboard side, a third covers the navigator’s position and, finally, there is one in the lower frontal position. All the pieces are thin and nicely molded showing defined frames.
The bay can be shown closed with a piece covering it, or open, trimming the middle section and using only the external doors. The bay floor corresponds to the underside of the fuselage floor and shows acceptable detail. The Mk. XII torpedo is made up of halves, with separate fins and fuse propellers, as well as additional fins that possibly stabilized it at shallow depth, as it was used against moored ships. The launch system is also nicely rendered in two parts.
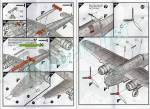
Wings are divided in two pieces, with the lower halves inserted in the upper halves to get thinner tips. As I mentioned, the interior flaps and ailerons are separate pieces, as are the double tail lights, which are clear pieces. The detail is quite good overall, especially the definition of the oil cooling intakes on the leading edges, which are open and show the internal filter. The lower faces also carry the wheel wells. The bottom side shows some raised detail, but the sides are smooth. The port wing trailing lights come in one piece and are attached within the wing. These lights are covered by a nice transparent piece. The long side reinforcement tabs protruding from the fuselage seem more than enough to give wings and fuselage a stiff join.
Tail surfaces comprise a separate rudder, detailed with the navigation lights, and the stabilizers, made up of two halves with elevators molded in the lower halves.
The engine nacelles also come in halves without the engine cowlings. Interior ribbing looks decent, but it’s marred by some ejector marks. There are several pieces to render part of the engine benches. They must be glued to the wings before the nacelles. The wells are delimited by rear and front panels molded with some detail. The doors are one-piece and show nice internal detail. There are also alternative pieces to pose the doors closed in flight.
Each cowling consists of two halves, a front and a rear ring, this having the cooling fins closed. There is also an upper air intake and exhaust, both in separate pieces. The engines seem convincing. The cylinder rows have been completely molded with the propeller shaft in the middle. The propellers have a nice shape and have no flash, but they seem a bit large and somewhat thick. Spinners are separate pieces.
The landing gear comprises two legs with separate folding arms and wheels. These come in halves, with smooth tyres and acceptable detail on the hubs. As in other kits, Airfix has molded them with a flat section to simulate weight. The tail wheel is molded with its leg.
I will not add anything more about the clear pieces already mentioned. I just must point out that the clear sprue contains two similar radars molded inside teardrop-shaped fairings, which proves that Airfix has already planned the next release of this kit. These pieces alone do not tell us much about it, as these radars can be seen in pics of Mk. Is, Mk. IIs, and other types.
The decals include British roundels, codes, serial numbers, stencils and the pilot’s instrument panel. The sheet is well printed, in saturated colors and without excess of carrier film.
The A4 instruction booklet has 20 pages printed in color. It contains a historical and technical summary about the aircraft, which, by the way, does not mention the Australian-made Beauforts, 107 assembly sequences and two final pages with painting and decaling options. Both the assembly and the different alternatives are well detailed and clear. The last two pages contain profiles of two aircraft, well known for their attacks on German warships at the start of World War II. This choice seems clever for the first release. The paints, of course, belong to the Humbrol range.
I admit that this new Beaufort is not as much as I expected from Airfix, but it is also true that the kit far exceeds everything at this scale in non-limited editions. Overall detail is undoubtedly well done, although it could have been better without so many marks on the interior. Being easier to build, this is clearly a better choice than the Special Hobby kits for the average modeller. This new Beaufort can be recommended to any interested modeller, except beginners.◊
Actualizado – Updated: 5 / 2022
Publicado – Published: 8 / 2021
©www.jmodels.net


Debe estar conectado para enviar un comentario.