
De un vistazo – Quick look
MATERIAL Y PIEZAS
MEDIA & PARTS:
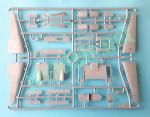
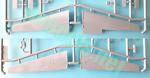
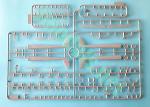
- Plástico inyectado (164 piezas), plástico transparente (19 piezas).
- Injected plastic (164 parts), clear plastic (19 parts).
CALCAS – DECALS:
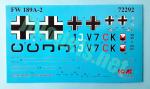
- Cruces balcánicas de diferentes tipos y tamaños, insignias de unidad, matrículas y algunos estarcidos. Aspecto brillante, con buen registro y saturación de color. Sin exceso de soporte.
- Balkan crosses in different types and size, unit badges, registers and some stencils. Glossy appearance, with good register and saturation. No excess of carrier film.
OPCIONES – OPTIONS:
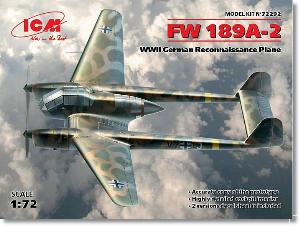
- Focke-Wulf Fw 189A-2. 1.(H)/32. Finland. Summer 1943.
- Focke-Wulf Fw 189A-2. 2.(H)/31. Rostov-on-Don region. January 1943.
INSTRUCCIONES – INSTRUCTIONS:
- Folleto A4 de 16 páginas impreso en blanco y negro. Muestra una breve historia del avión con datos técnicos, un plano numerado de piezas, 68 capítulos de montaje, una página con vistas del modelo terminado, 2 páginas de perfiles en color y una tabla de colores con equivalencias de pinturas de Revell y Tamiya. Claras y bien impresas.
- 16-page A4 booklet printed in black and white. It shows a short history of the aircraft with technical data, a numbered parts plan, 68 construction steps, a page with views of the finished model, 2 pages of profiles in color and a table of colors with matches in Revell and Tamiya paints. Clear and well printed.
LO MEJOR – THE BEST:
- Buen detalle en la carlinga. Líneas de panel y detalle externo. Piezas transparentes. Superficies de control posicionables.
- Nice cockpit detail. Panel lines and external detail. Clear pieces. Posable control surfaces.
LO PEOR – THE WORST:
- Algunas marcas de eyector visibles. Montaje delicado en ciertos ensamblajes.
- Some ejector marks on visible spots. Fiddly assembly in certain construction steps.
VALORACIÓN – CONCLUSION:
- Un gran paso adelante en esta escala. Muy bien detallada por dentro y fuera con algunas zonas menos logradas y marcas no difíciles de eliminar. El montaje no es del todo sencillo, pero sí asequible al modelista medio.
- A great step forward at this scale. Nicely detail inside and outside with some improvable areas and pin marks that won’t be difficult to clean up. Construction is not straightforward but it is suitable for the average modeller.

La maqueta
Hacía mucho tiempo que ninguna marca hacía un Fw 189 en esta escala y solo teníamos las reediciones ocasionales de MPM, Special Hobby o Italeri, hasta que ICM realizó un nuevo molde hace unos años.
A ICM, como a otras marcas, siempre le salen muchos detractores y pocos valedores. Los descontentos suelen criticar su despiece excesivo, las piezas delicadas y frágiles, o ese plástico tan particular que en muchas ocasiones emplea, especialmente notable al tacto y también al peso, pues los bastidores engañan cuando uno los toma en la mano. A esta maqueta le ocurre todo lo anterior pero igualmente posee otros aspectos muy destacables que, en justicia, también se deben reivindicar.
La maqueta comprende dos bastidores de piezas grises, un bastidor de piezas transparentes, la hoja de calcas y las instrucciones. Como de costumbre en ICM, el contenido está bien protegido en una caja de cartón rígido con sobrecubierta.
El plástico es más bien blando y tal vez con excesiva flexibilidad. Esto se nota más en las piezas de mayor tamaño. Las piezas están bien moldeadas y gran parte de ellas poseen un tamaño muy pequeño. Bastantes menos son frágiles y necesitan cuidado al manipularlas. No aprecio rebabas ni deformaciones. Las marcas de eyector son en su mayor parte invisibles tras montar la maqueta. Las más evidentes están situadas en el asiento del piloto y navegante, el cono de la torreta trasera y en los lados de la carlinga.
El detalle externo de esta maqueta es muy notable y hay que reconocer que ICM le ha puesto empeño. Las líneas de panel son finas y están muy bien grabadas. Los paneles de mantenimiento y accesos también están grabados con precisión, algunos remachados con finura. También hay detalles reproducidos en relieve con acierto, como los refuerzos de los encastres de las alas o las líneas de la estructura situadas junto a ellas. No queda atrás tampoco el detalle en las piezas menores, como las ametralladoras o la rueda de cola.
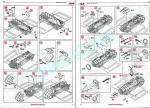
ICM ha planificado un montaje muy sensato por zonas del avión, que comienza por la carlinga, seguido de la zona intermedia de las alas, las góndolas, el doble fuselaje y cola, las alas, los motores y finalmente el tren de aterrizaje. Con la adición del armamento subalar y pocos detalles más, el modelo estará completo.
La maqueta es básicamente la misma que la versión A-1 del fabricante con cambio en el armamento y en el cono posterior del fuselaje. La única alternativa de montaje es el panel acristalado de la torreta dorsal, que puede ser plano o abultado dependiendo del aparato de las instrucciones que elijamos hacer.
Carlinga
El montaje combina el detalle de la propia carlinga con el de la mitad inferior de la sección central de las alas donde aquella va pegada. La carlinga contiene un suelo completo con dos zonas texturizadas de manera diferente, una de ellas es la colchoneta del ametrallador de cola. Los lados de la carlinga están panelados en relieve y en la parte externa muestran los encastres para unir las mitades superiores de la zona central de las alas.
En la zona anterior la carlinga tiene el asiento del piloto, unos controles muy finos separados en dos piezas, los pedales y la consola de las palancas de gases. Lo único que ICM no ha incluido es la mira de bombardeo y la de las ametralladoras fijas de las alas. El panel de instrumentos va pegado en la pieza transparente superior del morro acristalado. El panel muestra los indicadores en relieve.
Junto al piloto hay piezas para colocar la base y el asiento del navegante. Tras el piloto hay un panel de forma triangular con algunos instrumentos en la pieza, la barra antivuelco pegada a los lados de la carlinga, paneles separados para las radios, tres piezas cilíndricas que tienen aspecto de ser las cámaras fotográficas, y varias cajas de munición de ametralladora. Falta el motor de la torreta de cola pero se puede simular fácilmente con una pieza cilíndrica.
Con el morro y la cubierta acristalada hay que proceder con un extra de paciencia y cuidado. Todas las piezas transparentes que los componen son finas y tienen la estructura bien reproducida en relieve.
Por comodidad para el fabricante pero no tanto para el modelista, el morro está dividido en cuatro piezas, dos de ellas más pequeñas situadas a los lados. Lo único positivo es que los paneles separados hay que unirlos antes de pegar el morro en el fuselaje.
La cubierta de la carlinga está dividida en dos piezas laterales unidas por otra de plástico que simula la escotilla del techo. La zona dorsal tiene dos piezas, una de ellas opaca que tiene grabados los paneles de acceso a la carlinga junto con las asas de apertura poco definidas. El panel acristalados situado tras la carlinga muestra el hueco de la torre dorsal, provista de un anillo de plástico con el afuste de las ametralladoras y la cúpula transparente que, como he dicho, tiene dos opciones. Las armas me parecen muy bien reproducidas para ser de plástico.
Los paneles superiores de cola vienen en una pieza con dos transparentes laterales separados que salvan el escalón del fuselaje. Esta zona lleva también dos pequeñas ventanillas pegadas desde fuera en la zona del ametrallador trasero. La torreta de cola dispone de un anillo de plástico interno para pegar sobre él otro anillo con el afuste del armamento, un panel cónico opaco y otro transparente. Las ametralladoras son idénticas a las dorsales.
Sobre la zona intermedia de las alas y bajo el fuselaje hay que colocar el mástil de la radio, dos carenados, uno de ellos transparente, y la escalerilla de acceso en la parte trasera.
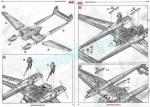
Alas
La zona intermedia de las alas está dividida en mitades. La que soporta la carlinga lleva unidos los huecos de los pozos de las ruedas. La pieza superior muestra los encastres del fuselaje auxiliar y en la cara inferior el interior de los pozos sin detalle y con una pequeña marca de eyector. Esta pieza lleva también un par de piezas separadas simulando las troneras de las ametralladoras alares pero no vienen abiertas. Los flaps centrales vienen separados y pueden situarse en posición no neutra. La zona anterior está detallada con un panel que representa la estructura interna del fuselaje visible a través del morro.
El resto de las alas está despiezado en mitades unidas a las lengüetas moldeadas en la sección central. Además de lo mencionado al inicio de este artículo, el detalle externo muestra las luces de las puntas, el faro de aterrizaje en pieza transparente, el tubo pitot y el armamento subalar, que comprende cuatro bombas en mitades con aletas separadas y finas. Los soportes llevan las abrazaderas separadas.
Los alerones son finos y están detallados con la aleta y el relieve de la estructura interna, aunque no es muy convincente. Los flaps, sin embargo, viene en mitades con la cara superior unida al ala y la inferior separada y detallada por dentro. Tanto los alerones como los flaps son posicionables.
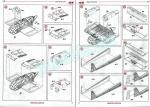
Fuselaje auxiliar, motores y cola
El fuselaje auxiliar lo forman mitades moldeadas con las aletas de cola y los timones separados. Van unidos con lengüetas a la parte posterior de las góndolas motoras.
Las mitades de las góndolas muestran varias marcas en el interior. Las cubiertas de los motores vienen separadas con las salidas de los escapes aparte y horadadas. La cara frontal de los motores está igualmente moldeada en otra pieza que muestra las dos tomas laterales abiertas y la central detallada con una pieza situada tras ella.
Las hélices son finas y bien perfiladas, pero me parecen algo estrechas y demasiado puntiagudas. El buje tiene las aletas de control del paso variable en una pieza aparte y cuenta con una base provista del eje de la hélice.
Las aletas verticales tienen un panelado bastante bueno. Las superficies de los timones dejan que desear pero al menos se les ha reproducido los actuadores y las luces de navegación. Los timones pueden colocarse en posición no neutra.
Las superficies horizontales se componen de tres piezas. Los estabilizadores vienen en mitades, lo mismo que el timón de profundidad, separado y posicionable. El pozo de la rueda de cola viene moldeado en la mitad superior y muestra un detalle mejor del habitual en esta escala y no tiene marcas. En este caso, el detalle en la superficie del timón es mucho mejor que en los demás.
Tren de aterrizaje
Los amortiguadores están separados en dos piezas colocadas a ambos lados de las ruedas en cada pata. Las piezas son finas y el montaje no es tan sencillo como pueda aparentar. El detalle tienen nitidez salvo en los propios amortiguadores, que parecen poco definidos. El mecanismo de retracción es de una pieza, fina y bien detallada. Los guardabarros poseen una finura pasable y una marca en el interior que será invisible con la rueda colocada. Las ruedas están plasmadas en mitades y las veo bien reproducidas. Tanto las llantas, que están marcadas, como los neumáticos muestran gran definición. Estos tienen el dibujo finamente grabado incluso en la banda de rodadura. Las tapas de los pozos están separadas y poseen detalle en el lado interno.
La rueda de cola está unida a la pata. La pieza es destacable por la reproducción de la amortiguación y de la misma rueda, que posee llantas radiales de gran nitidez. La tapa del pozo, por contra, no parece lo bastante fina y tiene una marca en la cara interna.
Calcas
La hoja muestra cruces balcánicas de diferentes tipos y tamaños, insignias de unidad, matrículas y algunos estarcidos. Las calcas presentan aspecto brillante, con buen registro y saturación de color. No tienen exceso de soporte.
Instrucciones
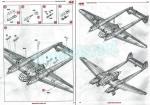
Consisten en un folleto de tamaño A4 de 16 páginas impreso en blanco y negro. Muestra una breve historia del avión con datos técnicos, un plano numerado de piezas, 68 capítulos de montaje, una página con vistas del modelo terminado, dos páginas de perfiles en color y una tabla de colores con equivalencias de pinturas de Revell y Tamiya. Las secuencias de montaje son bastante claras.
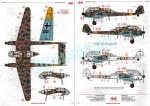
Dentro de su escaso número, los perfiles para pintar la maqueta son variados y nos presentan dos aviones, uno pintado con camuflaje de verano y el otro invernal situados en el Frente Oriental y Finlandia.
Valoración
Siendo una maqueta de amplia tirada, este Fw 189 supone un gran paso adelante respecto a lo que teníamos hasta ahora. El detalle de la carlinga es superior al que normalmente encontramos en esta escala y el externo es también muy notable en general, con el único inconveniente de algunas marcas que ICM ha dejado pero que no suponen ningún reto para el modelista medio. El montaje no es del todo sencillo en algunas fases y tal vez por ello no se puede recomendar a los menos expertos.
Creo que lo que viene en la caja da para hacer un modelo destacable de este avión. Los que deseen ponerle algo más, tienen varias mejoras disponibles en el mercado, por no hablar de calcas alternativas. A este respecto, lo que sí es imprescindible es un juego de mascarillas para poder pintar las numerosas piezas transparentes con mucha más facilidad. Afortunadamente también de esto hay variada oferta en el mercado.◊


The kit
It had been a long time since any brand released a Fw 189 in this scale and we only had the occasional reboxes from MPM, Special Hobby or Italeri until ICM released new tool kits a few years ago.
ICM, like other brands, always have many detractors and few supporters. Dissatisfied modellers tend to criticize the excessive breakup, the brittle parts, or that very particular plastic the company often uses, especially noticeable when touched or weighed as the frames seem a different thing when you hold them in your hand. All of the above happens to this kit too but it also has other very remarkable aspects that, in fairness, should also be claimed.
The kit includes two sprues of grey parts, a clear sprue, the decal sheet and the instructions. As usual with ICM, the contents are well protected in a rigid cardboard box with separate cover.
Plastic is rather soft and a bit too flexible. This is more noticeable in the larger parts. Pieces are well molded and many of them are very small. A few of them are brittle and need care when handling them. I don’t notice blemishes or flash on parts. The ejector marks are mostly invisible after assembly. The most evident are located in the pilot and navigator’s seats, the fuselage cone and on the cockpit sidewalls.
External detail is remarkable and should be admitted that ICM have taken the trouble with it. Panel lines are fine and very well engraved. The maintenance and access panels are also precisely engraved and some finely riveted. There are also raised details successfully rendered, such as the detail on the wing inserts or the structural lines located next to them. Detail in the smaller parts, such as the machine guns or the tail wheel, is not behind either.
Assembly is quite well thought out and consists of subassemblies, starting with the cockpit, followed by the wings centre section, the nacelles, the twin booms and tail, the wings, the engines and finally the landing gear. With the addition of the underwing armament and a few other details, the model will be complete.
The kit is basically the same as ICM’s A-1 version with a change in the armament and the rear fuselage cone. The only assembly alternative is in the glass panel of the dorsal turret, which can be flat or bulged depending on the version we choose from the instructions.
Cockpit
Construction starts combining the cockpit assembly with that of the lower half of the wings centre section where the cockpit is attached. The cockpit contains a full floor with two differently textured areas, one of which is the tail gunner’s mat. The cockpit sidewalls show the structural panels and they are molded with the wing roots on the outside.
In the front area, the cockpit has the pilot’s seat, very thin two-piece controls, the pedals and the throttle lever console. The only thing that ICM have not included is the bombsight and the wing machine guns sight. The instrument panel is glued to the upper clear piece of the glazed nose. The panel shows raised gadgets.
Next to the pilot there are pieces to place the navigator’s seat. Behind the pilot there is a triangular panel with some instruments in the piece, the roll bar attached to the cockpit sides, separate radio panels, three cylindrical pieces that look like cameras, and several ammo boxes for the machine guns. The cone turret drive motor is missing but can be easily simulated with a cylindrical piece.
Extra patience and care is needed to build the nose and fuselage glazing. All the clear pieces in the kit are thin, transparent and have nice raised frames.
For convenience for the manufacturer but not so much for the modeller, the nose is divided into four pieces, two of them smaller and located on the sides. The only positive thing is that the separate side parts are attached before gluing the nose to the fuselage.
The canopy and dorsal surfaces are divided into two side pieces joined by another plastic piece that simulates the roof hatch. The dorsal area has two pieces, one of them opaque that show engraved access panels along with poorly defined entry handholds. The glazing located behind the cockpit shows the opening of the dorsal turret, provided with a plastic ring with the machine gun mount and the clear dome which, as said, has two alternatives. The weapons look really nice for the media.
The upper tail glazing come in one piece with two separate side clear pieces attached just on the fuselage step. There are also two small windows attached from the outside onto the rear turret sides. The cone turret has an internal plastic ring with a further ring containing the machine guns mount, an opaque conical panel and a clear glazing. The machine guns are identical to the dorsal ones.
Under the fuselage detail includes the radio mast, two teardrop fairings, one of them clear, and the access ladder attached to the rear fuselage.
Wings
The wings centre section is divided in halves. The lower side has the wheel well gaps in the piece. The upper side shows inserts for the tail booms and on the lower face the interior of the wells with no detail and a small ejector mark. The machine gun ports are separate but they are not open. The flaps are separate and can be placed in a non-neutral position. The centre section front side is detailed with a panel rendering the fuselage internal structure visible through the nose glazing.
The rest of the wings are broken into halves attached to tabs molded on the center section. In addition to what I mentioned at the beginning of this article, external detail shows the wingtip lights, the landing light in a clear piece, the pitot tube and the underwing armament, which includes four bombs in halves with separate and thin fins. The pylons have separate sway braces.
The ailerons are thin and come detailed with the fin raised internal structure but this is not very convincing. The flaps, however, come in halves with the upper side attached to the wing and the lower one separated and detailed inside. Both ailerons and flaps can be shown lowered or raised.
Tail booms, engines and tail
Tail booms comprise two halves molded with the tailfins and separate rudders. They are attached with tabs to the engine nacelles.
The nacelles have several pin marks on the inside. The cowlings are separate with open exhaust pipes molded apart. The engine front is also separate and shows two open side intakes and the central one detailed with a piece behind the intake opening.
The propellers are thin and well profiled, but they seem a bit narrow and too pointed. The hub has the variable pitch control vanes in a separate piece and has a baseplate provided with the shaft.
The vertical fins show pretty good panels while the rudders leave something to be desired but at least the actuators and navigation lights are there. The rudders can be placed in a non-neutral position.
The horizontal surfaces are made up of three pieces. The stabilizers come in halves, the same as the elevator, which is separate and positionable. The tailwheel well is molded on the top half, shows better detail than usual in this scale and is free from marks. In this case, detail on the rudder surface is much better.
Landing gear
The shock absorbers are separated into two pieces placed on both sides of the wheels on each leg. The pieces are thin and assembly is not as simple as it may seem. Detail is nice except for the shock absorbers themselves, which look poorly defined. The retraction mechanism is one piece, fine and well detailed. The mudguards have passable thickness and a mark on the inside that will be invisible with the wheel attached. The wheels are molded in halves and look fine. Both the rims and the tires show great definition. These have the tread pattern finely engraved. The well covers are separated and detailed on the internal sides.
The tailwheel is attached to the leg. The piece is remarkable for the rendition of the oleo struts and the wheel itself, which has very sharp radial rims. As a contrast, the cover is not thin enough and has a mark on the inside.
Decals
The sheet shows Balkan crosses of different types and sizes, unit badges, registers and some stencils. Decals have a glossy appearance, with good registration and color saturation. They do not have too much carrier film.
Instructions
They consist of a 16-page A4 booklet printed in black and white. It shows a brief history of the aircraft with technical data, a numbered parts plan, 68 assembly chapters, a page with views of the finished model, two pages of color profiles and a color chart with Revell and Tamiya paint equivalencies. Construction steps are quite clear.
Considering their number, the profiles to paint the model are varied and depict two aircraft, one painted in summer camouflage and the other in winter camouflage located on the Eastern Front and Finland.
Conclusion
Being a mainstream kit, this Fw 189 is a big step forward compared to what we had until now. Cockpit detail leaves behind what we normally find in this scale and external detail is also very remarkable in general, with the only drawback being some pin marks that ICM left but they are not any challenge for the average modeller. Assembly is not that simple in some construction steps and for this reason it cannot be recommended to beginners or the less expert.
I think that what comes in the box makes for a remarkable model of this aircraft. Those who wish to add something more have a plethora of aftermarkets available, not to mention alternative decals. In this regard, a set of masks seems essential to paint the sundry clear pieces much more easily. Fortunately, there is also a varied offer of this on the market.◊
Publicado – Published: 4 / 2024
©www.jmodels.net


Debe estar conectado para enviar un comentario.