

De un vistazo – Quick look
MATERIAL Y PIEZAS
MEDIA & PARTS:
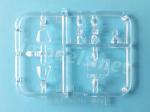
- Plástico inyectado (56 piezas), plástico transparente (6 piezas). Incluye 1 figura.
- Injected plastic (56 parts), clear plastic (6 parts). One figure included.
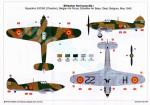
CALCAS – DECALS:
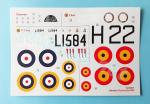
- Insignias británicas y belgas, matrículas, insignias de unidad, panel de instrumentos y algunos estarcidos. Muestran apariencia fina y colores saturados. Tienen buen registro y escaso soporte sobrante.
- British and Belgian roundels, registers, unit badges, instrument panel and some stencils. Apparently thin and color saturated. Printed in good register without too much carrier film.
OPCIONES – OPTIONS:
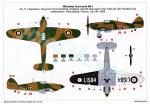
- Hawker Hurricane Mk.I. Escuadrilla N.º 111 de la RAF. Base de Northolt (Inglaterra). Avión presente en el festival aéreo del Día de la Bastilla. Villacoublay (Francia). 9 de julio de 1938.
- Hawker Hurricane Mk.I. Fuerza Aérea Belga. Escuadrilla 2/I/2AÉ (Chardon). Base Aérea de Schaffen, Diest (Bélgica). Mayo de 1940.
- Hawker Hurricane Mk.I. RAF No. 111 Squadron. Royal Air Force Northolt (England). Aircraft present in the “Fête de l’Air” Bastille Day. Villacoublay (France). July 9th 1938.
- Hawker Hurricane Mk.I. Belgian Air Force. Squadron 2/I/2AÉ (Chardon). Schaffen Air Base, Diest (Belgium). May 1940.
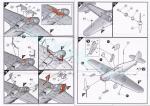
INSTRUCCIONES – INSTRUCTIONS:
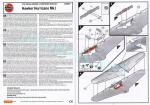
- Folleto A4 de 8 páginas impresas a color. Contiene una breve reseña histórica sobre el avión y 20 capítulos de montaje. Una hoja separada del mismo tamaño e impresa en color muestra perfiles y colores en códigos de pinturas esmalte de Humbrol.
- 8-page A4 brochure printed in color. It shows a short historical summary about the aircraft and 20 assembly steps. A separate A4 sheet printed in color shows profiles and paints from Humbrol enamel range.
LO MEJOR – THE BEST:
- Muy buen detalle externo. Carlinga. Pozos de las ruedas. Cubierta de la carlinga en dos piezas. Buena relación calidad-precio.
- Very nice external detail. Cockpit. Wheel wells. Two-piece canopy. Good value for money.
LO PEOR – THE WORST:
- Algunas marcas visibles en el interior de los pozos.
- A few visible marks inside the wheel wells.
VALORACIÓN – CONCLUSION:
- Muy buena maqueta de un Hurricane inicial y alternativa a otras con más detalle pero destinadas a modelistas experimentados.
- Very nice kit of an early Hurricane and an alternative to others aimed at experienced modellers.

La maqueta
El Hawker Hurricane inicial ha sido reproducido por muchas marcas conocidas a lo largo de los años, pero es en tiempos recientes cuando este modelo tan particular del famoso caza parece vivir su mejor momento tras los recientes lanzamientos de Arma Hobby y Eduard. Ambas maquetas tienen un gran nivel de detalle e incluyen piezas en diferentes materiales que las hacen más adecuadas para modelistas con experiencia.
Hace algo más de tiempo, Airfix le dio un cambio a su viejo Mk. I y nos trajo esta maqueta de nuevo cuño, más sencilla pero mucho mejor que las de su molde anterior. Sin llegar al nivel de las las marcas mencionadas, esta edición también tiene ventajas muy evidentes para los que prefieren trocar algún detalle por la sencillez de montaje sin perder demasiado en el cambio.
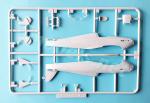
La caja trae cinco bastidores de piezas de distinto tamaño, además de un bastidor transparente, las calcas y las instrucciones. Las piezas están muy bien moldeadas, son finas y carecen de rebabas evidentes. Hay marcas de eyector en la parte posterior de la carlinga pero no se ven al instalar el asiento, mientras que las de los pozos, por fortuna no muy profundas, deberían rellenarse. En mi opinión, esta maqueta destaca por su magnífica reproducción de las superficies externas en las alas y el fuselaje, que está muy por encima de otras maquetas recientes de la casa.
La maqueta cuenta con la opción de poner las ruedas plegadas y además hay alternativas para la parte inferior del puro de cola. Hay otras piezas incluidas en un pequeño bastidor que no usaremos en esta versión, como una hélice tripala, un parabrisas y el timón de dirección. En los dos últimos no encuentro diferencias entre los que deberemos emplear en la maqueta y sus alternativas.
Las opciones de pintura de este Mk. I son bien conocidas y al menos la de la Escuadrilla Nº 111 de la RAF también ha sido empleada por otros fabricantes como Sword. Ambas aparecen publicadas en el libro The Hawker Hurricane I, número 111 de la vieja colección Profile Publications. Los dos aviones representan uno de los primeros Hurricane de serie con alas enteladas, hélice bipala Watts y motor Merlin II. Con estas características fue recibido el Hurricane en las primeras unidades de la RAF que lo operaron en el año y medio anterior a la Segunda Guerra Mundial y en la Batalla de Francia. El bajo rendimiento del entelado y la hélice condujeron a una actualización de los aparatos para dotarlos de hélices tripalas Rotol y recubrir sus alas con paneles metálicos. Con esta configuración tomaron parte en la Batalla de Inglaterra, ya en 1940.
Carlinga
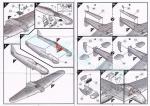
De acuerdo con las instrucciones, el montaje de esta maqueta en realidad comienza por las alas, pero seguiré la descripción más usual empezando por la carlinga.
Los lados internos de la carlinga tiene representados paneles e instrumentos sin demasiado detalle, sólo el suficiente para que no aparezcan vacíos. El estrecho suelo de la carlinga, los pedales y la palanca de control son piezas separadas y van colocados sobre el espacio intermedio entre ambas alas. El suelo está bien detallado, pero los pedales parecen un poco grandes.
En cambio, el asiento y el panel de instrumentos están unidos a los lados de la carlinga. El panel va unido a una estructura tubular fina y también a una pieza que representa el compás giroscópico. Los instrumentos vienen en una calca. La estructura va unida a su vez a la del mamparo trasero, que soporta el asiento. Este viene muy bien moldeado aunque tiene una ligera marca de eyector en el respaldo trasero que debería rellenarse.
Fuselaje y motor
El fuselaje está dividido en mitades moldeadas con la aleta vertical sin el timón de dirección. También carece de la parte inferior del puro de cola porque es opcional. El aparato belga llevaba un filete de carena de la rueda de cola y el británico carecía de él. Airfix ha logrado captar bien el perfil que le daba el motor Merlin II al morro de este modelo.
Los paneles grabados en las dos mitades son muy finos y creo que convencerán a los más exigentes. Algunos de ellos aparece además remachados. La textura de la estructura tubular trasera del fuselaje está conseguida con mucho acierto presentando un leve relieve tenue que sin embargo se dejará apreciar tras pintar el modelo.
El mástil de la antena y el tubo Venturi son piezas aparte. También lo son los escapes, correctos para este modelo, que se insertan en las ranuras del fuselaje. La hélice bipala Watts está muy bien reproducida en una pieza fina y excelentemente perfilada unida al buje, que también muestra perfil correcto. El cubo de la hélice es una pieza separada y va pegada a un cilindro que permite unir el eje de la hélice. El cilindro y la hélice se colocan de manera sencilla introduciéndolos en el hueco del morro.
Las dos tomas ventrales están muy bien perfiladas y viene abiertas. La entrada de aire al sobrealimentador está situada por delante de la del carburador, que tiene en su interior dos paneles detallados y una aleta de salida muy fina.
La cubierta transparente viene en dos piezas, ambas finas y con una buena representación tanto de la estructura exterior como del parabrisas.
La figura del piloto, patilargo y con la cabeza muy menuda, es bastante mala, pero a algunos les puede servir para cubrir la ausencia de cinturones si no disponen de alguna mejor en la caja de sobras.
Alas y cola
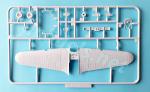
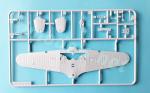
Las alas están separadas en dos piezas. Las superficies superiores vienen unidas para situar en su cara superior el suelo de la carlinga y por abajo el fondo de los pozos de las ruedas. El detalle en los paneles y en las superficies enteladas es verdaderamente encomiable y de hecho es el mayor punto fuerte de esta maqueta con el que puede competir con otras más recientes.
Las superficies de control están bien representadas, así como multitud de detalles como los carenados de las bisagras, los huecos de los expulsores de los casquillos, las luces de las puntas, o los paneles de acceso al armamento. Las luces de aterrizaje vienen en piezas transparentes y las troneras de las ametralladoras están ahuecadas. Además de las luces, sólo hay que colocar el tubo Pitot.
Las superficies de cola viene también muy bien detalladas, destacando los timones de profundidad y el suave entelado de las superficies. El timón vertical está separado e incluye el mástil de la antena y la luz de cola, ambos bien reproducidos.
Tren de aterrizaje
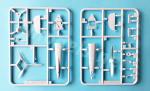
Los pozos cuentan con varias piezas detalladas para representar los lados internos y algunos dispositivos colocados dentro de ellos. El tren principal puede ponerse plegado, para lo cual hay dos piezas que simulan las tapas y ruedas.
El tren desplegado comprende tapas finas y detalladas en los lados internos y patas moldeadas con uno de los brazos de plegado. El segundo brazo lateral viene separado. El detalle de la amortiguación y engranajes resulta convincente. Las ruedas están hechas de una pieza y muestran el buje bien detallado en su cara externa y ahuecado. Los neumáticos tiene una sección algo más plana para simular el peso. La rueda de cola está fabricada de una pieza con su soporte.
Calcas
La hoja de calcas contiene escarapelas británicas y belgas, matrículas, insignias de unidad, el panel de instrumentos y algunos estarcidos, todos ellos están impresos con apariencia fina, colores saturados, buen registro y escaso soporte sobrante.
Instrucciones
Un folleto de tamaño A4 de 8 páginas en color contiene una breve reseña histórica sobre el avión y veinte capítulos de montaje. Una hoja separada del mismo tamaño e impresa también en color muestra perfiles y colores con los códigos correspondientes a pinturas esmalte de Humbrol.
Valoración
Sin lugar a dudas Airfix hizo un gran trabajo en esta maqueta, sobre todo en la reproducción del detalle externo. Parece justo reconocérselo, especialmente si se considera que no emplea piezas en otros soportes distintos al plástico, lo cual es jugar con desventaja (bien es cierto que voluntariamente) respecto a otros competidores.
Para muchos modelistas las piezas de fotograbado y de otros materiales no son un plato de gusto, por ello creo que esta maqueta es una buena alternativa, y también más barata, a las que otras marcas ofrecen de un Hurricane inicial. También me parece mucho más adecuada que otras para modelistas con escasa experiencia.◊

The kit
The early Hawker Hurricane has been kitted by many well-known companies over the years, but it is in present times when this very particular model of the famous fighter seems to be living its finest hour with the recent releases from Arma Hobby and Eduard. Both kits are highly detailed and include parts in different materials that make them more suitable for experienced modelers.
Some time ago, Airfix decided to refresh their old Mk. I and gave us this new-tool kit. Without reaching the level of the aforementioned manufacturers, this edition also has very obvious advantages for those who prefer to exchange some detail for ease of assembly without losing too much in the deal.
The box contains five sprues, a clear sprue, the decals and the instructions. Parts are very well moulded, thin and free from blemishes. There are ejector marks on the rear cockpit sides but they are not visible when installing the seat, while those in the wheel wells, fortunately not very deep, should be filled. In my opinion, this kit stands out for its superb rendition of the external surfaces on wings and fuselage, which is way ahead other kits of the British company.
The kit has the choice to build the wheels folded and there are also alternatives for the lower part of the rear fuselage. There are other parts included in a small sprue that we will not use in this version, such as a three-bladed propeller, a windshield and the rudder. I find no differences between the parts we should use in the kit and their alternatives in the last two cases.
The two paint finishes suggested in the instructions are well known and at least that of RAF No. 111 Squadron has also been used by other manufacturers such as Sword. Profiles of both aircraft were published in the book The Hawker Hurricane I, number 111 of the old Profile Publications collection. The two aircraft represent one of the first production Hurricanes with tapered wings, a Watts two-bladed propeller and a Merlin II engine. With these features the Hurricane was adopted in the first RAF units that operated it in the year and a half before the Second World War and in the Battle of France. The poor performance of the tapered surfaces and the propeller led to an upgrade of the aircraft, which was provided with a Rotol three-blade propeller and stressed metal skin on the wings. With this configuration they took part in the Battle of Britain in 1940.
Cockpit
According to the instructions, assembly actually starts with the wings, but I’ll follow the more usual description starting with the cockpit.
The inner cockpit sides have panels and instruments thah look a bit soft. The narrow cockpit floor, pedals and control stick are separate parts and are attached on the surface between the two wings. The floor is well detailed, but the pedals seem a bit large.
Instead, the seat and instrument panel are attached to the cockpit sides. The instrument panel is attached to a thin tubular structure and also to a piece that represents the gyroscopic compass. The instruments come in a decal. The structure is in turn attached to the rear bulkhead, which holds the seat. This one comes nicely molded although it does have a slight ejector mark on the rear seatback that should be filled.
Fuselage and engine
The fuselage is divided into halves molded with the vertical fin but without the rudder. It also lacks the lower rear section of the tail because it is optional. The Belgian aircraft had a tail wheel fairing fillet but the British Hurricane sported a flat surface instead. Airfix has managed to capture the profile that the Merlin II engine gave to the Mk. I nose.
The engraved panels on the two halves are very thin and I think they will convince the most demanding modeller. Some of them are also riveted. The texture of the rear fuselage tubular structure is successfully achieved, showing a slightly raised texture that will be noted after painting the model.
The antenna mast and the Venturi tube are separate parts. So are the exhausts, correct for this mark, which are inserted into fuselage slots. The Watts two-bladed propeller is very well reproduced in a thin, profiled piece molded with the spinner and shows a correct profile. The propeller hub is a separate piece attached to a cylinder that allows to insert the propeller shaft. The cylinder and propeller are easily fitted by inserting them into the nose.
The two ventral intakes are correctly moulded and are open. The supercharger air intake is located ahead of the carburettor intake, which has two detailed panels inside and a very thin rear fin.
The clear canopy comes in two pieces which look thin and show a nice rendition of both the exterior frame and the windshield.
The pilot figure, long-legged and with a very small head, is quite bad, but for some it can be useful to fill the lack of seatbelts if they don’t have a better one in the spare box.
Wings and tail
The wings are separated in two pieces. The upper surfaces are joined to attach the cockpit floor on the upper side and the bottom side is the bottom of the wheel wells. Detail on the panels and on the tapered surfaces is really nice and this is in fact the best asset of the kit.
Control surfaces are nicely represented but also many other details such as the faired hinges, the ammo chutes, the wingtip lights or the armament access panels. The landing lights come in clear pieces and the machine gun ports are hollowed. Apart from the lights, you just have to attach the Pitot tube.
Tail surfaces are also very well detailed and a special reference should go to the elevators and the soft tapered surfaces. The vertical rudder is separate and includes the antenna mast and the tail light, both well moulded.
Undercarriage
The wells feature a few detailed pieces for the internal sides and some items placed inside them. The main undercarriage can be shown folded, for this there are two pieces that include the covers and wheels.
The unfolded legs include finely detailed covers and legs moulded with one of the folding arms. The second side arm comes separate. The shock absorbers and the torque arms are realistic. The wheels are made in one piece and show detailed outer hubs. The tires have a slightly flat section to simulate weight. The tail wheel is made in one piece with the leg.
Decals
The decal sheet contains British and Belgian roundels, registers, unit badges, the instrument panel and some stencils. All of them are printed with a fine look, saturated colours, good registration and little excess of carrier film.
Instructions
An 8 page A4 color brochure contains a brief historical summary of the aircraft and twenty assembly chapters. A separate sheet of the same size, and also printed in color, shows profiles and paints from the Humbrol enamel range.
Conclusion
Unquestionably Airfix did a great job in this kit, especially in the rendition of the external detail. It seems fair to recognize it, especially if one considers that the manufacturer only uses plastic parts, this means a disadvantage when compared to other competitors.
For many modelers photo-etched parts and resins are not their cup of tea, so I think this kit is a nice and inexpensive alternative for an early Hurricane. It also seems much more suitable for the less experienced modellers.◊
Publicado – Published: 4 / 2023
©www.jmodels.net


Debe estar conectado para enviar un comentario.