
De un vistazo – Quick look
MATERIAL Y PIEZAS
MEDIA & PARTS:
- Plástico inyectado (94 piezas), plástico transparente (10 piezas). Incluye 2 figuras (4 piezas).
- Injected plastic (94 parts), clear plastic (10 parts). Two figures included (4 parts).
CALCAS – DECALS:
- Cruces alemanas, escarapelas italianas y británicas, matrículas, panel de instrumentos, decoraciones del fuselaje y numerosos estarcidos. Aspecto fino y mate. Buen registro y sin exceso de soporte. Bien impresas.
- German crosses, British and Italian roundels, registers, instrument panel, nose arts and stencils. Matt and thin appearance. Good register without too much carrier film. Well printed.
OPCIONES – OPTIONS:
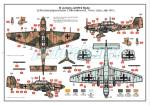
- Junkers Ju87B-2 Stuka. 6./Sturzkampfgeschwader 2 Immelmann. Tmimi (Libia), Julio de 1941.
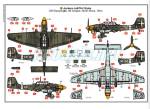
- Junkers Ju87R-2 Stuka. Regia Aeronautica. 209ª Squadriglia. 96º Gruppo. Norte de África, 1941.
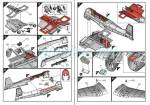
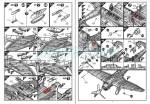
INSTRUCCIONES – INSTRUCTIONS:
- Folleto de tamaño A4 de 12 páginas impreso en color. Contiene una breve historia del avión con datos técnicos, 48 secuencias de montaje y dos páginas de perfiles. Las referencias de color aparecen en pinturas esmalte de Humbrol. Claras y bien impresas.
- 12-page A4 brochure printed in color. It shows a short history of the aircraft with technical data, 48 assembly chapters and 2 pages of profiles. Color references are given in Humbrol enamel paints. Clear and well printed.
LO MEJOR – THE BEST:
- Carlinga. Panelado. Opciones de montaje.
- Cockpit. Recessed panels. Assembly alternatives.
LO PEOR – THE WORST:
- Unión del fuselaje y alas un tanto complejo.
- Fuselage and wing join seems a bit tricky.
VALORACIÓN – CONCLUSION:
- Posee muchos activos que merecen la consideración del modelista interesado en este avión: bien detallada, con amplias opciones de construcción y variedad en la pintura.
- It has many assets which deserve to be considered by the modeller interested in this aircraft: detail is well rendered, has several assembly choices and paint finishes are varied.

La maqueta
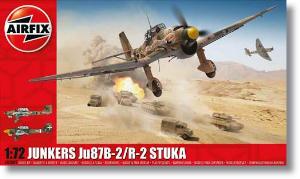
Esta caja es la primera reedición del nuevo molde que a partir de 2015 Airfix ha venido poniendo a la venta. En este caso la edición incluye dos modelos empleados en el teatro de operaciones norteafricano. Exteriormente, los modelos B-2 y R-2 no eran muy diferentes, así que el fabricante ha aprovechado esto para ofrecernos ambos.
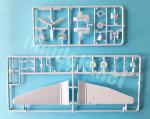
La caja contiene cinco bastidores de piezas, uno de ellos transparente, la hoja de calcas y las instrucciones. Las piezas están muy bien moldeadas, no tienen rebabas ni marcas evidentes. En este sentido, la carlinga viene especialmente limpia en los lados. El detalle externo de las alas y el fuselaje es notable, realizado con líneas grabadas finas y limpias y sin la excesiva profundidad de otras maquetas de Airfix en esta escala.
Hay varias alternativas durante el armado de la maqueta. Además de las figuras, la cubierta de la carlinga puede mostrarse abierta, llevar o no la sirena del tren de aterrizaje, y la carga bajo las alas puede combinarse con depósitos adicionales. Las instrucciones no lo indican, pero en este caso lo normal sería conjugar un menor peso de las bombas con los depósitos si vamos a emplearlos. Además, tenemos la posibilidad de poner las ruedas con peso o no, como si el modelo estuviese en vuelo.
Las dos versiones del Ju 87 representadas en esta caja corresponden a modelos empleados en los primeros años de la Segunda Guerra Mundial. El modelo B-2 introdujo el equipo tropicalizado, que también llevaba el R-2. Este también se caracterizaba por un cambio de motor y su capacidad para llevar depósitos auxiliares en la parte externa de las alas que ampliaban su radio de acción en casi 400 km. Debido al peso de los depósitos, la velocidad y techo de este modelo eran algo menores que los de otras variantes.
Carlinga
Los lados de la carlinga están detallados mediante piezas superpuestas moldeadas con diferentes instrumentos para ambos puestos. El suelo es común para ambos espacios y está unido a un marco que da forma y refuerza el diedro de las alas en su parte interna. Esta pieza va pegada sobre la sección ventral del fuselaje, que también incluye las caras inferiores de las alas hasta el tren de aterrizaje.
El interior está representado en la parte delantera con una palanca, un panel liso con los instrumentos de calca, un asiento moldeado con los arneses si no usamos la figura del piloto, o sin ellos si lo hacemos, El asiento del piloto parece un poco grande, pero se debe a que la figura simula llevar un paracaídas tras él y por eso el asiento parece tener más profundidad de la necesaria. El puesto trasero tiene un asiento bien detallado con su base separada y una especie de consola que cierra la carlinga donde vemos la superficie de apoyo para apuntar la ametralladora de cola.
Siguiendo las instrucciones, una vez cerrado el fuselaje, se añaden los restantes elementos de la carlinga, como el panel intermedio entre ambos puestos, detallado con el bastidor de soporte de la cubierta y las radios del tripulante trasero en la parte posterior, así como la mira unida al almohadillado antigolpe sobre el panel de instrumentos del piloto. La ametralladora va pegada dentro del abultamiento transparente trasero, que viene separado de la cubierta. El arma no está muy bien representada y es mejorable con otra de resina, pero al menos recuerda a la real.
La cubierta transparente es opcional y posee tres piezas tanto para mostrarla abierta como cerrada, sin posibilidad de combinarlas. Las piezas son finas y la estructura está bien definida. Sobre la parte central hay un mástil para la antena.
Fuselaje y motor
Las mitades del fuselaje incluyen la aleta vertical de cola sin el timón y carecen del motor. Las superficies están finamente paneladas. Una vez pegadas las mitades, el fuselaje se superpone a la sección central de las alas que contiene la carlinga. Luego hay que añadir un misterioso panel ventral transparente que las instrucciones indican sobrepintado en el color inferior del modelo. El panel va unido a otra pieza transparente con forma de embudo cuadrado, también pintada, y colocada por delante de la carlinga. No logro explicarla mejor porque ignoro lo que representa.
El capó motor está separado en tres partes, dos mitades inferiores y la cubierta superior separada. Hay un un anillo añadido en la parte frontal. Los escapes están moldeados en una pieza y muestran los tubos bien perfilados. Las tomas y salidas superiores e inferiores vienen en piezas separadas que se colocan en los huecos del capó. La inferior del radiador está bien detallada y la salida trasera muestra las aletas de refrigeración cerradas.
La hélice va pegada sobre un cilindro atravesado por el eje para permitir el giro. La hélice de una pieza va situada entre el buje y la placa trasera. Las palas son finas, no tienen rebabas y parecen correctamente torsionadas. Una vez montada, solo hay que introducir el cilindro en el hueco del morro. El sistema parece bastante simple y permite pintar la hélice y el resto del avión por separado.
Alas y cola
Las alas vienen en mitades y presentan un buen grabado en los paneles, muy diferente del de otras maquetas que Airfix estropeó por pasarse en la profundidad. Las mitades superiores de las alas van pegadas primero sobre los bastidores laterales del suelo. Tras abrir los agujeros pertinentes según la carga subalar que vayamos a ponerle al modelo, se añaden las mitades inferiores.
Los bordes de ataque están detallados con las carenas de las ametralladora, el tubo Pitot y la luz de aterrizaje transparente. Los tubos del armamento son un poco cortos y apenas se notan. Sobre las superficies inferiores hay que colocar los frenos de picado, obviamente en posición plegada. Airfix ha simplificado los alerones fabricándolos en una pieza junto con los brazos de las bisagras. El montaje no me parece que vaya a ser tan sencillo ya que hay muchos puntos de unión por alinear a la vez entre las alas y los alerones. Un poco de maña parece necesaria en este caso. A los alerones les falta la aleta en la sección exterior.
Los estabilizadores tienen los contrapesos de las puntas separados. Los soportes inferiores dobles son de una pieza. El timón vertical también está separado.
La carga subalar está compuesta de dos depósitos auxiliares pegados sobre soportes dobles, adecuados para el Ju 87R-2, y cuatro bombas de 50 kg con soportes aparte o una de 500 kg. colocada sobre un soporte con abrazaderas y el trapecio de lanzamiento pegado por delante del soporte.
Tren de aterrizaje
Las patas y los guardabarros están divididos en mitades. Las patas son opcionales, con sirenas o sin ellas. Las ruedas están moldeadas simulando el peso, pero su aspecto es un poco exagerado. Los neumáticos llevan un tope para alinearlos iguales dentro de cada guardabarros. Simplemente girando cada rueda dentro del guardabarros podemos conseguir tapar la sección aplanada y dejar el neumático redondo en la base de la rueda. La rueda de cola está unida a la pata.
Figuras
Airfix ha incluido un par de figuras mucho mejores que las habituales. No sólo los detalles en los arneses, el traje de vuelo y el casco están más definidos, sino que la posición de las piernas las diferencia. Ambas tienen el brazo izquierdo separado y en posición ligeramente distinta.
Calcas
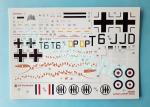
La hoja contiene cruces alemanas, escarapelas italianas y británicas, matrículas, el panel de instrumentos, decoraciones del fuselaje y numerosos estarcidos, pero no hay esvásticas. Las calcas tienen aspecto fino y mate, un buen registro y carecen de exceso de soporte.
Instrucciones
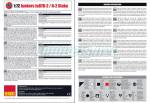
Están impresas en un folleto de tamaño A4 de 12 páginas en color. Contiene una breve historia del avión con datos técnicos, 48 secuencias de montaje y dos páginas de perfiles. Las referencias de color aparecen en pinturas esmaltes de Humbrol. El montaje sencillo de seguir.
Hay dos alternativas de acabado. La primera corresponde a un conocido Stuka B-2 adornado con serpiente sobre el fuselaje que está bien documentado en fotografías. El segundo es un R-2 de la Regia Aeronautica, que tiene otra posibilidad adicional si empleamos las escarapelas británicas como si se tratase de un avión capturado.
Valoración
Airfix ha hecho un buen trabajo con esta maqueta, a la que le ha dado varias posibilidades de montaje, acabados distintos y un buen detalle general. Hasta las figuras son mejores que las acostumbradas. Por ello me parece que no resultará difícil al modelista medio sacarle partido. No sé si este puede ser el mejor Stuka en esta escala hoy, pero sin duda que es una opción interesante y que merece ser considerada.◊


The kit
This box is the first reissue of the new tool kit that Airfix launched in 2015. In this case, the boxing includes two Stuka variants used in the North African theater. Externally, the B-2 and R-2 variants were not very different, so the manufacturer has taken advantage of this to offer us both.
The box contains five sprues of parts, one of them with clear parts, the decal sheet and the instructions. Pieces are very well molded, there are no obvious blemishes or pin marks. In this sense, the cockpit is especially clean on the sides. The wings and fuselage external detail is quite good, featuring thin engraved lines, nothing to do with the deep panels Airfix made in other 1/72 aircraft kits.
There are several alternatives during assembly. In addition to adding the figures or not; the canopy can be displayed open; the legs can be built with or without the siren; and the underwing load can be combined with auxiliary tanks. The instructions do not point it out, but the usual thing would be to combine a lower bomb weight with the tanks if we are going to use these. In addition, we have a choice for weighted or unweighted wheels, as if the model were in flight.
The two Ju 87s in this release correspond to variants used in the first years of World War II. The B-2 introduced a tropicalized kit, which the R-2 also carried. This was also characterized by a change of engine and its ability to carry auxiliary tanks under the wings that increased its range by almost 400 km (around 250 mi). Due to the weight of the tanks, the speed and ceiling of this model were a bit lower than in other variants.
Cockpit
The cockpit sidewalls are detailed with separate pieces molded with different instruments for both cockpits. The floor is common and attached to side frames to reinforce the wing dihedral on the inside. This piece is glued on the fuselage belly, which also includes the undersides of the wings up to the landing gear.
The front cockpit interior has a control column, a flat panel with decal instruments, a seat molded with the harnesses if we do not use the pilot figure, or without them if we do, The pilot’s seat seems too big, but the reason seems to be that the figure carries a parachute behind him. The rear cockpit has a well-detailed seat with a separate base and a kind of rear console where we can suppose the gunner could aim the machine gun.
Following the instructions, once the fuselage is closed, the remaining cockpit pieces are added, such as the intermediate panel, detailed with the support frame for the canopy and the radios molded on the back, as well as the sight attached to the anti-shock padding above the pilot’s instrument panel. The machine gun is attached inside a separate clear bulge that is later attached to the rear canopy. The weapon is not outstanding and could be improved with a resin replacement, but at least it looks the part.
The canopy is optional and has three pieces to be displayed either open or closed, without any possible combination. The pieces are thin and the raised structural detail looks nice. The middle section is detailed with the antenna mast.
Fuselage and engine
The fuselage halves are molded with the tail fin without the rudder and the engine. Once the halves are glued, the fuselage is glued onto the wing centre section containing the cockpit. Then you have to add a mysterious clear ventral panel that the instructions show overpainted in the same color used on the lower fuselge and wings. The panel is attached to another clear piece in the shape of a square funnel, also painted, and attached in front of the cockpit. I can’t explain it better because I don’t know what it represents.
The engine cowling is separated into three parts, two lower halves, a separate deck, and a ring at the front. The exhausts are molded in one piece and feature well-profiled nozzles. The upper and lower intakes and outlets come in separate pieces that fit into the cowling gaps. The lower radiator intake is well detailed and the rear outlet shows closed cooling gills.
The propeller is attached to a cylinder with a shaft inserted to allow rotation. The one-piece propeller is located between the spinner and the back plate. The blades are thin and seem correctly twisted. Once everything is made up, this cylinder is inserted into the nose. The system looks quite simple and allows to paint the propeller and the rest of the model separately.
Wings and tail
The wings come in halves. The upper halves of the wings are first glued onto the side frames. After opening the appropiate holes according to the underwing load we wish to use, the lower halves are added.
The leading edges are detailed with the machine gun fairings, the pitot tube and a clear landing light. The armament muzzles are a little short and barely noticeable. The dive brakes are attached on the lower surfaces, obviously in the folded position. Airfix have simplified the ailerons by molding them in one piece along with the hinge arms and the mass balances. Assembly does not look that simple since there are many connectiing rods to align at the same time between the wings and the ailerons and a little skill will be necessary to align the pieces correctly. The tabs are missing in the outboard ailerons.
The stabilizers have separate tip mass balances. The V-struts are one piece and the vertical rudder is also separate.
The underwing load comprises two auxiliary tanks, both suitable for the Ju 87R-2, and four 50 kg bombs with separate racks or one 500 kg. placed on a rack provided with sway braces and the bomb crutch glued in front of the rack.
Undercarriage
The legs and spats are divided into halves. The legs are provided with optional siren fairings. The wheels are weighted but they look too flat. The tires have a tab to align them inside each spat. By simply turning each wheel inside the spat we can hide the flattened section and expose the round tire. The tail wheel comes attached to the leg.
Figures
Airfix have provided much better figures than usual here. Not only are the details on the harnesses, flight suit and helmet more defined, but the position of the legs are different. Both have the left arm apart and in a slightly different position.
Decals
The sheet contains German crosses, Italian and British cockades, license plates, the instrument panel, fuselage decorations and several stencils, but not swastikas. Decals have a thin and matte appearance, good registration and no surplus carrier.
Instructions
They are printed in color on a 12-page A4 booklet that contains a brief history of the aircraft with technical data, 48 assembly sequences and two pages of profiles. Color references appear in Humbrol enamels. Assembly should not be difficult following the directions.
There are two finishing alternatives. The first corresponds to a well-known Stuka B-2 sporting a snake on the fuselage that is well documented in photographs. The second is an R-2 operated by the Regia Aeronautica which has an extra choice if we use the British cockades as if it were a captured aircraft.
Conclusion
Airfix have done a good job with this kit, giving it several assembly possibilities, different finishes and good overall detail. Even the figures are better than usual. Therefore, it should not be difficult for the average modeller to take the best out of it. I don’t know if this can be the best Stuka in this scale today, but it is certainly an interesting option and worth considering.◊
Publicado – Published: 5 / 2024
©www.jmodels.net


Debe estar conectado para enviar un comentario.