

De un vistazo – Quick look
MATERIAL Y PIEZAS
MEDIA & PARTS:
- Plástico inyectado (49 piezas), plástico transparente (17 piezas), Peana de plástico (plástico transparente, 2 piezas).
- Injected plastic (49 parts), clear plastic (17 parts). Base (clear plastic, 2 parts).
CALCAS – DECALS:
- Hinomarus, matrículas, insignias de unidad y bandas. Acabado brillante, de pariencia fina. Saturadas de color y sin demasiada película de soporte.
- Hinomarus, code numbers, unit markings and stripes. Apparently thin with a glossy finish. Color saturated without too much film.
OPCIONES – OPTIONS:
(Ver texto – See text)
- Kawanishi H6K5. Marina Imperial japonesa. Y-21 blanco. Yokohama Kaigun Kokutai, 1941-42.
- Kawanishi H6K5. Marina Imperial japonesa. KEA59 blanco. 901 Kaigun Kokutai, 1943-45.
- Kawanishi H6K5. Marina Imperial japonesa. KEA 80 blanco. 901 Kaigun Kokutai, 1943-45.
- Kawanishi H6K5. Marina Imperial japonesa. I-VIII-5 rojo. 8 Kaigun Kokutai, 1940-42.
- Kawanishi H6K5. Marina Imperial japonesa. 51 blanco. Yokohama Kaigun Kokutai, 1941-42.
- Kawanishi H6K5. Marina Imperial japonesa. Yokohama Kaigun Kokutai, 1941-42.
- Kawanishi H6K5. Imperial Japanese Navy. White Y-21. Yokohama Kaigun Kokutai, 1941-42.
- Kawanishi H6K5. Imperial Japanese Navy. White KEA59. 901st Kaigun Kokutai, 1943-45.
- Kawanishi H6K5. Imperial Japanese Navy. White KEA 80. 901st Kaigun Kokutai, 1943-45.
- Kawanishi H6K5. Imperial Japanese Navy. Red I-VIII-5. 8th Kaigun Kokutai, 1940-42.
- Kawanishi H6K5. Imperial Japanese Navy. White 51. Yokohama Kaigun Kokutai, 1941-42.
- Kawanishi H6K5. Imperial Japanese Navy. Yokohama Kaigun Kokutai, 1941-42.
INSTRUCCIONES – INSTRUCTIONS:
- Folleto A4 doblado de 6 páginas impreso en blanco y negro. Contiene un sumario histórico sobre el avión, un plano numerado de piezas, 6 secuencias generales de construcción y perfiles para pintar y colocar calcas. Referencias de pintura de Gunze Sangyo. Muy claras.
- A4 6-page folded leaflet printed in black and white. It contains a historical summary about the plane, a numbered parts plan, 6 main assembly steps and profiles to paint and set decals. Very clear.
LO MEJOR – THE BEST:
- Montaje sencillo. Buen detalle general para la escala.
- Easy build. Overall nice detail.
LO PEOR – THE WORST:
- Marcas en la carlinga. Cúpulas del fuselaje cegadas.
- Ejector marks on cockpit sides. Closed fuselage glazed blisters.
VALORACIÓN – CONCLUSION:
- Único molde todavía a esta escala. El montaje no muestra especiales dificultades y se puede recomendar también a modelistas menos expertos. La ausencia de un carro de transporte limita las posibilidades de presentar el modelo terminado.
- Only tool at the scale. Assembly will not be a headache even for the less experienced. The lack of a trolley limits the choices to show the model on land.

La maqueta
Esta maqueta debe ser una de las primeras que Trumpeter puso a la venta en esta escala en 2003. Hay también una versión civil, etiquetada como Kawanishi H6K5-L, que salió al mismo tiempo. Posteriormente, el molde ha tenido reediciones de la marca MonoChrome.
Aunque en la caja no figura el modelo concreto, las instrucciones señalan que la maqueta representa una hidrocanoa Kawanishi H6K5 o, en su denominación oficial, Hidrocanoa de la Marina Tipo 97 Modelo 23, de la que se fabricaron 36 unidades hasta 1942.
El contenido de la caja incluye un folleto de instrucciones, una hoja de calcas, un bastidor de piezas transparentes, dos bastidores de piezas grises y una peana transparente de dos piezas.
El plástico es fino, está bien moldeado y carece de rebabas. No hay marcas en las superficies exteriores, pero abundan en el interior del fuselaje. De ellas, sólo nos van a estorbar las pocas, tenues, que afectan a los lados de la carlinga. También hay marcas en los paneles internos de la carlinga, que por estética conviene eliminar por mucho que no se vean tras pegar el fuselaje.
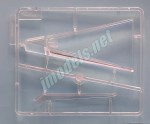
El bastidor transparente contiene piezas bien moldeadas y finas para la escala. Los montantes de los paneles acristalados muestran cierto detalle pese al tamaño, por ejemplo en el puesto de cola o en las cúpulas de observación laterales.
Interior y fuselaje
La carlinga contiene cierto detalle, que no siempre podemos apreciar en las maquetas de aviones a esta escala. El suelo es una sola pieza e incluye tres asientos muy distintos a los reales. Una pieza en la parte delantera hace de panel de instrumentos, plano y sin calca para representarlos. Dos mamparos en la parte posterior simulan los habitáculos de proa. Estos paneles muestran accesos abiertos y huecos a los lados. En uno de dichos mamparos se ha simulado incluso la pequeña mesa del navegante, o eso parece. Por delante de los asientos de los pilotos, una barra en forma de U invertida muestra los volantes de los controles. Eso es todo, y ya es algo. La cubierta acristalada de la carlinga es de una sola pieza, con zonas traslúcidas para marcar las superficies que van pintadas. Sobre ella hay que colocar una antena direccional y una pequeña cúpula de observación, cuya base no es hueca como debería ser.
Antes de cerrar el fuselaje, hay que incluir diversas ventanillas a ambos lados. Algunas disponen de hueco y en otros casos hay que abrirlo, ya que la maqueta, como se ha mencionado, comparte molde con el modelo H6K5-L. Por este motivo, el hueco de las cúpulas laterales acristaladas de la versión militar no está abierto en el fuselaje. Según las instrucciones, sólo hay que horadar un par de marcas para pegar las cúpulas encima, con lo cual el fuselaje cerrado se ve a través del plástico transparente. Creo que Trumpeter no ha acertado en las instrucciones olvidando señalar que los huecos están rebajados en el interior del fuselaje y pueden abrirse para darles mayor verosimilitud.
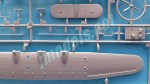
El fuselaje está dividido en mitades con puntos de alineación machiembrados en los filos de las piezas. Salvo la parca carlinga y las ventanas, nada más hay dentro. Las superficies exteriores muestran un buen y limpio panelado, con las escotillas de acceso bien marcadas. La quilla está bien moldeada con su doble escalonado característico. La parte superior tiene dos aberturas para situar los soportes centrales de las alas. Ambos son piezas separadas y de formas diferentes.
Alas y empenaje
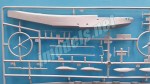
Las alas están divididas en mitades y se han moldeado con las carenas de las góndolas de los motores. El panelado en ambas caras es variopinto. Si bien la mayor parte de las líneas parecen correctas para la escala, las líneas horizontales son un poco anchas y profundas a mi juicio. Con todo, aún pasables. Las superficies de control están decentemente detalladas con los actuadores, e incluso las puntas muestran las luces de navegación.
Los motores, como cabe esperar del tamaño, se han simplificado mucho. Cada motor cuenta con un capó, detallado con la toma superior de aire y el engranaje reductor de la hélice moldeado en la pieza. Las aletas de refrigeración también están marcadas. Las hélices, destacables por su finura y perfiles, están unidas a los bujes.
Los soportes laterales de las alas son piezas separadas, añadidas una vez que se han pegado las alas sobre los soportes del fuselaje. Cada ala cuenta con dos soportes y dos travesaños unidos en forma de U cuadrada. Los flotadores externos están moldeados en mitades con soportes separados.
Los estabilizadores vienen unidos a una sección del fuselaje trasero con soportes inferiores separados. Una vez pegados, puede añadirse la cúpula acristalado de cola, que muestra buena definición. En esta ocasión el fuselaje queda hueco tras la pieza. Las derivas se han moldeado con los timones y también tienen soportes separados. Los timones muestran un detalle aceptable conforme a su tamaño. Para acabar el montaje, sólo queda añadir el tubo pitot y los dos soportes de las antenas.
Base
Trumpeter ha incluido una peana transparente de dos piezas cuyo mástil va encajado en un hueco del fuselaje que hay que abrir al inicio del montaje. De esta forma, la maqueta sólo puede mostrarse en vuelo o en una escena marítima. Trumpeter podría haber incluido un carro de transporte en tierra como alternativa, sin mucho el número total de piezas ni la dificultad de la maqueta.
Calcas
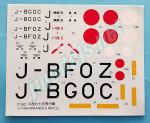
La hoja de calcas tiene buen aspecto. Incluye hinomarus, matrículas civiles, códigos de unidad situados en la cola y bandas. Todas ellas tienen acabado brillante, muestran gran nitidez y correcta saturación de color. La película de soporte no es excesiva. La hoja es común a las dos maquetas de Trumpeter, ya que contiene también matrículas civiles de gran tamaño que no son aplicables a las versiones de esta edición.
Instrucciones
El folleto de instrucciones está impreso en blanco y negro en papel de tamaño A4. Consta de 6 páginas que muestran un sumario histórico sobre el avión, un plano numerado de piezas, 6 secuencias generales de montaje y perfiles para pintar y colocar las calcas. Las referencias de pintura aparecen en códigos de Gunze Sangyo. Las opciones de pintura son dos (gris o verde de la Marina Imperial) con hasta 6 alternativas para los códigos de cola pertenecientes a unidades diferentes que no se mencionan. Gracias a la nitidez de la hoja de calcas, y con la ayuda de internet y del libro de Eduardo Cea La Aviación de la Marina Imperial del Japón. Aviación con base en tierra, Vol. I y II, creo haber averiguado a qué unidades pertenecieron los distintos aviones identificando sus códigos de cola. La lista completa aparece en el sumario que precede a este texto.
Valoración
Este molde sigue siendo por el momento el único disponible en esta escala para hacer un Kawanishi Tipo 97. La maqueta tiene un detalle aceptable en general para la escala y no es difícil de montar, por ello se puede recomendar también a los menos experimentados.
Quienes deseen algo más de detalle, pueden considerar el juego de mejora de Rob-Taurus, que incluye resinas, fotograbados y transparentes de la carlinga de acetato. También un carro de transporte en tierra, detalle que se echa en falta en esta maqueta, que solo permite mostrar el modelo en su base o en una escena.◊


The kit
This kit must be one of the first Trumpeter released in this scale back in 2003. There is also a civilian version, labeled Kawanishi H6K5-L, which came out at the same time. Subsequently, new reboxes came from MonoChrome.
Although the specific model does not appear on the box, the instructions indicate that this is a Kawanishi H6K5 flying boat or, in IJN designation, Navy Type 97 Flying Boat Model 23, of which 36 units were manufactured until 1942.
The box contents include an instruction booklet, a decal sheet, a clear parts sprue, two gray parts sprues, and a two-piece clear base.
Plastic is thin, well molded and free of blemishes. There are no marks on the outer surfaces, but a bunch of them on the fuselage interior. Of these, only a few affect the cockpit walls. There are also marks on the cockpit bulkheads, which for aesthetic reasons should be removed, though they are not visible after closing the fuselage.
The clear sprue contains nice pieces, which are thin for the scale. Glazed panels show some detail despite their size, for example on the tail turret or on the waist blisters.
Cockpit and fuselage
Not being outstanding, the cockpit contains some detail, something which we don’t always find in aircraft kits at this scale. The floor is one piece and includes three seats that are very different from the real ones. The instrument panel is a flat piece without instruments nor a decal to render them, which is in fact the front cockpit bulkhead. Two more bulkheads at the rear simulate both the cockpit and the navigator’s / flight engineer’s stations. These panels show open passageways and holes on the sides. One of these pieces even show a tiny navigator’s table molded on, or so it seems. There is also a separate inverted U-shaped bar showing the steering wheels. That’s it, and that’s something. The glass canopy is in one piece, with translucent areas to mark the surfaces that are painted. This clear piece is detailed with a loop antenna and a small observation dome, whose base is not hollow as it should be.
Before closing the fuselage, several side windows must be included on both sides. Some are provided with gaps in the fuselage, but in other cases they must be opened, since the kit, as mentioned, shares the tool with the H6K5-L version. Also for this reason, the glass waist blisters of the military version are not open. According to the instructions, it is only necessary to drill a couple of holes to insert the blisters on top, but a closed fuselage section will be seen behind the clear plastic. I think Trumpeter forgot to point out that the fuselage walls have marks to cut out both blisters from the inside.
The fuselage comes in halves with alignment pins on the edges. Except for the small cockpit and the windows, there is nothing else inside. Exterior surfaces show good, clean panel lines, with access hatches well marked. The keel is nicely shaped with its characteristic stepped bottom. The fuselage top has two openings to place the wing centre-section support struts. Both are separate pieces of different shapes.
Wings and empennage
The wings are divided in upper and lower surfaces and have been molded with the engine nacelle fairings. Panel lines on both sides combine sharp thin lines which look accurate for the scale with horizontal lines that seem a bit wide and deep, in my opinion. They are still passable though. Control surfaces are decently detailed with the actuators, and the wingtips show tiny navigation lights.
The engines, as one may expect, have been greatly simplified. Each engine features a cowling, detailed with the top air intake and the propeller reduction gear molded in the piece. The cooling fins are also marked. The propellers show finesse and nice shapes, and they come molded with the hubs.
The side underwing struts are separate pieces which are added after the wings have been attached to the fuselage struts. Each wing has two separate struts and two crossbars attached in a square U shape. Wing floats are molded in halves with separate front and rear struts.
The stabilizers are one piece molded with a section of the rear fuselage. The lower struts are also separate pieces. Once stabilizers are attached, the glazed tail turret can be added. This time the fuselage is hollow behind the clear piece. The fins have been molded with the rudders and are also provided with separate struts The rudders show acceptable detail for their size. Assembly finishes with the addition of the Pitot tube and two antenna masts.
Base
Trumpeter has included a two-piece clear base with the mast fitting into an opening the modeller can open in the fuselage belly at the beginning of assembly. The finished model can only be shown in flight or at sea. Trumpeter could have included a trolley as an alternative, without raising parts count, or the kit’s difficulty, too much.
Decals
The decal sheet looks good. It includes hinomarus, civilian codes, tail markings for the military versions and some yellow stripes. All of them have a glossy finish, show great sharpness and correct color saturation. Carrier film is not excessive. The sheet is common to both Trumpeter kits, as it also contains large civilian registration codes that are not applicable to this release.
Instructions
Instructions are printed in black and white on an A4 folded leaflet. They comprise 6 pages showing a historical summary about the aicraft, a numbered plan of parts, 6 main assembly sequences, and profiles to paint and set the decals. Painting references appear in Gunze Sangyo codes. As usual with the IJN aircraft, paint choice is just a question of apples or oranges, these being IJN grey or IJN green. There are up to 6 alternative tail markings belonging to different units that are not mentioned in the leaflet. Thanks to decal sharpness, and with the help of the Internet and Eduardo Cea’s book La Aviación de la Marina Imperial del Japón. Aviación con base en tierra, (Imperial Japanese Navy Aviation. Land-based Units) Vol. I and II, I could match each tail code on the decal sheet to a specific IJN unit. The complete list appears in the kit summary above.
Conclusion
For the time being, this is the only tool available to build a 1/144 Kawanishi Type 97. The kit has an acceptable overall detail for the scale and will be an easy build for any modeller, including the less experienced.
Those who wish a little more detail can consider Rob-Taurus upgrade set, which includes resins, photo-etched parts and acetate canopies. Also included is a land trolley, a detail missing in this kit which would have been welcomed.◊
Actualizado – Updated: 4 / 2022
Publicado – Published: 2 / 2022
©www.jmodels.net


Debe estar conectado para enviar un comentario.